|
I was keen to build
an RAF Phantom, but the Fujimi kits were distinctly thin on the ground in the UK
at the time, so the only real alternative was the old Matchbox kit which, in
addition to the usual Matchbox traits of simplicity, relatively crude detail
& heavily engraved panel lines, also suffers from mis-shapen nose contours
& canopies. John,
my fiancé, had been experimenting with an old Matchbox kit & assured me
that situation could be dramatically improved by fitting the radome from an Esci
F4C/J & the spare canopies from a Fujimi F4M, so we went ahead &
obtained a suitable kit from a mate in Felixstowe – thanks Julien.
We also bought the Aeroclub white metal detail set &John dug into his
stash & came up with a variety of decals & the Fujimi canopy.
The Aeroclub set actually includes a vacform canopy, but as we’re both
total vacophobes we thought the Fujimi canopy was the safer option.
After many months of muttering, John finally got organised, made a
suitable mould & ran off a few copies of an Esci radome in glassfibre resin,
so now we were ready to start.
The main problem
with the Matchbox canopies is that the frames are moulded as part of the
fuselage & the clear parts are just the clear portions, but with spurious
framework round the edges, so the first job was to remove the frames from the
fuselage to open up the cockpits to the proper size.
I then dealt with the cockpit bath, adding a little detail in the form of
a pair of Modeldecal panel decals, a scratchbuilt rear coaming & a stick of
indeterminate origin that John found in one of his spares boxes.
The fuselage was then assembled, adding a couple of plasticard shims to
the upper nose joint, widening it to fit the new radome, which was fitted with
gap-filling superglue prior to a session of filing to smooth it into the
fuselage. The rest
of the airframe went together without problem & a few sessions of sanding,
rubbing down & Halfords automotive primer readied it for paint & also
reduced the panel lines to more sensible proportions, the only other mod being
to fill & sand the window in the port side of the canopy arch &
scratchbuild the back-seater’s periscope from a disc of plasticard & an
offcut of Contrail rod.
Painting started
with a few assorted shades of Alclad round the rear fuselage & stabs, which
was then masked & Air Defence Grey scheme applied using Humbrol enamels.
A few coats of clear gloss & we were ready for decals.
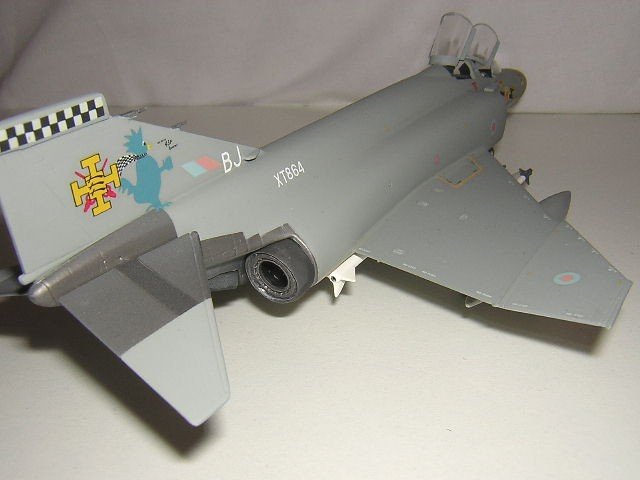
The aircraft I chose
to model was a 111 Squadron aircraft , which had been “zapped” by 43
Squadron, their neighbours at RAF Leuchars, who had painted a giant blue chicken
on the fin. The
zaps were from a Modeldecal sheet , with the rest a mix of Modeldecal &
Xtradecal. All
went on well & were sealed with another coat of gloss.
Once the aircraft
had been decaled, I started on all the detail parts, using the landing gear
& ejection seats from the Aeroclub set, the gear doors, Sparrows & wing
tanks from the kit, with the tank pylons filed & sanded to a more
aerodynamic shape, the same also being done with the inner pylons, which then
had Sidewinder rails added from an Italeri F104 & Sidewinders from a
Hasegawa weapons set. Finally,
the distinctly poor gunpod was replaced by a Fujimi
spare.
Having fitted all
the various detail parts, we gave the model a final flat coat,
then John razor-sawed the Fujimi canopy into pieces for me, I painted,
matt coated &
fixed in place the 3 sections, filled the starboard side canopy arch window with
Krystal Kleer & the job was finished.
Whilst the kit will
never be as good as the Fujimi ones, I think that the few simple alterations
transform the appearance quite considerably & I’m very pleased with the
finished product. As
an illustration of the differences, I’ve included a comparative photo of the
finished model with an unmodified Matchbox kit nose.
Catherine
|
Click on
images below to see larger images
|
 |

|
|
|