|
THE AIRCRAFT
The HS-129 achieved the distinction of being the only WW II aircraft, and one of
the few in history, specifically designed for the anti-armor role.
Initially flying in prototype form in 1939, it never achieved the results
envisioned for it, because of it's relatively low production (only 870 total
produced) and high attrition rates. As designed, the HS-129 had several
limitations and features, some of which were strikingly similar to those of the
modern A-10. It was always underpowered, like the Hog. It also had
mediocre maneuverability, and engine reliability problems only made these
problems worse. Some of its unique features were a cockpit that was so
small the engine instruments had to be mounted on the sides of the engine
nacelles, and the gunsight placed in front of the windscreen. The cockpit
was heavily armored, and the main wheels only partially retracted to minimize
damage in a wheels up landing, also like the A-10. It also carried a large
caliber anti tank gun, sound familiar? In this case, though, the gun was
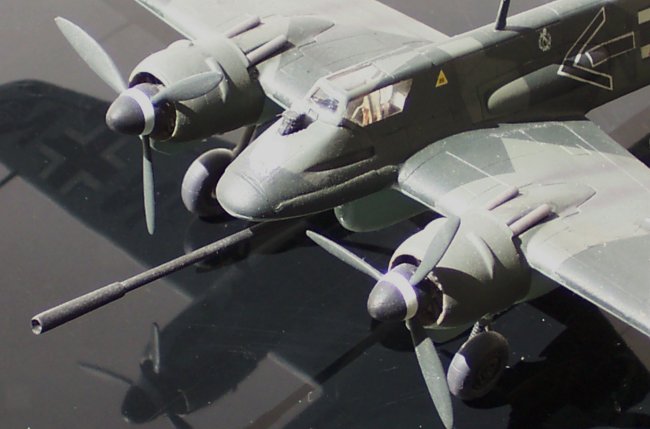
underneath the fuselage. The particular version I elected to model is the
Hs 129B-3/Wa. This is one of the better known variants, because of the
large 75mm PaK-40 anti-tank cannon carried under the fuselage. The
PaK-40 could penetrate 133mm of armor at a range of 1000 meters and
carried 26 rounds. The addition of this large weapon meant that the two
fuselage mounted MG17's were removed and their troughs faired over.
It also meant
that the carrying aircraft became almost unmanageable due to the weapon's
weight and severe recoil; in fact, in an emergency the gun pod could be
jettisoned. Only two units received this version for operational use in
the winter of 1944/45: 10.(Pz)/Sch.G.9 and 14.(Pz)/Sch.G.9. It was an
aircraft from this last unit that I elected to model.
|
Click on
images below to see larger images
|
|

|

|
THE MODEL
Italeri has released a couple of kits covering the differently armed versions of
the HS-129. In detailing this is a typical Italeri kit with recessed panel
lines which are slightly on the deep side. The fit throughout was
excellent, and the need for filler non-existent.
Construction started with the cockpit, and since the kit's version was so
plain I substituted the Hi Tech resin version instead. This is pretty much a
drop in affair, the only unusual aspect of it being the seat back, which is vac
formed. Once the seat back was cut out and glued to the seat base with CA,
the whole assembly was sprayed with Polly Scale RLM-02, detailed with decals and
paint, then inserted into the fuselage. The fuselage halves went together
with no problem, as did the wings, Tenax being the glue of choice.
When working on the wings, the engine nacelles are separate parts, and I
detailed their bare interiors with styrene strip and some spare resin.
The wings and horizontal tail planes were now attached, along with the gun
pod which
had the resin replacement added for the gun muzzle. There are some
parts to be careful of when handling the kit; the aileron hinges and pitot tube
in particular can be fragile, so they were left off till right before
painting. Finally the gun fairing was applied, and the gun sight was
attached, but the sight "glass" was left off till after all painting
was done.
DECALING AND FINISHING
After the wheel wells were stuffed with tissue paper and the canopy masked with
Tamiya tape, Gunze RLM 65 Hellblau (H 067) was sprayed on the under surfaces
first, then masked off. Aeromaster RLM 71 Dunkelgrun (#1024) was
then sprayed and, again, masked off in a splinter pattern. Finally Gunze
RLM 70 Schwarzgrun (#1023) was applied to the upper surfaces and the and
propellers to complete the camouflage. Future was applied as a gloss coat,
and after it had dried for twenty four hours, decaling began.
Super Scale decal set # 72-710 was used; It actually dupiclates the kit
markings, but it is thinner and easier to work with. The most difficult
part were the fuselage codes, which on the real aircraft consisted of a newer
set applied over an older, faded set. To simulate that fading I first
applied the original codes and let them dry. I then misted several highly
thinned coats of the base paints over them to get the look I was after.
More Future was applied, then the second set of codes. The rest of
the decals went on with no problem including ones to simulate the engine
instruments on the inside of the engine nacelles, then another coat of Future
was applied to seal them. Weathering was done using artist's oil paints on
the control surfaces. Since this was presumably an older
aircraft (as shown by the faded, painted over codes) I really should have
weathered
the whole model more extensively with the oils, not just the control
surfaces, but laziness won out. Polly Scale matte coat was applied and
loose items were attached. These consisted mainly of the gear doors and
the gunsight "glass." The doors were added with CA glue, while
Elmers white glue was used for the gunsight. Some more weathering was done
at this point using charcoal, and exhaust stains were applied using gray, black,
and
brown paints mixed together. Italeri's kit is a simple, easy to
build, well produced replica of this relatively unknown, but pioneering
aircraft.
Murph
|
Click on
images below to see larger images
|
|

|

|
|
|