|
Here are some in
progress photos of my scratch-built AT-38B Talon. This project started 15 years
ago, when I obtained some engineering data, profiles, and 3-views of the T-38
from the fine folks at Northrop. I finally started work on the project about 4
years ago,, working on it off and on while I was between "normal"
kits.
Much of the credit
for the techniques I'm using must go to the modelers who are showcased in John
Alcorns two books about scratch building; Scratchbuilt, and The
Master Scratchbuilders. If you are not familiar with these books,
check them out..there is something for everyone in them, I believe.
The method behind
this madness is pretty simple, and not as hard as I thought. I made master
patterns for the fuselage sides out of basswood..undersized by .040 for
the eventual vac forming process. The basswood masters were made by first making
two identical profile cutouts of the fuselage sides in thin sheet styrene. To
these two "side views", I attached fuselage profiles cut out of .030
styrene, being very careful to ensure they were glued at a perfect 90 degrees to
the side views. Basswood blocks were then glued in between the profile sections,
and the whole mess was sanded down until I hit the plastic
profiles..thereby easily establishing the shape of the fuselage. I then
temporarily attached the two fuselage halves together, and trued-up the forms
with some fine sanding. Finally I split the forms into four sections: forward
fuselage left and right, and aft fuselage left and right. I had to do this
because my Vac form machine isn't big enough to handle a 3 ft long T-38!
Using these master
patterns, I vac formed shells in .030 styrene. I installed bulkheads and formers
to the inside..taking into account wheel wells, speed brakes, intakes, etc. I
attached the two aft fuselage shells together, and used Bondo auto filler to
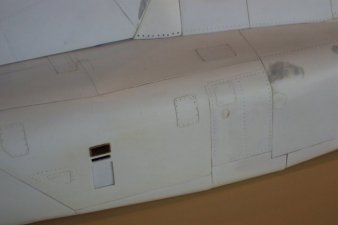
clean up the seams. I drew the panel lines on first with pencil, and when I was
satisfied with them, went over them with ink. Then using thin masking tape, I
made individual patterns of each panel, and using these tape patterns, I made
individual panels out of .010 sheet.
Each individual
panels' rivet detail was made this way..After the panel was cut to shape, I
would lay the panel on a sheet of balsa, and run a pounce wheel along the edges
to make recessed rivets. The soft balsa underneath the panel forces the plastic
to "quilt" around the rivet, and looks very convincing. I would then
lightly sand the back of the panel to eliminate the bumps from the rivets,
and attach the panel to the shell at the appropriate spot with super glue, or
MEK. Some panels needed some convincing with light heat from a hair dryer.
The raised rivets on
the heat shield (forward of the tail pipes) were simply embossed with a pounce
wheel from the backside of the panels.
I've just now
started on the forward fuselage. I plan on having the canopies open and building
the full interiors. Also, the speedbrakes will be extended, and the ailerons
drooped. I'm also scratching my head on how best to build the funky SUU-20 for
the centerline pylon..Hmmm..
|
Click on
images below to see larger images
|
|
|
|
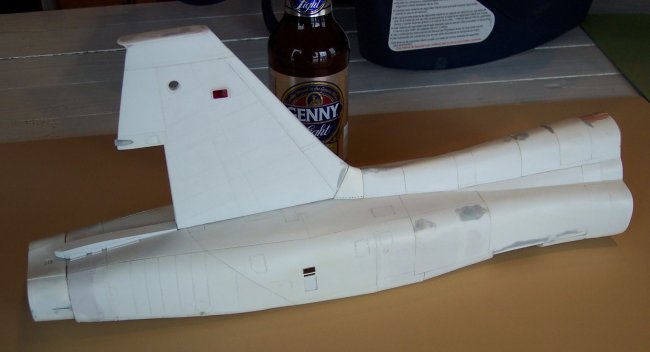
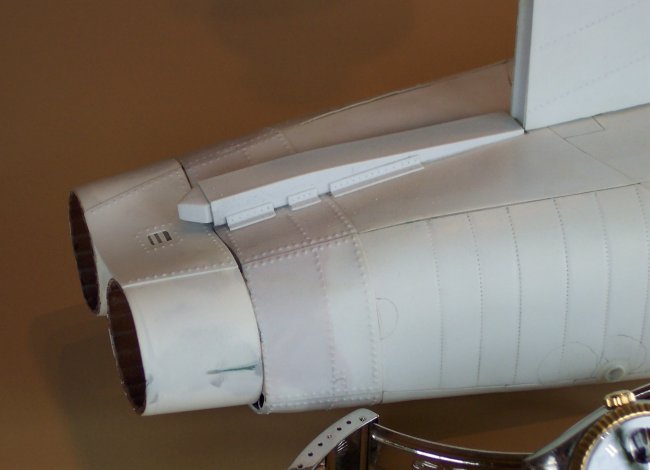
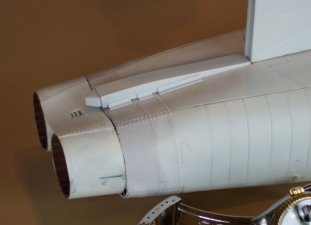
The tail pipes were formed from
the plastic shot glasses that come with children's cold medicine. You can see
the ballast box which is unique to the AT-38.
The vertical fin is solid
plastic, sheeted with .010 styrene embossed with rivet / panel details. A brass
tube secures the fin to a larger brass receiver tube in the fuselage. Below you
can see the genesis of the wheel well and speed brake bay. I didn't quite get
these shapes right, and have since rebuilt this section. The watch gives a
pretty good idea of how big this monster is.
Pete
|
Click on
images below to see larger images
|
|

|

|
|