|
The kit comes in a largish, solid
top-opening box. Seven sprues are moulded in grey plastic, plus one sprue
in clear and all are contained in one bag. A 6 page folded instruction
manual and colour paint and decal
reference sheet, are included. One sprue has the larger square fin and
rudder another has the over-wing fuel tanks and there are alternative parts for
two styles of ventral tank. Trumpeter has already released another kit
covering the F1a/F2 and it looks like Trumpeter will be releasing an F3 soon so
there will be differences in those kits. The mouldings are crisp with
panel lines engraved nicely, some are very fine and others are a little heavy
but certainly OK. There are not too many rivets and no flash was evident.
The canopy parts are thin and very clear. The clear sprue also carries two
Firestreak missiles which I expect is to allow you to paint the missile body and
leave the head clear but the Red Top missiles are moulded in regular plastic.
The decal sheet looks very busy with lots of stencils. Upon closer
inspection, however, the squadron markings and
stencils are not very clearly printed and the colours are very slightly out of
register and I suspect the roundel colours are not totally accurate.
Click on
images below to see larger images
Construction
All of the parts were cleaned in dish soap and construction began.
The plastic is harder than perhaps Tamiya or Hasegawa and the sprue gates
are a little large. This combination means that you must be very careful
removing the parts from the sprue, leave a little extra on the part and
then trim a little at a time. If you try to cut the gate off too
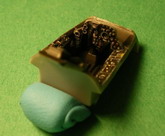
close to the part, you will end up damaging it. The cockpit consists of a
tub, instrument panel, control stick, seat and coaming. These were
painted Tamiya NATO black. The panel and side consoles have raised details
and looked great after dry brushing and a little detail painting.
The seat is a bit simple, I painted the cushions olive drab and desert
yellow and I made seat belts from Tamiya tape. It looks OK with the
canopy closed but a resin or white metal seat would be a big improvement.
The air intake assembly combines the radome, ducting, a compressor face
and nose wheelwell and was assembled and painted Alclad Chrome at this
time. The rear jet pipes are nicely detailed and are assembled
painted Alclad Burnt Iron and set aside to be installed later. Now you
have to decide which version you are going to make as you need to add
inserts for upper or lower guns or blanks if no guns.
I added blanks for the lower
openings but left out the upper gun inserts which were painted Burnt Iron and
added at the final assembly stage. It was at this point that I began to
realize that the fit of parts was going
to be perfect allowing a lot of pre-painting of sub assemblies before bringing
them all together at the end. The radome was painted Tamiya Deck Tan
before attaching to the intake assembly. The cockpit and intake
assemblies go into a fuselage half and the other half added and again a perfect
fit. Don’t forget to add about ½oz./5gr of nose weight, there is no
mention of it in the instructions and I forgot and found out later it is a tail
sitter. Luckily I was able to drop a small piece of weight through the back of
the model before I added the jet exhausts. .The kit provides alternative fronts
for the ventral pack one with cannons, the other without, I used the no cannon
pieces and the fit was very good again.
Next, the wing halves were assembled and don’t forget to open up the holes for
the over-wing tanks if you are building the F6. Here the instructions
start to let you down as they do not indicate the tanks are for the F6
only and do not apply for the F2a. I dry fitted the wings to the fuselage
and again the fit would be perfect so I left the wings off until later as
painting would be easier with them off. I also left the nose intake ring
off, again it will be easier to paint separately and add it later. The
windscreen and canopy came next, after a dip in future and left to dry for a
day, they were masked with Tamiya tape. The front windscreen was super-glued in
place and the main canopy glued with Kristal Klear so it could be removed and
posed open later.
Colour Options
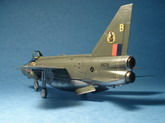
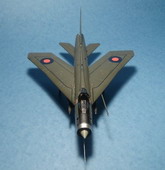
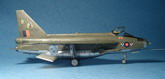
Two options are provided for in the kit. The instructions don’t indicate
what aircraft are featured but the side of the box shows that these are an
F2a XN871/B in green topsides over natural metal undersides from No.19 Squadron
RAF in 1975 and an overall grey F6 XR753/A from No.23 Squadron from 1970.
The painting guide indicates Gunze paint numbers in both Aqueous and lacquer,
with a cross reference to Vallejo, Model Master, Humbrol and Tamiya numbers.
Some colours are not provided a Tamiya or MM equivalent but generic colour names
such as green or silver are given. On the painting guide, it is difficult to see
some paint details such as where exactly the black anti-glare panel starts and
the colour of the canopy frames etc. Also the nose radome on the green F2a is
shown as silver but my references indicated tan/buff on some green Lightnings
and a light green/olive on NMF, grey and camouflaged ones. I chose the No.
19 scheme.
After joint clean up and polish, the bottom of the fuselage, wings, tailplanes
plus the landing gear, gear doors, ventral fins and the canopy were all primed
with Tamiya gloss black acrylic and then all except the canopy were painted
Alclad White Aluminum. After 24 hours, these metal areas were masked and
then the model was sprayed with Tamiya primer. Next all upper surfaces,
plus the leading edges of the lower wings were painted Gunze H309 73 FS34079
green. All masking except the canopy was removed and a coat of future was
applied. The kit decals, although not very well printed were thin and went on
very well. I used Microsol on most of them and Mr. Mark Softer on a couple
that had to conform a little more such as the roundels. Here the paint and
decal guide lets you down again, there are so many decals it is difficult to
determine the exact location for many of the smaller stencils. Another
shortcoming of the decals is that there are not enough decals to complete 2
Firestreaks or 2 Red Tops, you can do one of each and that is what the colour
guide shows. I wanted two Firestreaks so I ended up cutting the decals in
half and placing them on the outside of the missiles hoping the inside won’t
be easily seen. After the decals, another coat of Future was applied to the main
components and a light wash of Paynes grey oil was added to the panel lines and
landing gear to highlight the detail. Next, the wings were attached and it is
important to add the flaps before attaching the wings as there is no room to do
it after. You don’t need to use any glue on the flaps as the fit is that
good
as they clip into place and give you moveable flaps without pins or hinges.
The tail planes have very small pins to help locate them but after they
inevitably broke off, the pins were replaced by wire inserted into the tail
pieces and they were attached with super glue. A final coat of Aeromaster
acrylic semi gloss clear was applied. The remaining parts such as the
landing gear, gear doors, fuel probe, antennas, gun inserts, rear jet pipes,
nose intake and pitot were now added. The canopy masks were removed, the yellow
line decals were added to the canopy with Future and it was complete.
Conclusion
The fit was very good everywhere, you have a choice of two versions but check
your references since the instructions are not that clear on what parts go with
what version. The decals were plentiful, easy to use but not printed very well .
If you want a real beauty you should invest in aftermarket decals and a
replacement ejection seat. That said, I believe it looks really good
straight out of the box. In regards to overall accuracy, I don’t know if
it’s 100% perfect, but it looks like a Lightning and it was an absolute
pleasure to build.
Bill Bunting
Click on
images below to see larger images
|
|