|
I have been building models on
and off since I was a kid, and I love the old Monogram / Revell kits that I grew
up with. I had never heard of
Hasegawa or Tamiya, and did not discover resin or photo-etched details until
about six or eight years ago. One
of the kits I built as a kid was the Monogram AH-64 Apache.
As with most of my models back then, I glued it together in one day,
painted only some of the cockpit parts and rotors, and placed the decals right
on the bare, olive-colored plastic. I’ve
learned some patience since then, and prefer that my models look a little more
realistic. But I still build for
the fun of it, and I’m just not that concerned with being technically
accurate. I just want each aircraft
to look good sitting on the shelf, and know that I enjoyed building it.
I had an old Monogram 1/48
AH-64 kit that I bought on Ebay and decided to build my own out-of-box version
of my favorite helicopter ever. I
was very inspired by Rodney Williams’ four-part article of the Monogram Apache
in the ARC gallery. I was not going
to attempt the level of detail and scratch-building that he did, but I enjoyed
seeing what could be done with this old kit.
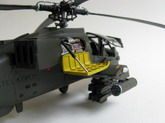
I started with the cockpit, painting all of the panels flat black and
dry-brushing the details, adding some red and yellow here and there to make it
pop. I also painted the pilot’s
MFD screen gloss green. I know
it’s bright for a screen that is turned off, but I wanted it to be noticed.
I used some scrap pieces of the low E string from my guitar to make hoses
on each seat. The seats were
painted with Model Master Acryl US Army Helo Drab, with gray cushions, and I
used the molded-on seat harnesses. I
masked the interior of the canopy with scotch tape and painted it Helo Drab.
This was my first time to use this masking technique, and I was really
happy with the results.
Next, I worked on the weapons.
I began by sanding the horrible mold lines and drilling out the backs of
the Hellfire missiles. After seeing
an AH-64 on static display at the Wings over Meridian 2008 Airshow a few weeks
ago, I noticed that I did not drill out a large enough diameter.
Oh well, it’s better than it being solid on the back.
I did not modify the rocket pods at all, but I wanted to make the gun
more detailed. I started by using
the point of a brand new X-acto blade to “drill” out the end of the barrel.
I removed the molded-on spring and replaced it with one that I made by
wrapping a thin wire around a small drill bit.
I saw on the real Apache that there is a rod inside the coil, which I
left out so that the detail is more noticeable.
I also added a wire on the other side to replace the molded-on wire.
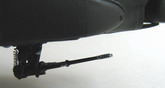
I did the same to the landing gear struts.
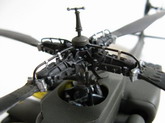
The rotor heads were an area
that I wanted to add some detail. The
large wires on top of the main rotor are present on some Apaches, and not on
others. I have no idea what they
are for, but I wanted them on my model to add detail and interest, and just to
see if I could do it. I used some
black wire of unknown size that was lying around in the tool box, and I used
strips of a soda can to make the braces. The
wires added to the tail rotor are a smaller size guitar string, cut and
super-glued in place. I wanted the
main rotor to have some sag in the blades, so I heated the plastic over a candle
and bent them by hand until they had the right curvature to them.
Be very careful if you ever try this because leaving the part over the
direct heat of the candle for too long can distort the plastic.
I almost did this. Happy
with the rotors, it was time to move on to the fuselage.
Click on
images below to see larger images
There
is a lot of work to do to get rid of the seams after the fuselage halves have
been joined, and I didn’t do as much as maybe I should have.
I took care of the main areas, mainly around the main rotor, in front of
the cockpit, and on the tail. I was
afraid of loosing the rivets on the rest of the aircraft to do too much sanding.
I mainly used the technique in the Tools and Tips section of applying
putty and then smoothing it with nail polish remover.
I need more practice, but I really like this method.
The entire Apache is brush-painted with US Army Helo Drab, since I
don’t have an airbrush and could not find this color in a spray can.
After gloss cote, decals, and dull cote, the brush marks are not that
obvious and I am happy with the results. I
did not glue the end cap for the rotors in because I wanted to be able to lift
the rotors out if needed. So both
rotors just sit in their respective openings.
The
big endeavor in this project was to scratch-build an engine.
I began by opening the engine nacelle on the starboard side, and added
bracing with strip styrene. The
engine itself is not accurate at all, but rather loosely based on photos and
diagrams until I thought it looked good. Again,
I just wanted something to look cool on the shelf.
I wasn’t going for authenticity. I
used a cross section of a Bic ballpoint pen for the engine, with the screw-off
tip of some other click-pen for the bell-shaped exhaust.
Then I just glued on some parts from the spare box, copper wire and other
wires, painted it and dry-brushed it, and decided that it looked as good as
anything else I’ve ever build from scratch, which is nothing.
In conclusion, this old kit was a
very enjoyable build, and I learned a lot about working with wires and other
materials to build from scratch. I
love that this hobby is enjoyable for everyone: those who strive for precise
technical and historical accuracy, those who build models that are “close
enough,” modelers who make things up, or those in-betweeners.
I’m glad that Steve has provided the Aircraft Resource Center website
where everyone can see what each other is doing, get inspiration and ideas,
learn new techniques, or just return and look at some of our favorite subjects
over and over. As long as there are
models to build, I plan to keep building them.
And I hope you do, too.
Darren
Click on
images below to see larger images
|
|