|
History
– A VERY brief history.
The
General Dynamics F-111 is one of the most controversial aircraft that ever
flew. Perhaps no other aircraft before or since has been so bitterly
criticized in the media. It suffered a protracted development cycle in
which numerous serious problems had to be identified and repaired, and
cost overruns came to be a serious concern. Of the several thousand that
had originally been planned, only 562 flight worthy examples of seven
different variants were completed. The F-111 was the subject of protracted
and bitter debates within the Congress, with opponents denouncing the
aircraft as a "flying Edsel" that was more dangerous to the US
than it was to any potential enemy.
However,
after a prolonged development period in which many, many problems had to
be identified and fixed, the F-111 turned out to be one of the most
effective all-weather interdiction aircraft in the world. Although
vilified by some as being an unsafe and dangerous plane, the F-111 series
of combat aircraft established the best safety record of any of the
aircraft in the Century Series of fighters --- only 77 aircraft being lost
in a million flying hours.
The
F-111 never had an official Air Force popular name. However, because of
its long, pointed nose, the F-111A came to be known unofficially as the
"Aardvark", or just 'Vark for short.
At
the 1996 F-111 retirement ceremony at the Lockheed-Martin (formerly
General Dynamics) Plant in
Ft. Worth ,
Texas, the F-111 was officially named the “Aardvark”.
Click on
images below to see larger images
The
Kit
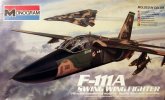
The
Monogram F-111A started out life as a 1/48 scale Aurora TFX kit. I have
never seen one of these and tried to buy a few of them on Ebay, solely for
the collector value of it. It is my understanding that this kit was more
of a toy than what we consider today as a serious model kit.
Phil
Brandt summed it up the best….. (who’s name is on the decal sheet of
the Monogram kit!)
“The most obvious area is the incorrect
fuselage shape. Although Monogram redid the downward "swoop" of
the radome, the top planview reveals that the taper from the capsule to
the pitot is still too rapid, ala Aurora. The fuselage hump aft of the canopy was changed somewhat (more
filleting), but still doesn't flow gently toward the strake that comes
forward from the vertical fin. And, that strake is much too thick and
doesn't taper to a sharp edge along the top.
The canopy has been recast in Monogram's outstanding thin, clear style.
Unfortunately, it, too, is simply a copy of the Aurora
version--and it's inaccurate! The real F-111 canopy lower line is not
horizontal in relation to the fuselage center line, but has a definite
downward slant toward the radome. And, the top view of the actual canopy
reveals a windshield profile that does not curve in toward the nose nearly
as much as that of the Monogram/Aurora version. To produce an accurate
canopy for this model, the builder will either have to reshape the
windshield panels from clear sheet, or vacuform a whole new canopy.
Another glaring discrepancy is the turned-in engine inlet lips; they're
simply not correct! And, the engine lower housing should sweep up much
more dramatically, starting at a point even with the aft main landing gear
door. The inlet spike air bleed holes and splitter plates remain unchanged
from Aurora and feature the artistry of what must be the Matchbox "Trench
Digger's" brother. Monogram redid the seats, but retained the totally
inaccurate Aurora
instrument panel--yuk!
The landing gear strut and trunnion assemblies have been done from scratch
and are a great improvement. The Aurora
wheels will need to be widened. The speed brake is improperly contoured;
it should be wider and the sides should curve up to meet the fuselage
curve (after the engine contour is moved upward).
The strakes that jut out of the lower empennage have been retained from Aurora, and are still incorrect.
They should stick out at approximately 60
degrees from the horizontal, and they should be moved upward about
1/4".
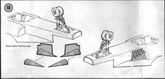
The afterburner assemblies are too long and too small in diameter, and the
hydraulically- actuated "fingers" (there should be six, not
four) that actuate the nozzle leaves do not taper correctly.
The "speed bumps" which extend aft beside the nozzles have been
correctly chopped off by Monogram, but should have a circular, not oval,
cross section. And, the tail bumper/tail hook housing is much more
prominent in the real bird than the small ridge that has been added by
Monogram.
As for ordnance release assemblies, Monogram chose to use TERs (can you
say "eff- four?"), which have NEVER been used by the F-111
fleet! The modeler will have to construct the correct BRUs.
Monogram added raised panel detail over the entire airframe, but went too
far when they added "blow-in doors" aft of the intakes; the A
model doesn't have 'em! The serial number on the decal sheet applies to a
1977 aircraft of the 429 TFS "Black Falcons" (today it's the 429
ECS (EF-111As--last of the USAF Varks) at Cannon AFB). If the builder uses
the green markings of the 442 TFTS, another serial number will be
necessary for accuracy, because tail number 054 was an operational bird
not a TF-coded (training) one. 429 TFS aircraft used a yellow horizontal
stripe on the vertical fin and black rectangles with crew names stenciled
in white on either side of the canopy (the green ones (442 TFTS) on the
kit decal sheet with Nick Muralt's and my name are totally bogus!). The
naturally black nose gear doors featured a stylized yellow falcon head
with the inscription "429 TFS". BTW, I recommend SuperScale
(ex-Microscale) decal sheets 48-229 and 48-393.”
Kit
Construction
I
built this kit straight out of the box….for the most part. The basic assembly
is out of the box. The biggest problem I had with this kit is the wings.
Every
one of these kits I have ever seen in the box has the same problem: the wing
upper and lower halves are severely warped. The wings are almost to the point
where they are almost unusable. I spent a lot of time and a lot of hot
water trying to get these wings straight and I still didn’t get them perfect.
The
fuselage fit is pretty good; I did have problems with the nose. Not so much the
fit, but the Pitot tube being part of the nose. I knocked it off a few times.
The cockpit was painted and installed without any modification or any real
detailing. I did not use the kit pilots, although I did have other Monogram
pilots that I put into the front office of this bird. Adding those pilots made
an improvement in the looks of the cockpit.
Since
I was going for the look of a later F-111, the intake splitter plates had to go.
This was very easy. I scored just below the cone and it snapped right off. A
little bit of clean up sanding and it was ready to go!
The
landing gear, being probably the best part of this entire kit was left alone,
except for the nose landing gear wheels. The kit wheels were very plain. I dug
up some F-18 nose wheels from the spares box and used those instead.
As
Phil stated above, the F-111 NEVER carried TERs. This is actually an incorrect
statement. Operational F-111’s never carried TERs, but F-111A RDT&E,
serial number 63-773 did carry them. But I figured, with all the inaccuracies in
the kit, leaving the TERs would be no big deal at this point, so I left them
alone. I did however have a set of fuel tanks that would look great on this
F-111 project. So I mounted the tanks to the empty pylons that came in the kit.
Paint
and Decals
I
live close to Cannon AFB,
New Mexico
, Home of the 27th Fighter Wing. My Dad was a retired Air Force
Master Sergeant and we would make “commissary runs” usually once every two
months to Cannon. I remember as a kid seeing F-111s taxi-by and take off.
I thought to myself….”Now, that’s cool!” With that said, I wanted to do
an F-111 from Cannon. Now, do I do one that is in the SEA scheme with the black
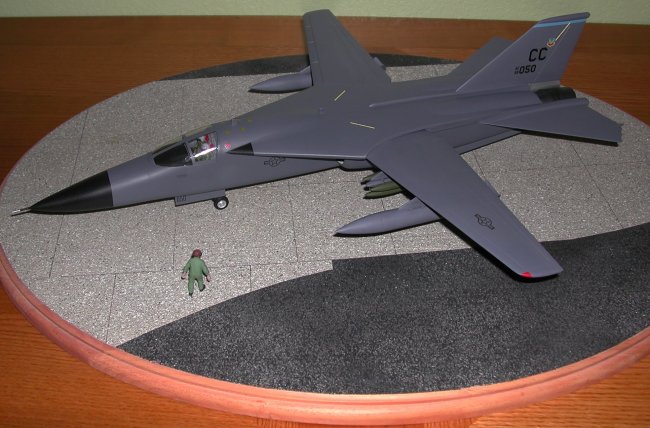
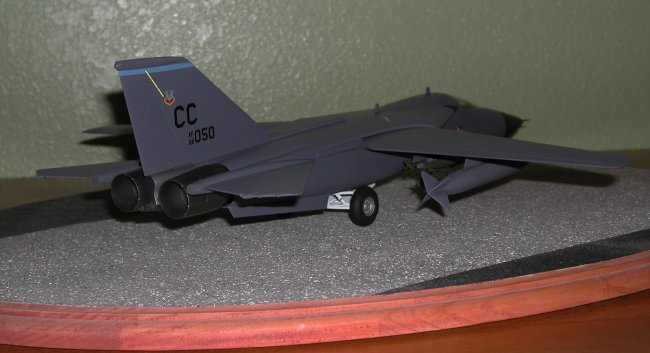
bottom, or do I do a later Gunship Gray F-111. It was an easy choice. Gunship
gray is easier to paint than SEA scheme.
I
searched the best F-111 website in the world – www.f-111.net and found lots of
pictures of 27th gunship gray aircraft. I knew that Cannon, for
a little while solely operated the F-111D. A” D” model it is! So I am
chugging along build my F-111D……looked at lots of F-111D pictures. I picked
up my In Detail & Scale book and started reading about F-111Ds. Remember
those fuel tanks I told you about earlier? F-111Ds NEVER carried external
tanks…..EVER! So, guess what? The search was on the find out which version
carried external tanks. Now, I was building an F-111E……or as close as you
can get to an F-111E with this kit. I did find a few pictures of Gunship Gray
F-111Es stationed with the 27th toward the end of their career. WHEW!
I
mixed up my Model Master FS36118 Gunship Gray and went to town spraying this
F-111. To me, when the Air Force transitioned to the overall gunship gray paint
scheme, the aircraft took on a meaner look. Maybe it’s just me. The wheel
wells where painted the standard white, as well as, the landing gear.
The
decals were the next challenge. I couldn't find anything I could use in
the spares box to make the jet that I wanted. So, I tinkered with the idea of
making my own, how hard could it be. It went down to the local hobby store and
bought the Vitacal system for making decals. It very simple and straight
forward. I used Powerpoint to make my decal and printed them out using the Vital
paper and my Canon MP150 inkjet printer. What I did find it if you are printing
black decals, such as tailcodes and serial numbers, not a problem. When you get
into colors on the transparent decal film, the colors are not 100% solid. Oh
yea, they look great on the paper, but when you slide them off, the disappear.
Printing then on white decal paper yields better results, but try trimming the
white from around the edges of a unit badge! A combination of homemade decals
and the spares box completed the project.
Conclusions
Overall,
the final result ended looking something like an F-111. Keeping in-line
with my tradition, I really like taking a kit that is a bad kit and turning it
into something presentable. This one is no exception.
Steve
Click on
images below to see larger images
|