|
There
are some great articles in ARC regarding the Focke Wulf Fw190
‘Sturmbock’ aircraft from master modellers like Tolga Ulgur, Bruce
Bell and others. But I am one to say that I was quite surprised
to see that none of these models are in 1/32. The model that I have built
and am presenting to you will be ARC’s first 1/32 scale Sturmbock.
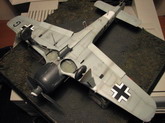
This is my
Large Scale rendition of the Focke Wulf Fw190 A8/R2 flown by Hauptmann
Wilhelm Moritz of IV Gruppe, JagdGeschwader 3. I opted to use the new-tool
Hasegawa Fw190 A8 kit, mainly because of the positive feedback that it
gets from the modellers that have built this kit in large numbers. I have
to admit, the kit is fairly accurate and is impressively large. I highly
recommend the kit to those who want to built a reasonably
detailed and accurate Large Scale Focke Wulf Fw190.
The reason I
built this model is because the most successful mission of the Sturmgruppe
was on July the 7th, which is also my birthday. I wanted to have
something to remember my birthday by and this model does the job.
Armed with
EagleCals EC#99-32, I set out on building a model that was fairly
accurate, but one that I was proud to have displayed for others to see.
There isn’t much for me to say about the construction of the model kit,
as it is well engineered that it is just as good as a Tamiya kit. Other
articles in ARC and Hyperscale clearly elaborate the ups and downs of this
model kit. However, I do want to point out that to get a good fit in the
wing root, the modeller must pay special attention to the wing assembly.
Especially when you are joining the wheel well part to the lower wing.
This is more elaborated in Brett Green's Fw190 D9 article over at Hyperscale.
Most of the
model was built OOB, with the conversion and detailing scratchbuilt. The
conversion includes…
1.
The cockpit bolt-on armour was fabricated from 0.020” sheet
styrene
2.
The blinkers were from 0.023” half round styrene strips
3.
The windscreen armour was simulated by painting the frames from the
inside of the kit part
4.
I used the alternate ejection chutes that came with the kit
5.
The Mk108 ejection ports were opened up on the lower wing and was
backed with sheet styrene
6.
The Mk108 barrels were from aluminium tubing
7.
The fairings on the gun troughs were round wooden toothpicks cut
and sanded to shape
The
scratchbuilt detailing includes…
1.
Scratchbuilt shoulder and lap harnesses on the seat
2.
Adding hydraulic brake lines with fine copper wire
3.
Replaced the IFF aerial with stretched sprue
4.
Added the antenna wire using stretched sprue
5.
Added pedal straps to the rudder pedals
Any details
that I have missed on the construction side of the model can be found on
this link http://forum.largescaleplanes.com/index.php?showtopic=13395
Click on
images below to see larger images
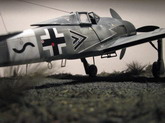
The
model was a testbed for my try at preshading, and it came out with good
results. Paints used were the trusty Tamiya acrylics, the camo was done
freehand with my Tamiya HG single action airbrush and the model was
painted in one day, which is a personal best for me. The decals were
great!!! No silvering whatsoever. I highly recommend them to those who
would be interested in building interesting or well known Luftwaffe
subjects. Weathering was done with pastels, airbrush, graphite pencil
and silver paint. The usual weathering process was used. A custom satin
coat sealed the carefully done weathering and she was finished; 2 and a
half months after opening the model's box.
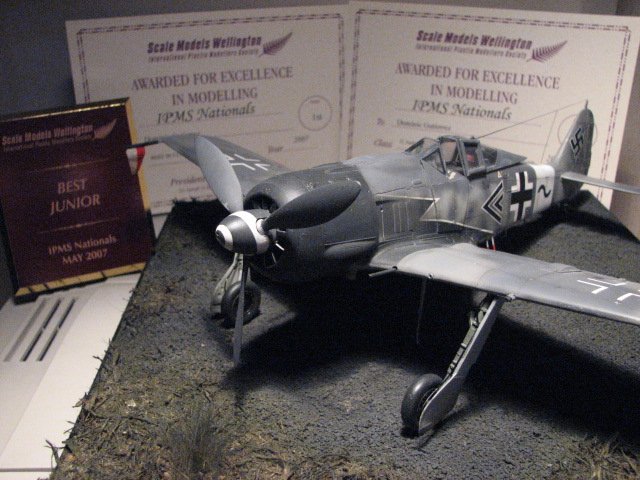
I entered the model
in the 2007 IPMS Nationals in New Zealand, and it took 1st place in
Junior Aircraft and Best Junior Modeller award. After the competition, I
was well complimented by many senior and junior club members, and the model will
be featuring in our club's newsletter this month. So my model has lived up to my
standards and I’m proud to have built it, and have it sitting in it's display
base in our living room.
I hope you like my
model. Feel free to send comments and queries if there is anything that you
would like to know.
Happy Modelling...
Dominic
|