|
This
is the current boxing of the Italeri
kit, converted into a GR4A of the type operated by 13 & II(AC) squadrons of
the RAF. Although a reconnaissance
machine, the GR4A retains the same attack capability sensors & weapons as
the standard GR4. The only missing
elements being the two nose mounted cannon which are displaced by the recce
sensors. The basic kit sure looks
like a “Tonka”, appearing fine in outline, comes with slightly heavy
recessed panel lines, a good selection of stores, a reasonable cockpit with
multi-part seats & nice clear transparencies.
Not having used the decals, I cannot comment.
Before
I describe the process, here’s a list of the added enhancements &
conversions:
1.
Paragon dropped slats &
flaps. This set also provides detailed wing sweep seals & tail pivot
“fishplates” – both of these are totally missing from the kit.
2.
Paragon afterburner cans –
better detailed & including the thrust reverser actuator mechanism, again
missing from the kit.
3.
Paragon ejector seats.
4.
Paragon wing & fuselage
pylons
5.
Paragon front fin replacement
section.
6.
Hindenburger tanks & FLIR pod from the Airfix
GR4 kit.
7.
Storm Shadow CASOMs from the Revell
Typhoon kit.
8.
White metal linescan pod & sensor window overlays from the Flightpath
set.
9.
Model Alliance 90th
Anniversary Tornadoes decals with elements from the Airfix
decal sheet.
Click on
images below to see larger images
Building
began for me with the wings. The Paragon
instructions illustrate where to remove the plastic from the kit parts &
although I thought I followed these correctly, I discovered when coming to
attach the new leading edge parts, that I had removed too much plastic.
Fortunately the model room waste bin hadn’t been emptied in the
intervening period & I was able to fish out the plastic I had removed &
reattach the necessary with the use of filler & superglue!
Brass rod was used to represent the flap operating screw jacks but I lost
patience when trying to do the same for the slats.
I
taped the upper & lower rear fuselage parts together & offered up the Paragon
wing sweep seals & marked their outline.
It was then a simple job to remove the plastic & fit the
enhancements. Cutting off the front
of the kit fin & replacing it with the more accurate Paragon
section was similarly easy.
I
had to remove a little plastic from the kit parts to fit the Paragon
burner cans but no problem there.
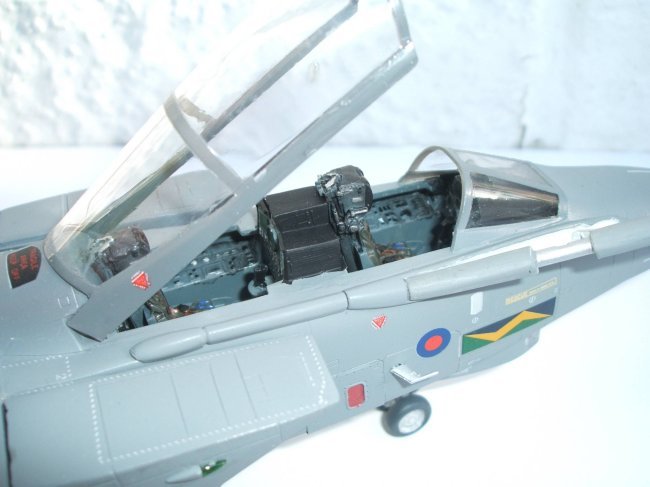
I
left the cockpit basically as it was even through it isn’t a true
representation of the GR4/4A. The
only mod was to remove some plastic from the navigators instrument panel shroud
& add a pair of Paragon seats.
I added some lead weights in the nose cone to prevent a possible tail
sitter.
With
the wings installed the rear fuselage can be assembled.
The tailplanes are provided with an internal linkage for those who like
such “working features” but as it would make masking & painting easier I
omitted this, attaching the tail planes themselves later with the Paragon
“fishplates”. I did however use
the mainplane linkage armature as it holds the wings level.
The
front to rear fuselage joining went well with just a little filler being
required. The fin was added &
blended in with PVA glue. As others
have noted, the intakes are not a stellar fit.
I removed quite a bit of material from the face that mates with the
fuselage but still had to perform a bit of sanding & rescribing once in
place. More problems with the
separate, two part glove vanes, which were a total nightmare to assemble &
install. On the GR4 but not the F3, these accommodate Kruger
flaps; the Italeri F3 kit uses an
otherwise identical main fuselage, hence, these parts are provided separately in
each kit.
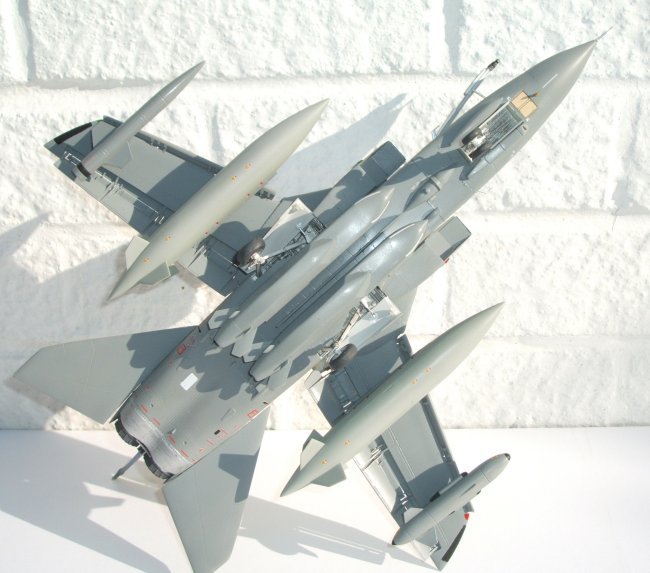
The
Paragon replacement fuselage pylons
(three) were added along with the Flightpath
white metal Linescan pod & etched metal overlay panels for the GR4A version.
The Flightpath instructions
were followed without a hitch (the Airfix
kit provides a reasonable linescan pod & decals for the sensor windows
without the added expense if preferred!).
Now
to the painting. Xtracolour
Dark Sea Grey topsides with Dark Camouflage Grey for the remainder & all
stores. White for the undercarriage
bays & legs - all – reasonably simple.
Hindenberger tanks were sprayed Barley Grey although it’s quite common
to see machines with these in darker grey, or one of each for that matter!
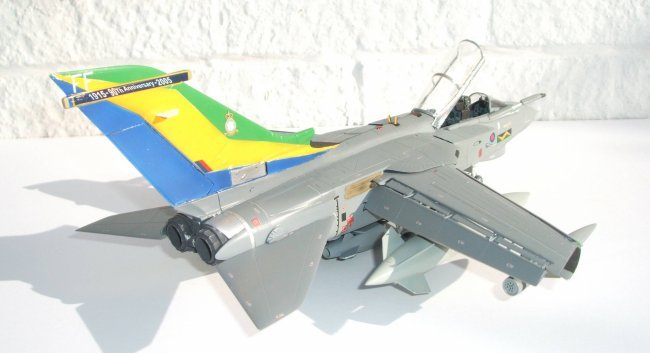
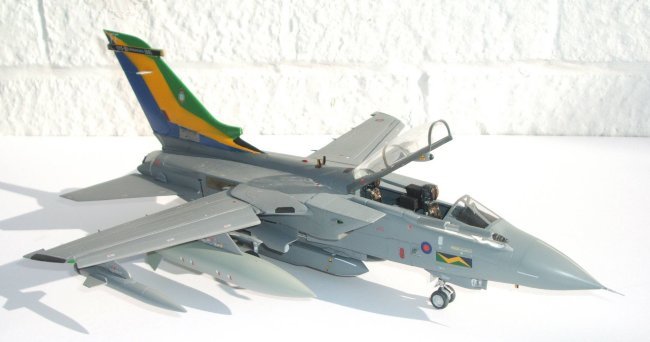
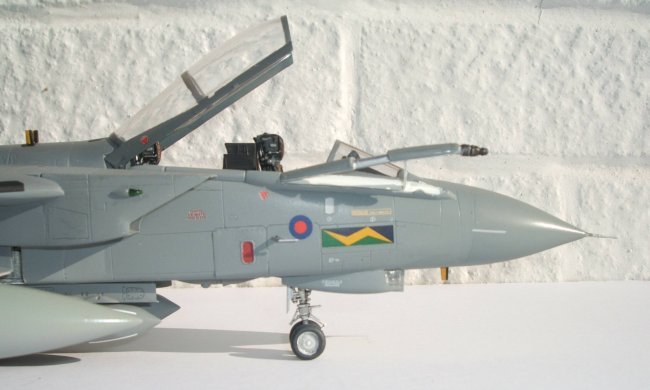
My
model depicts 13 squadron’s 90th Anniversary ship.
Main markings are from the MA
sheet. I sprayed the fin in lime
green (Humbrol) & roundel blue
& added the yellow flash when dry. Disaster!
What had been a bright yellow on the sheet became an awful slushy grey/yellow over the paint – a bit too thin I think.
Jon Freeman at MA however came
up trumps with a replacement set. This
time, I sprayed the whole fin white, then photocopied the decal sheet &
carefully cut out the port & starboard flashes, tacking them onto the fin in
the correct positions before respraying the blue & green areas.
This left a white area approximately corresponding to the yellow flashes.
On application of the yellow flashes, the results still weren’t as good
as I had hoped. With hindsight
(& for the benefit of anyone else tackling this scheme), I would have
sprayed the fin white, applied the flashes & the sealed them with varnish
prior to masking them & spraying the coloured areas.
Most of the other decals (roundels, stencils etc.) came from the Airfix
GR4.
With
all the decals applied, the model was washed & left to dry before an over
all coat of matt varnish.
Finally,
the stores & all the smaller details that are best left until last could be
added. The BOZ & Sky Shadow pods are from the Italeri
kit, tanks from the Airfix kit &
the Storm Shadow CASOMs were already
assembled from the Revell Typhoon so
it would have been rude not to use them here!
I had to trim the horizontal stabiliser fins on the Storm Shadows to get
them to fit adjacent to one another. The
result is still not perfect but further trimming would have been unthinkable.
In
conclusion, the Italeri kit builds into an impressive model.
The MA decals provide a colourful alternative to the otherwise over all
grey option. Apart from the wing
surgery & those tail flash decals, the whole build was quite simple &
relaxing. My next “Tonka” will
be an Operation Telic GR4.
A bit easier on the painting!
One
idea though that I hope Paragon might consider:
how about offering the wing seals & tail plane fishplates as a
totally separate set, or incorporating them either with the tail fin correction
or the afterburner can sets. They
really do improve the kit but if they are only available in the slat & flap
set, the cost may be beyond the pockets of many & others who lack the skills
to perform the “wing surgery” may feel it a waste to buy that set just to
obtain these parts.
Graham
Click on
images below to see larger images
|