|
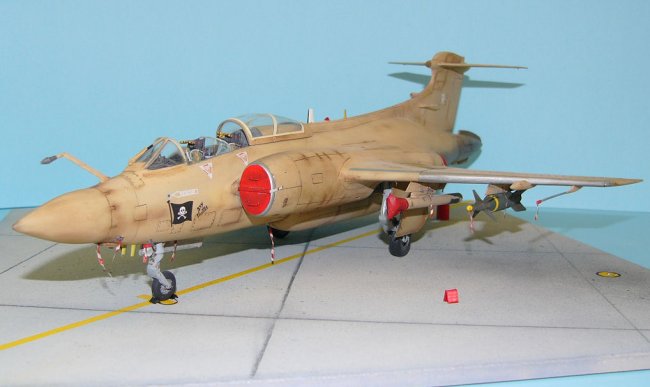
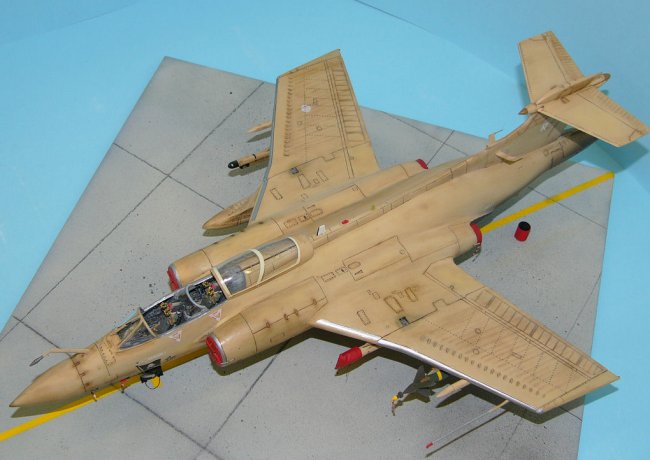
Here is my Airfix
Buccaneer in 1/48. I've always had a thing for the Buccaneer, fairly underrated
IMHO but a potent strike aircraft, particularly armed with 4 Sea Eagle ASM's. If
push ever came to shove I think they would have caused some problems for the
Soviets in the seas to the north of the UK. Funnily enough for an aircraft
designed for the low level strike role, their finest hour come in 1991
when a detachment from RAF Lossiemouth, made up from crews and aircraft form 12
Sqn, 208 Sqn and 237 OCU was rushed to Bahrain to provide laser designation for
the RAF Tornado fleet. After the first few days the Buccaneers often dispensed
with their AIM-9L's and carried a CPU-123/B 'Paveway II LGB instead.
I had heard
many bad things about the Airfix 1/48 Buccaneer, but it's the only option in
this scale so I had no choice. , I want to do the 3 major UK jets that took part
in Operation Granby, so I thought I'd have a go at the Buccaneer first. I
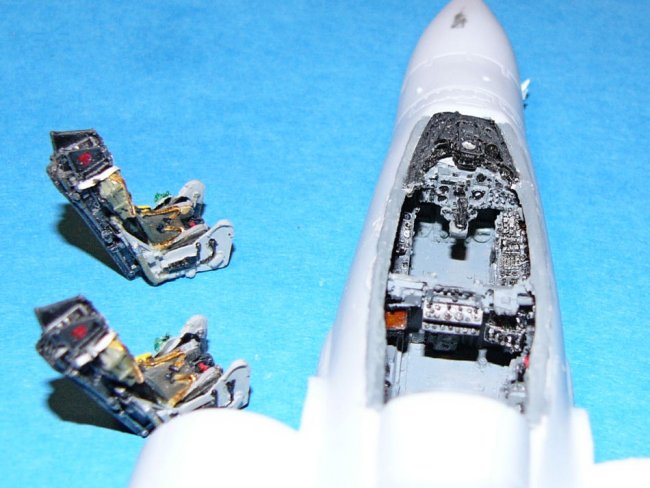
picked this one up along with the Neomega cockpit on Trademe (NZ's version of
Ebay) and then instructed my parents it was my birthday present :-). The kit
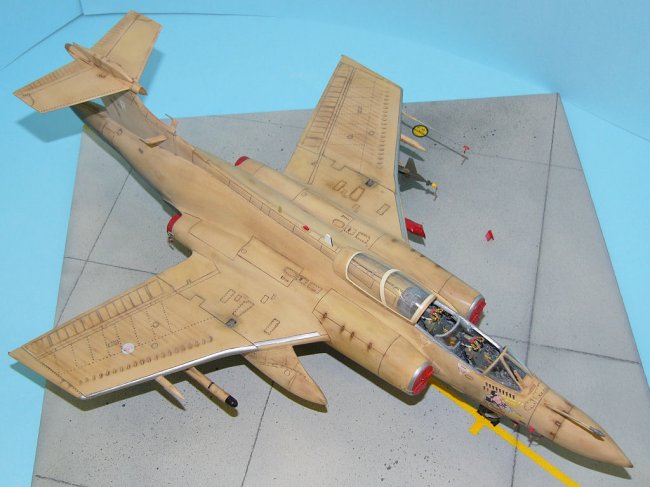
cockpit is average at best, so getting the Neomega set with the kit was a bonus
as I would have had to fork out about $50 AUD to buy it. The kit cockpit has
decals for the instruments so it would be ok, particularly if you put the pilots
and closed the canopy.
| Getting the
resin cockpit to fit was a bit of a struggle, in fact it's not quite right
but I'm not telling where. The cockpit set didn't come with a HUD glass so
some clear card was used with some wire as the supports. I had heard this
kit suffers from a wrapped fuselage. Not sure which way it is supposed to
be warped but mine didn't look too bad. A bit of filler was used to
along the fuselage joins which are horizontal rather than vertically as
usual. |
Click on
image below to see larger image
|

|
|
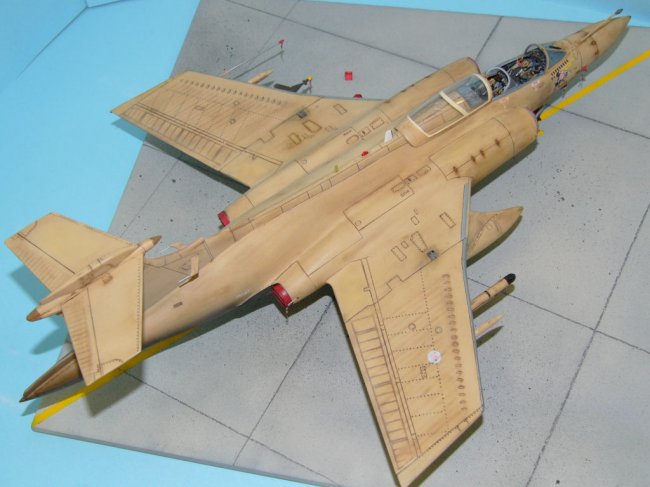
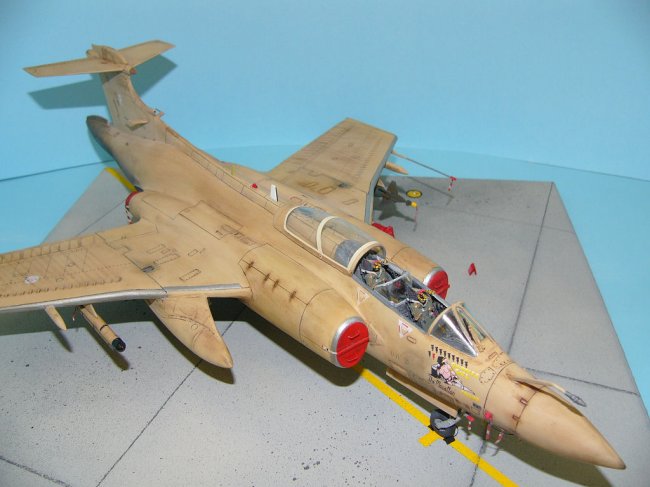
I also used a lot of filler
around the intakes and the exhausts. I re-scribed the bomb bay as it had raised
detail. I decided early on not to do the airbrakes open or the wings
folded. I also opened a slot for the canopy to slide along on he upper
fuselage as per Ted's Modelworks . The wheel well is pretty basic but I just
couldn't be bothered trying to add any detail in there. Plus I figured no one
would be looking in there except me.
|
Click on
images below to see larger images
|
 |

|
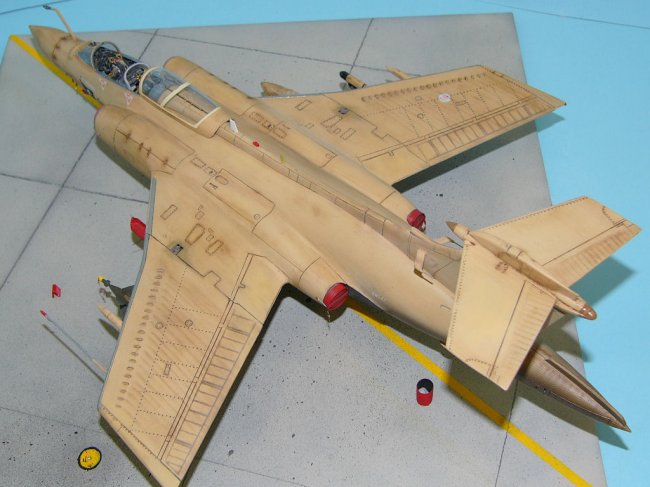
Trying to get a good
match for the colour took a bit of heartache. The recommended paint,
Humbrol paint Desert Pink (250) was way to pink, even lighted up. perhaps that
was how they looked straight from the paint shop but none of Gulf War aircraft
(of any type) looked pink in any of the pictures I had seen (and I looked at a
lot) In the end I used a mixture of Humbrol Satin Oak (71) with a drop of red
and D some Desert Sand (63) I mixed up 3 batches of this during the
painting process, the trick being not to overdo the red. the slight differences
in colour didn't worry me as all the pictures of Operation Granby Buccaneers I
had seen showed them very dirty. I also decided not to do the standard
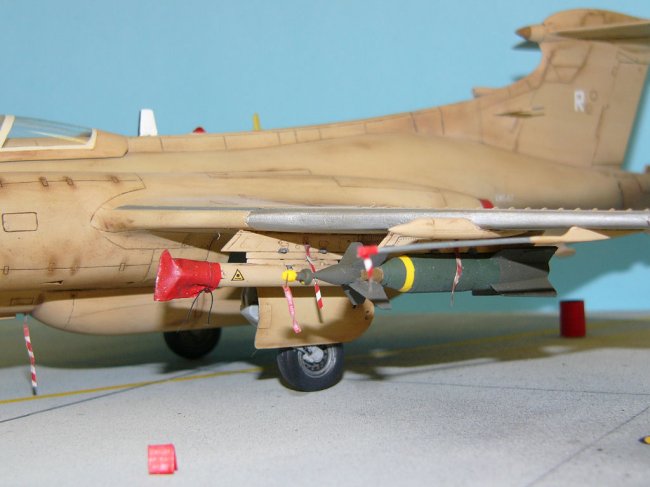
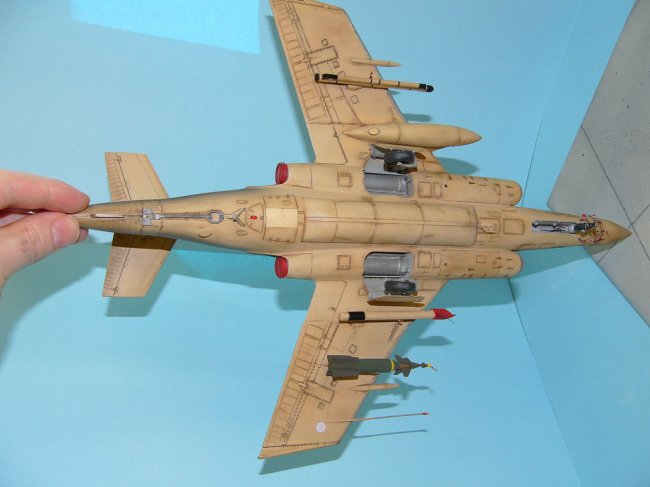
configuration I'd seen all other models. I decided I'd hang some CPU-123/B 'Paveway
II, LGB's on my aircraft. I picked these up from AMRAAM lines. My configuration
would be 2 X CPU-123/B Paveway II, 1 X Pave Spike and 1 X AN/ALQ-100 ECM Pod.
Originally I had intended to do
the aircraft supplied in the box, but unfortunately Airfix had chosen one of the
more un-exciting aircraft with nose art. Thankfully Santa noticed that the
Australian Museum of Flight had the Model Alliance Gulf War Buccaneer decal set
and delivered them to me :-). The reminder of this set is now for sale if
anyone's interested.
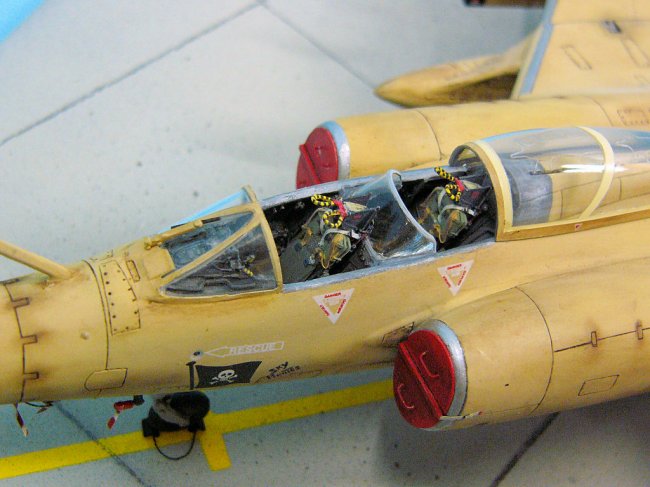
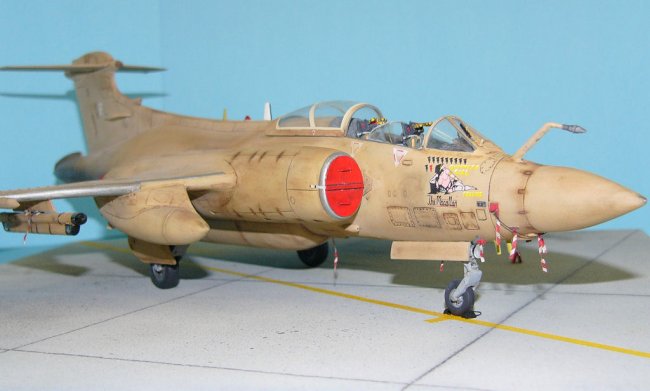
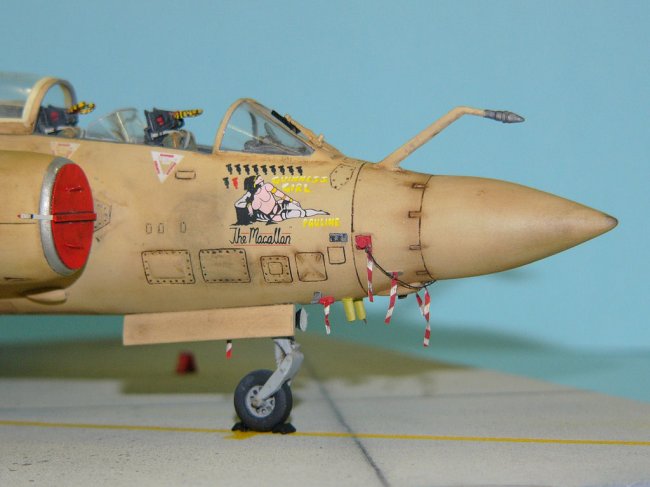
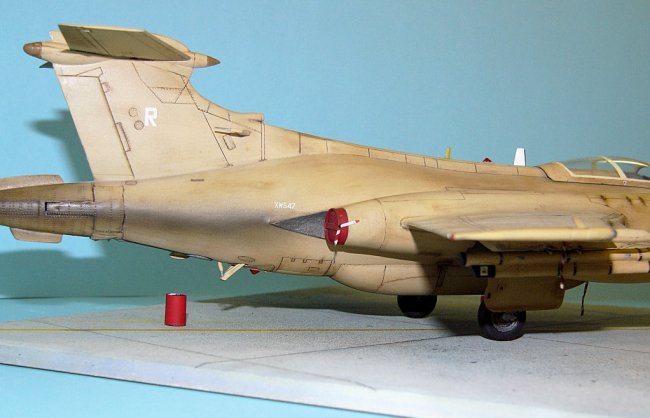
The aircraft was now assembled into it's major bits and painted, Now I had
choose which aircraft I wanted to do I chose XW547 Guinness Girl as I loved the
nose art, and I had a couple of photos of it. This was to turn out to be a bit
of bad decision. I applied the decals as normal as per the instructions on the
sheet.
I contacted the webmaster of http://www.blackburn-buccaneer.co.uk/
to ask some questions, he pointed some bit of his site that were either new or I
hadn't explored. In particular the pages for each aircraft that flew in
Operation Granby. I was now I found out this was the ONLY aircraft that retained
the original wing-tips, my proposed configuration was incorrect and that the
deal sheet had the roundels in the wrong place. Being a bit anal about these
things, (if you listen to my wife I'm more than a bit), off came the small
wing-tips all the other aircraft had, (had to saw them off), on went the large
wing-tips, on went the starboard slipper tank, off came the roundels,
(thankfully Model alliance give a you a spare sets.
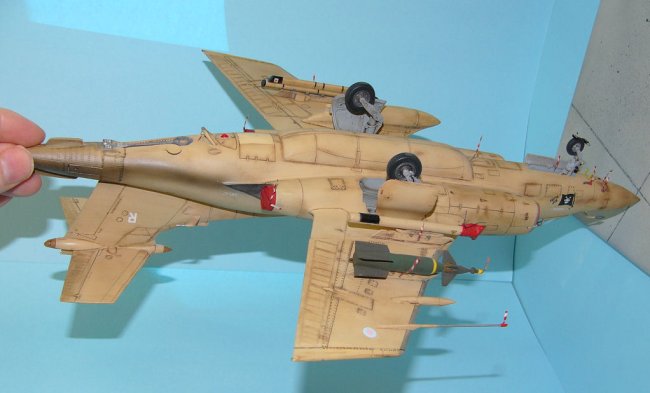
Also he pointed out that the
forward wing hinges are exposed, not covered as Airfix had them. I scratch built
the hinges as best I could from the one photo I had.A few more questions
revealed that flare dispensers needed to fitted to the inner of the outboard
station, there were scratch built out of the spares box and square plastic
stock. I also found a heap of new photos of Guinness Girl, some of her in
Bahrain itself, these were valuable. Also she is one of the aircraft preserved
in the RAF Museum Hendon, so there are a few of pictures of her there, she is a
lot cleaner but still carries some of the stains of combat.
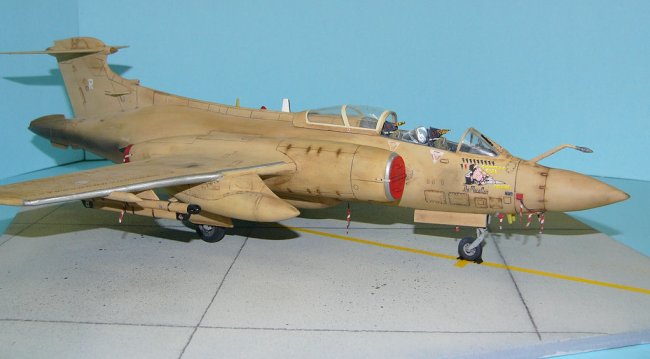
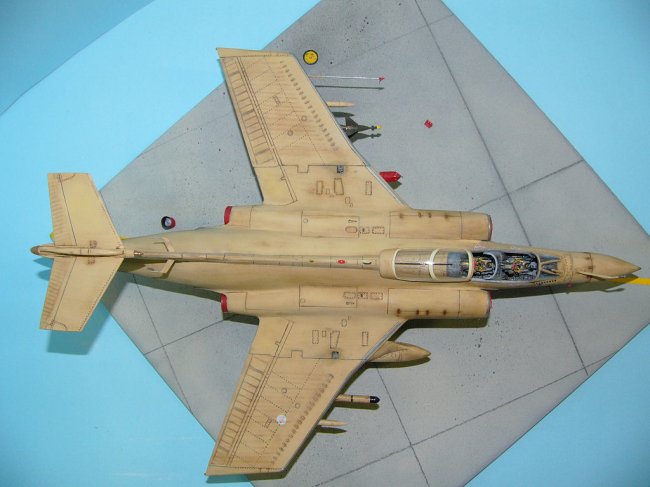
The kit was then
touched up in places where it needed it an re-coated in Kleer. A enamel was
applied and then a coat of Gunze Flat applied. Next artists chalks were used to
add all the dirt/sand that covered these aircraft during their stay in Bahrain.
The stores were fitted and all the little antennas, pitot tubes etc fitted. I
wanted to do this one as it would be on the ground so with some more help from
Andy (webmaster of http://www.blackburn-buccaneer.co.uk/
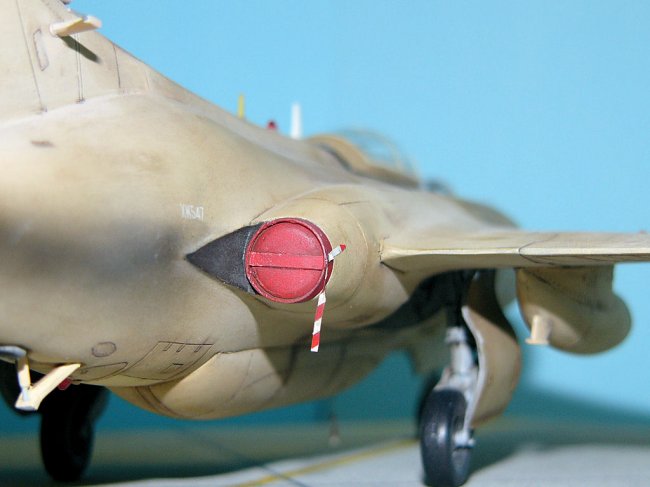
) I set about building all the blanks etc. The pitot tube blanks are rolled up
tape, the intake blanks were made from plastic card, with handles made from
wire. The exhaust blanks were made from the end of the tubes my scalpel blades
came in, they were nearly a perfect size. The intake and exhaust blacks serve 2
purposes hide the average intakes and exhausts that come with the kit and look
the part with all he other blanks etc. The attaching straps are just tape.
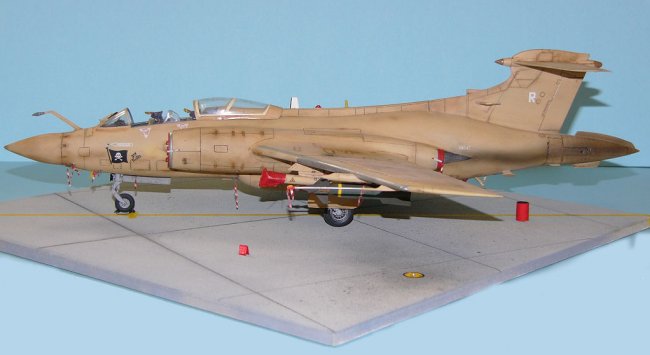
The remove before fight tags were attached and one last coat of Gunze Flat
applied.The areas that looked glossy were then brush painted with Humbrol Clear
gloss, The base is a tile painted with grey paint. The drum at the rear of the
aircraft is a McDonald's' drinking straw and the chocks built from plastic
tube stock. I tried to paint the MDC on the canopy but just couldn't, so I left
it.
Some minor criticisms of the
aftermarket stuff are, the AMRAAM Lines bomb needed a bit of work as the tips
were poorly formed, the model alliance decals seem a bit small compared to the
real thing and the roundels are shown in the wrong place and the Neomega cockpit
set has no decent instructions. These are minor though.
Overall I'm very
happy with the way this one turned out, particularly as I have heard that this
was a dog of a kit and although it took me nearly 5 months to complete.
I'm not sure I'd ever build another Airfix Buccaneer though, If I did I'd do it
in the air. I'm that happy with it that I'm considering it being my first entry
in the local modelling competition.
Well thanks for
reading and enjoy the pictures, I took a few of them ;-) Check out my other kits
at www.gibstuff.net/models
Calum
|
|