Since I
last wrote about this kit several changes to plans happened.
I was building this as a C model but decided that I really loved
the scheme of the VMFA-115 CAG as featured in the 2 Bobs Patriot
Hornet sheet.
|
Click on
image below to see larger image
|

|
|
|
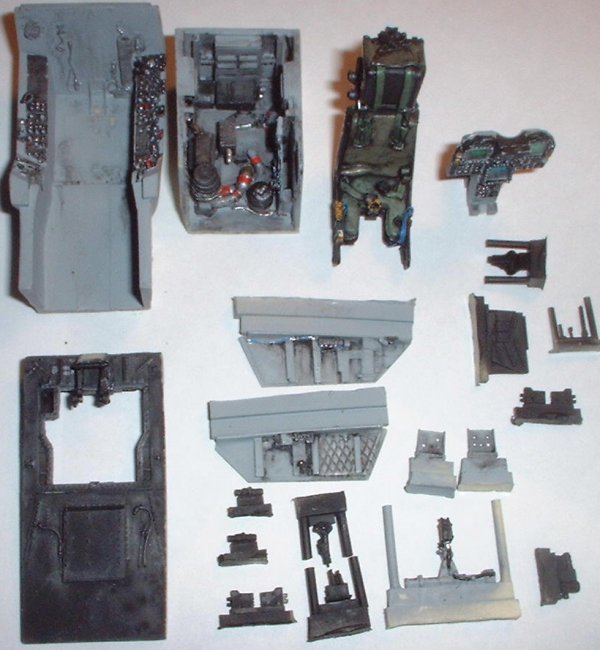
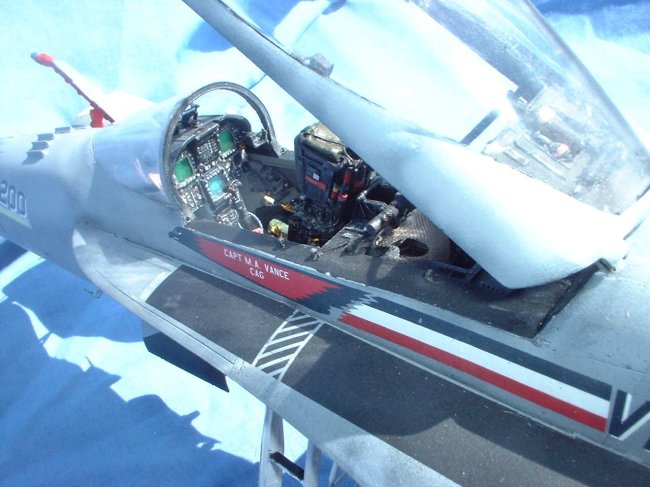
This lead me to pick up the Black Box F/A-18A
conversion set (cockpit and tail fins) and of course
the 2 Bobs decal sheet, I also added the Black Box
Exterior set (bomb racks, refueling probe, EPU panel,
burner cans and 2 bucket chaff dispensers which I did
not use).
|
Click on
image below to see larger image
|

|
|
|
I also added the kit parts needed such as the IFF
antenna (this was added to A models during an upgrade
to plus standard), RWR antennas and other differences
like the gun bay grills. Although Academy markets this
kit as a C model they really understand the model
builders need to build other versions and provide a
lot of parts that they don't have to, my hats off to
them for that and my thanks. But I still had the nice
CE cockpit set for the C model so I picked up another
kit to build as a C, more on that latter. I decided
that I wanted to open this kit up a bit and detail a
few eye catching things (to go with the eye catching
markings).
|
Click on
image below to see larger image
|

|
|
|
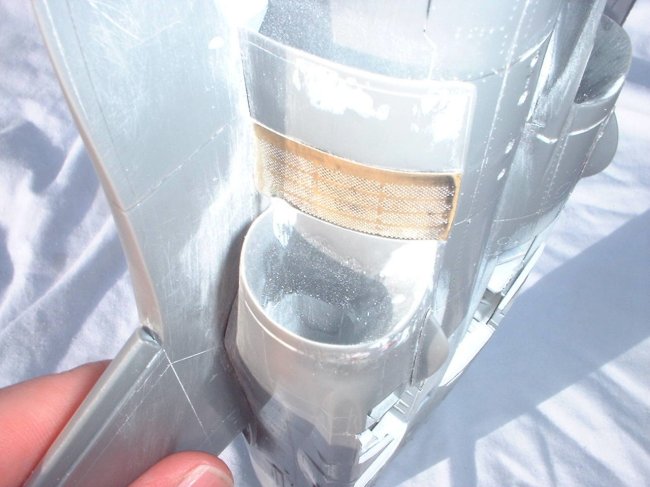
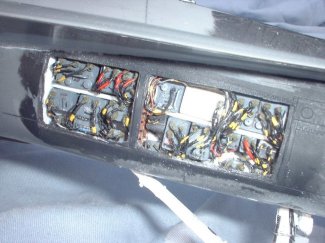
I started with the kit provided radar section and
removed the molded on wires (which are incorrect) and
added my own wiring using that great Daco book to
guide me, I also used some of the Eduard placards
along with the kit decals.
|
Click on
image below to see larger image
|

|
|
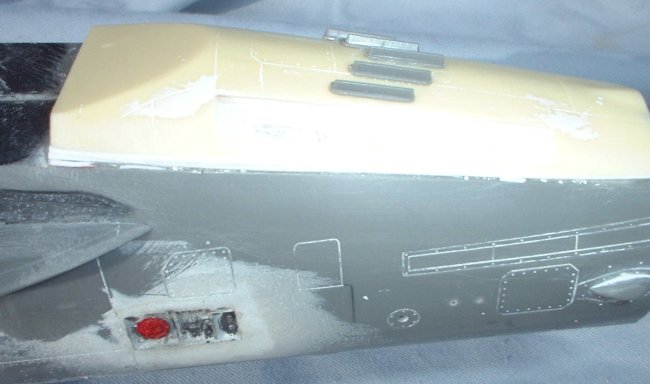
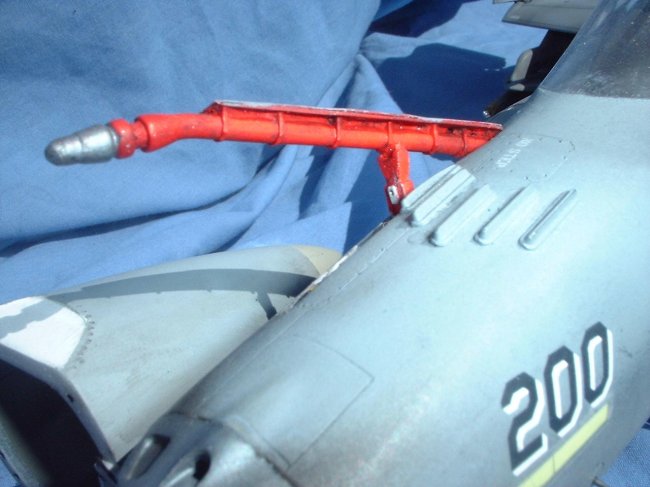
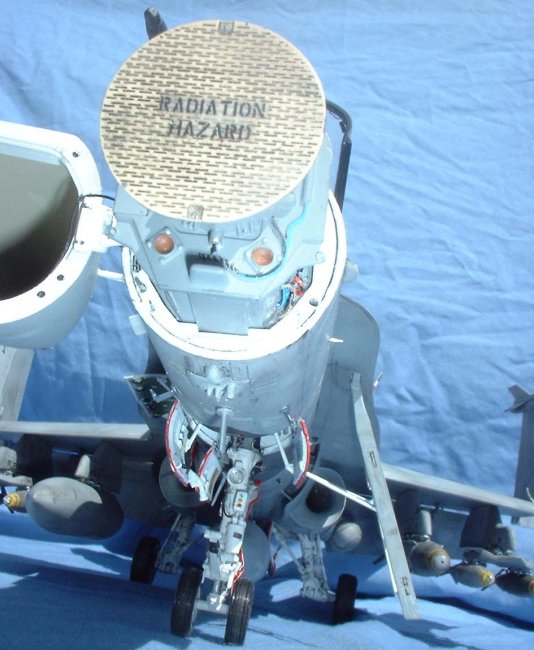
To go with the open nose I used the BB refueling
probe and the BB EPU panel to add more interest around
the nose.
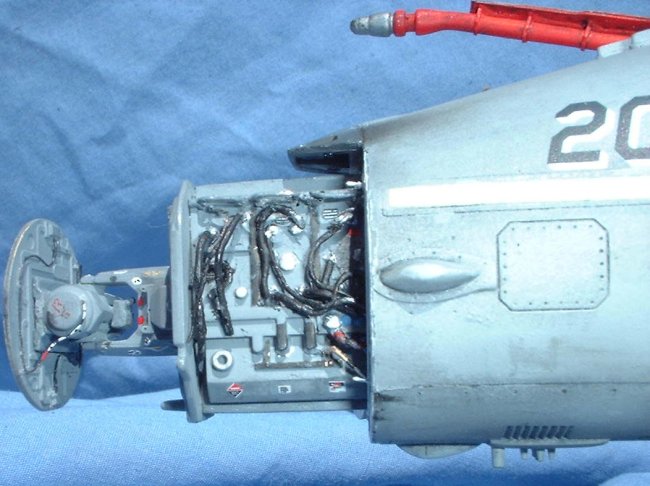
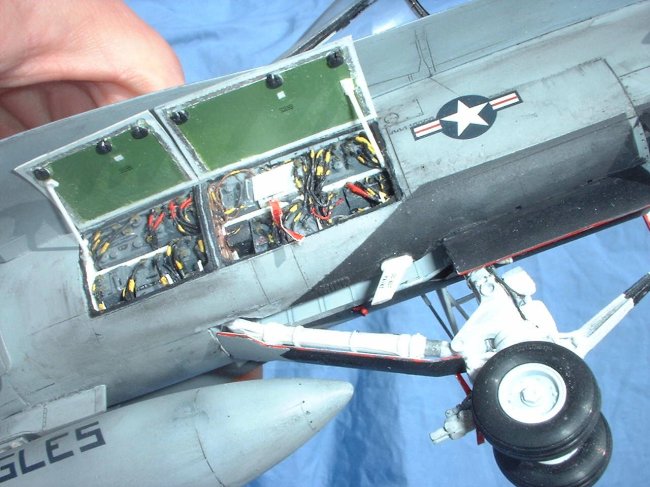
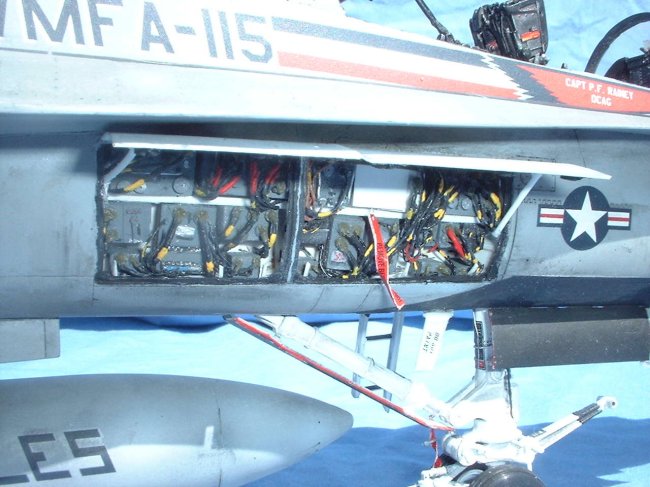
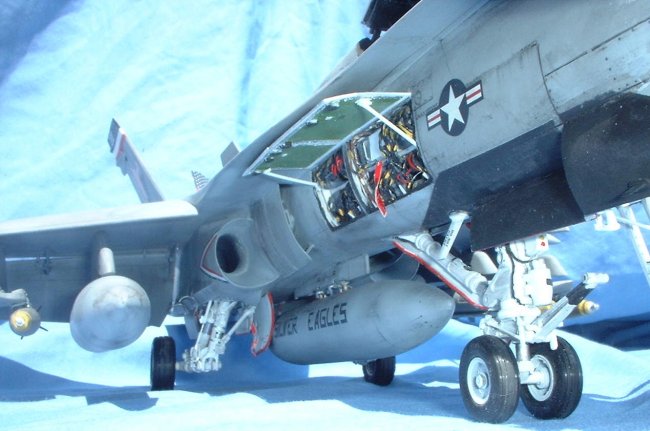
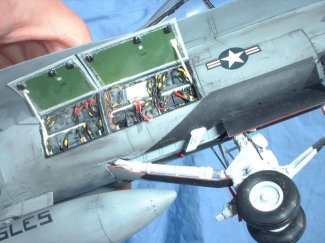
Not satisfied I then decided to open a avionics
bay and scratch build the details.
|
Click on
images below to see larger images
|
 |
|
This may sound daunting but I had recently done
this with a F/A-18F Super bug and I knew it wasn't
that hard, all you need is some good color photos and
some time. The bay was sectioned and walled in using
evergreen plastic stock, with some wires and ribbing
running along the top. The boxes were made by cutting
up chunks of resin pour blocks (don't throw them out
they are useful for a lot of things) and then drilling
out holes for the wiring and adding a few details to
the faces (such as poking holes for circuit breakers).
I latter added the doors, making them from thin
plastic card (I bent them to match the curved surface)
and rod for the latches. I then painted them green and
applied some stencil decals (the kit has plenty- I
think I used a weapon stencil) and outlined things in
aluminum foil (it appears they used foil tape on the
real thing). Although it looks hard it really is
pretty simple to do, and if you have good photos as I
did in the Daco book (they have all the avionics bays
in there) it's no problem to do.
|
Click on
images below to see larger images
|
|

|
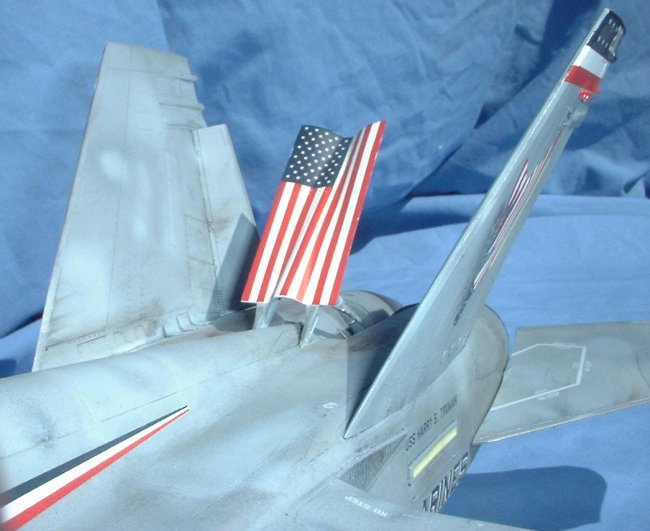
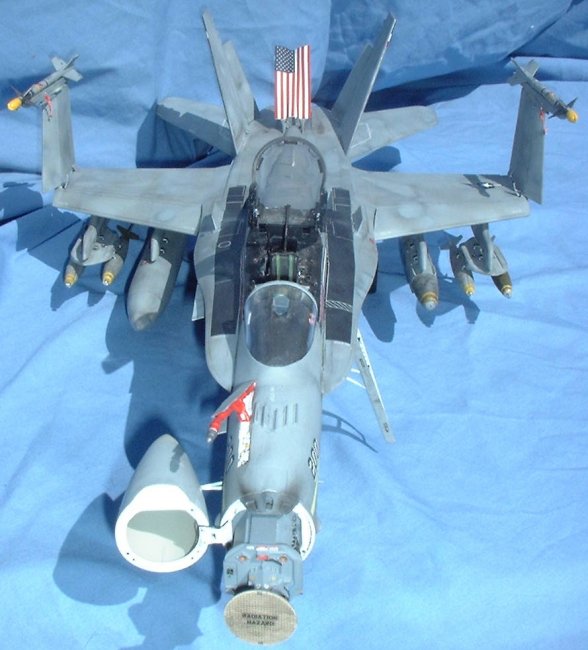
And of course I set the air brake open to show off
the flag, I detailed the inside by adding correct ribs
with rivet holes and I detailed the hydraulic actuator
with some wire and placards.
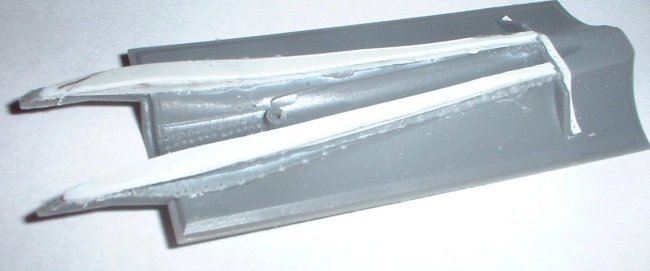
The Black Box fins helped make life easier for me,
I tried to convert a kit fin before I bought the set
and trust me it is very hard to do as the shape of the
RWR antennas are different and it's not just a matter
of sanding off the middle one. The BB fins are very
nicely done, checking them against photos shows they
are a dead on match. That said I was unhappy with the
leading edge of the fin, it was way too thick and
square. This is because that is where the fins are
attached to the pour blocks and this causes the
problem. If I was copying the part in resin after
making the master (I have done this with my own parts)
I would have chosen to make the base of the fin the
pour area, I would imagine that would give a bigger
area for the pour (you need that at the top the mold)
and keep the thin leading edge. That's just my
opinion, and like I said I am glad they include the
part. If
Cutting Edge
had included a fin conversion in
their A model pit set I would have gone with that
instead as I think they do a nicer job (not that BB is
bad) and they include the canopy parts. I am surprised
that CE made a pit set but never made the fin set as
you can't have one without the other.
|
Click on
images below to see larger images
|

|
|
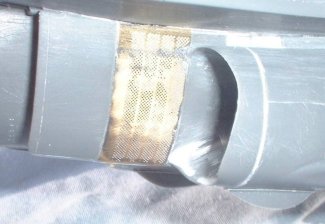
The intakes were a pain in the butt and gave me
the most difficulty of the whole kit, lot's of
sanding! I regret using the Eduard PE for the vortex
generators, they filled in too easily with glue and
paint and didn't add much in the end, should have left
those off. I discovered a trick that I used on my next
kit after I spent hours looking for a perfect seam. If
you paint the lip and the trunk separately (Grey and
White) you can glue them together afterwards and the
seam is where the paint line goes! Save yourself the
headache! It's easier to do this then to try to sand
it smooth.
|
Click on
images below to see larger images
|
 |
 |
After I finished construction, which goes quick
due to the excellent engineering of this kit, I
tackled the painting and weathering process. I wanted
to do this kit after seeing Kaan Gök's article on how
he painted his Hornet
(http://www.arcair.com/tnt1/101-200/tnt119_weathering_Gok/tnt119.htm)
and I had to try my hand at doing the same thing. I
began by laying down the base coats of light and dark
ghost Grey (lower and upper surfaces of course) as
Kaan had done. I then began weathering the hell out of
it using the chalk pastel sludge method, dirtying it
up and staining the paint a darker Grey in the process
(as it is on the real jet), leaving some areas more
dirty than others (such as the rear underside as this
is always stained from the APU). I then began the spot
painting over the dirtiness.
I have had my Testors Aztec airbrush for three
years and it wasn't until now that I figured out how
to use it to get the right affect. I have always
pushed down and pulled back on the lever and just
blasted away using masks to control
the scheme with a lot of over spray. Although it works
for most basic jobs I have always wondered how people
manage to free hand camo jobs and some of the more
advanced WW II Nazi paint schemes.
| I have tried before
to be light on the airbrush control and get fine line
results but I was not doing it the correct way. For
those who are like me and have had this problem I will
try to describe the right way for you. It is a matter
of pushing down lightly as you pull back, about half
way each you will begin to get a fine line. I always
pushed down hard and thought pulling back controlled
it. The air is controlled by the backwards pull and
the paint is the push down, it takes a really gentle
touch, I never realized how small the pressure must
be, it is very sensitive.
|
Click on
image below to see larger image
|

|
|
After I figured this out I was able to add very
small spots and fine lines along the panel lines to
match the real thing. This is of course due to the
fact that corrosion control on the boat is always spot
painting anywhere there could be rust, such as after a
panel is opened and screws have been turned. I used
both dark and light ghost Grey to apply the spot
paints in random order and because of the underlying
dirty paint the fresh paint gives it that contrast and
spotty appearance. This look is one of my favorite
things about modern US Navy aircraft and why I am so
attracted to modeling them.
This aircraft is a CAG jet and I know some of you
out there think that CAG jets never get dirty, well
you are wrong! Sometimes CAG birds are line jets that
receive CAG markings over their dirty paint, other
times they just get dirty during the cruise. The
NATOPs guidelines state that no complete repaints can
be done during the cruise only spot paints and that
includes CAG jets. I really liked this CAG bird
because it was so dirty and colorful at the same time. I tried to match and create the exact same pattern on
my model as was on the real jet. I had a decent amount
of photos of this aircraft thanks to the US Navy
website (http://www.news.navy.mil/) and
came pretty
close to the real thing, I was happy with the results. I of course had to average things out since weathering
changes over time and no two photos are exactly the
same. If those clean paint job guys out there still
doubt me take a look at these photos of this jet on
it's latest cruise, it's still just as dirty as it was
during the Iraq war;
http://www.navy.mil/view_single.asp?id=22577
http://www.navy.mil/view_single.asp?id=22562
http://www.navy.mil/view_single.asp?id=22450
Judge for yourself how dirty and patchy the paint job
is, anyone out there who paints this jet in monotone
Light and Dark Ghost Grey as though it's a air show
plane is wrong.
The decals were both good and bad. I love
Twobobs
subjects and all the variety that they bring to our
kits, bravo as always to them! But they are also not
the easiest decals to use, mostly because they are
super thin and can break up easily and sometimes come
off after you think they have set. I had a lot of
break up with mine in the red white and blue areas and
was able to restore most of it thanks to cutting
strips from the VFA-201 decals also on the sheet (the
colors match). The flag decal on the air brake was the
best of the bunch and the fin tip stuff was the most
difficult, I also had a major break up on the stripe
behind the VMFA-115 titles on the hump after I had
clear coated (what fun that was). The fin tip decals
were actually too small and the blue at the top needed
some extra filling (again from the VFA-201 decals)
this may have been because I was using the Black box
fins and the decals were sized for the kit fins (which
are wrong to use of course). I don't fault Twobobs
for all this, they did a great job with the artwork, I
would fault Super Scale who prints the decals for
making them too thin. If I had known how ultra thin
they were I might have coated them with some liquid
decal film to make them stronger (Micro-sol makes
that). I am not saying that Super scale needs to make
them an inch thick, of course thin is good, but we
still need them to hold up during application and not
rip and tear. One note about the artwork on the sheet,
I believe that 2 Bobs researched the jet after it had
returned from Iraq as the photos on the instruction
sheet show a fresh paint job and it has a "Iraqi
Freedom" seal on the ammunition door (I never found
any other photos of this and I think it was only
temporary) so I decided to drop this. The eagle and
the flag on the tail also seamed to change mid-cruise
(I found photos before and after the change, both
during the war) so the 2-bobs
decals were correct for
latter in the war, and seam to be current to the jet
now (although the speed brake has the CAGs name on it
now- see photo links above).
After all the painting and weathering I proceeded
to the final touches and gluing on of the small stuff.
Everett
|
|