|
Contrail are long
out of business now, but in their day were second only to Rareplanes in the UK
as manufacturers of great subjects in Vac-Form. Some of their kits have been re
released by Aircraft in Miniature, and Sanger, who between them seem to have
most of Contrail's moulds.
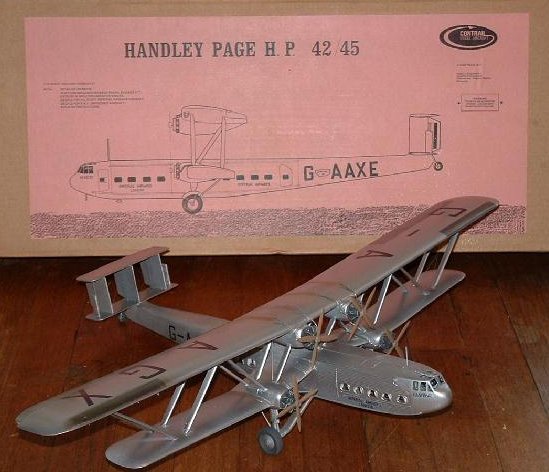
This is a very
impressive kit, a huge box, packed with Vac formed parts, as well as a lovely
decal sheet, a large instruction sheet, a bag of injection moulded parts and a
huge sheet of detail photographs of the prototype.
The decal sheet
gives you a choice of aircraft - any of the HP42s that saw service with Imperial
Airways as airliners, and a couple in RAF camouflage which were transferred
from Imperial to military duties.
The instructions
are a mixed bunch: the sheet of detail photographs was very welcome, being as
they were, both large and well reproduced. The main instructions were printed on
good quality paper on an A2 sheet, with a set of 1/72 scale 3 view drawings.
Initially, I was pleased with the drawings, but several times I was to find that
the parts were so different from the drawings that it was impossible to use them
for reference without re-shaping most of the kit parts. As it is, I decided to
use drawings from the internet for scale reference and take all measurements for
structure from the kit parts.
Speaking of
which, the vac formed parts are another variable lot, veering from superb (the
upper wing) to "oh dear" (fuselage halves).
To be fair, the
HP 42’s corrugated forward fuselage must have been a nightmare to accurately
mould in this medium, and quite clearly, hundreds of the breather holes
necessary in vac forming were needed to get the plastic to sit in the moulds
properly. Unfortunately, the sheer number of the resulting "pips" as
well as their location means that it was impossible to remove all of them
and stay sane.
The Injection
moulded parts: engines, propellers, wheels etc are really very basic, and indeed
crudely moulded in very brittle plastic. I would have preferred better raw
material to work with, but the owner of the model wanted it built straight from
the box.. That said, with work, they look okay and do the job.
A sheet of clear
plastic is supplied for cabin and fight deck glazing, but I elected to use
Humbrol Clearfix instead, particularly as the cabin windows were all moulded
slightly differently: unsurprising given that the kit is 30 years old and the
masters would all have been made by hand. Using Clearfix meant that I would not
have to tailor each window exactly to its’ aperture.
The kit really is
a product of its’ time, and was a much more challenging than I anticipated,
with a rather unique approach to the interior, and some odd discrepancies as
regards the drawings when compared to the kit parts.
Construction
starts, not unusually, with the interior. However, this is where similarities
with other kits end: firstly, there is almost no interior detail provided
for the flight deck, which is a shame considering the highly visible nature of
this area behind the very large glazed area. Secondly, a complex sub structure
is provided for the cabin area, with different layouts for the two different
operating divisions - East or West.
I fabricated a
basic but more than adequate cockpit from the contents of my spares box and some
plasticard, with steering columns made from fine wire. The instrument panel was
the only detail provided for this area in the kit.
The Cabin was
supposed to be made up from two clamshell halves, incorporating the curtains for
the windows, and a series of walls and seats, which would then be inserted into
the fuselage before closing it off.
Nope.
Didn’t fit at
all well, and I was worried about the possibility of the whole lot coming loose
one day and turning the model into an elaborate marraca.
So, the walls of
the cabin were separated and secured to the inside of the fuselage, and the rest
of the detail added in the normal way.
Here’s when I
found my next..er..Challenge. The seats were so poorly moulded that the
suggestion of filling them with car filler was out of the question - they would
simply have melted, so after narrowing down the seats that were useable, I
filled them with Milliput and hoped for the best.
Thankfully, the
seats I had were fine, but I was some seats short of a cabinful (some would say
that’s what I am most of the time) Still, the seats, walls and kitchen area
were all painted up, and, quite frankly, you can’t see them anyway. Still, I
know they’re there. (Most of the seats, anyway)
All of this work
done, it was time to close the fuselage, and here I was most impressed: the fit
of a lot of Vac Forms leaves much to be desired: it’s not uncommon for left
and right handed parts to be slightly different in size, but there were no
problems here. There are 3 bulkheads, and all helped in keeping the, frankly
huge parts together.
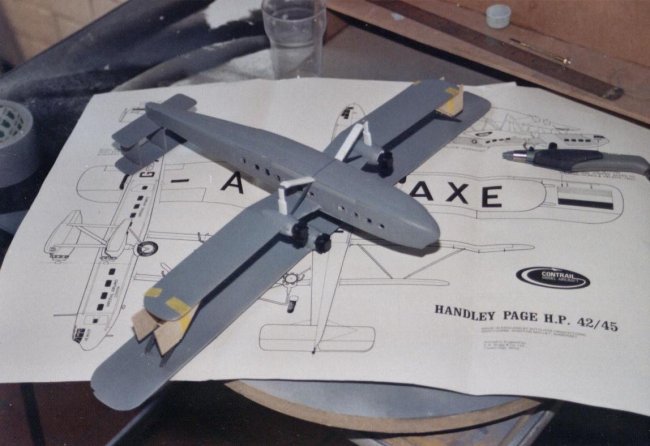
The wings came
next, and were actually pretty standard for a large vac form in that the top
wing needed to be strengthened. I used a balsa wood spar in 3 pieces, cut to
maintain the correct dihedral, and four large balsa hard points to maintain
rigidity near the struts.
The lower wings
were less of a delight, with the port wing being slightly longer than the
starboard. Still, easily fixed, it just reminded me to keep checking everything
as I went.
A second balsa
spar, with the correct anhedral for the lower wing roots was made and inserted
into square holes cut into the fuselage walls, and the wings slipped over them
and secured with Cyano and a good helping of Miliput to close the join.
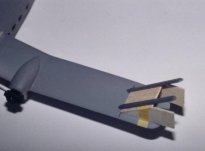
This left the
tail and detailing to be put together, and apart from the fact that the tail
surfaces were moulded in stock that was really far too thick for the job,
necessitating a Herculean effort of sanding back, this was all pretty
straightforward.
Until you try and
secure the tail unit to the fuselage. In Contrail’s defence, I must point out
that they do admit moulding the wrong camber onto the tail seat, and it’s a
really simple job to stick some more Milliput in the hole.
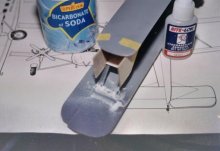
Getting the top
wing on was going to be interesting, so I had some tea. Then some more tea. And
some cake. Finally, I decided to make two balsa jigs for the outboard struts to
hold them at the correct angle while the glue (a mixture of Cyano and baking
soda - very strong but it left a small fillet at the base of each strut. I
considered this a fair compromise for getting a good secure joint and finishing
the model before judgement day) cured. When the struts were cured, the upper
wing was glued into place using the same concoction. This left the top wing,
secured by the four outboard struts, resulting in my being able to cut the
remaining struts to length and being able to glue them at both ends to each
wing.
It also resulted
in the strongest strut/wing joints I have seen on a plastic model.
|
Click on
images below to see larger images
|
|
|
|

|
I now tackled the
under cart, which is built rather like the undercarriage of a flying model:
it’s a bent wire, clad in plastic fairings. Unfortunately the drawings show a
wire shape/length and fuselage thickness that are too narrow. Basically you need
about five millimetres more on each end.
Still, nothing
that couldn’t be fixed…
The model was
painted next: window openings were masked off and the model primed with Halfords
grey primer: this stuff really is excellent.
Next a coat of
Halfords Ford Galaxy silver gave me my basic silver finish, and a foundation to
work on.
The rear of the
fuselage was airbrushed in Humbrol Metalcote Matt Aluminium and given a good
polish. Various areas were then shot with Metalcote Gloss Aluminium, Metalcote
polished Steel, and other Humbrol variants of silver, to reflect the differing
materials used on the original aircraft. Tyres were painted dark grey, as I hate
seeing black tyres- far TOO black. A dark grey gives you a better scale effect
in my belief.
The instructions
recommend that you use a strip of plastic rod supplied to represent the exhaust
pipes, but I found it to be unusable, possibly due to age, as it was very
brittle. I used wire instead. The exhaust on this aeroplane really are that
skinny.
The engines were
added, and painted with a mixture of greys and dry brushed with Humbrol
Aluminium. Holes were drilled in the engine fronts to take the Prop axles, and
the props painted in a dark brown and drybrushed in various lighter shades to
represent the mahogany of the real thing. Boss detail was dry brushed.
Nearly done!
The decals were
next, and were a lovely surprise in a kit of this age. They were superb: well
printed, in register, thin, and the colours seemed perfect. I used Micro Sol and
Set to settle the decals into the fuselage detail, and to help minimise the
carrier film. I then applied a coat of Klear and left it to cure.
Only two stages
next: weathering and rigging.
Weathering was
not a huge task, as the real aircraft seemed to have been kept very clean, as
befits a world leader in the airline industry.
I kept it simple
and gave the aircraft some exhaust staining and shaded some control surface
panel lines, finishing it off with some earth colouring over the tyres.
Finally, the
rigging. Dead simple for this lovely aeroplane: the HP42 hardly had any rigging,
unusual for a biplane. This is because the aircraft used a Warren girder
construction for the wing bracing, largely negating the need for wire bracing,
except for at the outboard struts.
The tail has some
rigging also, and it wasn’t until I had applied some rigging to the
undercarriage that I realised that the drawing I was using for reference was
wrong.
I have checked
lots of pictures, and found no rigging anywhere on the under cart. Bah! Rigging
by the way was achieved with a very small drill, some cyano and some invisible
mending thread.
Unfortunately, as
the model was to be posted, it was not possible to rig the radio wires over the
wings, as they would have been damaged no mater how well I had packed it for
transit.
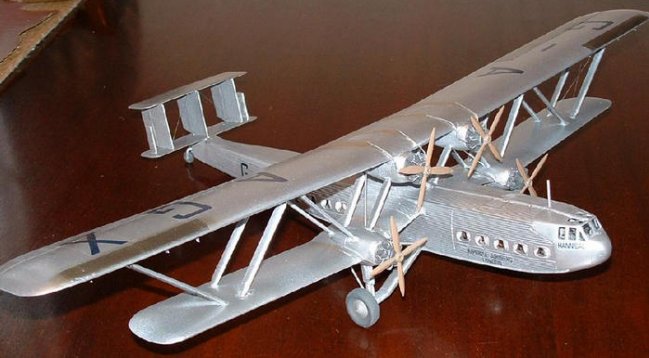
Overall,
challenging as it certainly was, I really enjoyed building this kit, it has
its’ faults, but doesn’t everything? It builds up into a very impressive
finished article, and it’s certainly a change from F-16s.
Recommended, but
NOT for beginners.
Stuart
|