|
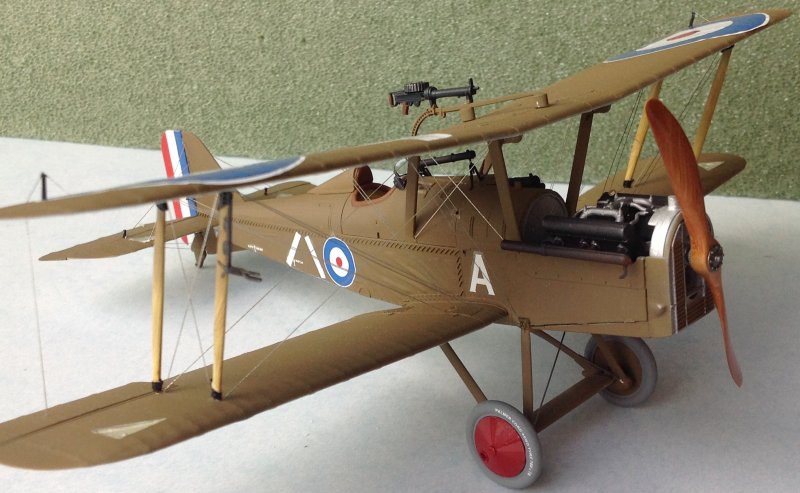
The SE5a reminds me of a racehorse. The rake of the wings and angular lines of the fuselage look like it is at the starting gate, ready to go all out.
The SE5a (Scouting Experimental) was designed by the engineers at the Royal Aircraft Factory. It was a minor modification to the SE5, the main difference being the removal of a partial clear canopy.
Previous to the SE5 and SE5a the RAF had a rather poor history of producing effective fighter aircraft for use by the Royal Flying Corps. Together with the Sopwith Camel, the SE5a formed the bulk of aircraft for the last 1 1/2 years of the War. While exact production numbers are not available, it appears that a little over 5,000 SE5a were produced.
Wingnut Wings chose the SE5a as one of its first kits for what was then a new line of 1/32 World War I airplanes. The SE5a was always one of my favorite airplanes, and after buying the kit years ago, I put it aside.
The, for the times, rather high cost combined with my skill set left me a little afraid of tackling the kit. Anyway, I finally got around to building it. My fears were unwarranted. The kit goes together like a dream. One of the nice touches is that WNW provides alternate fuselages.
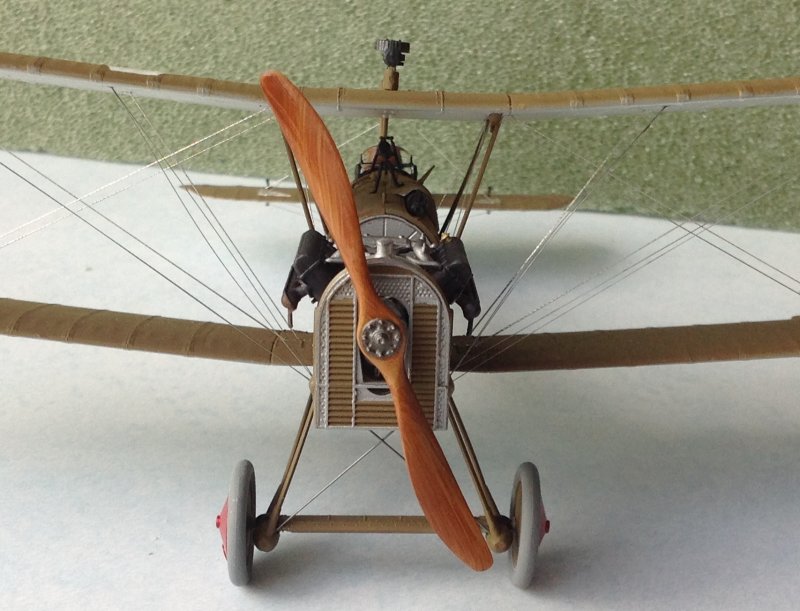
Some SE5a fuselages had a kind of wrinkled look while others looked tight as a drum-head. I chose the wrinkled look based on the pictures I had showing the SE5a I was going to build.
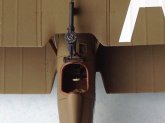
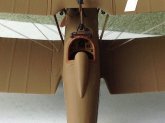
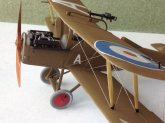
A few suggestions on construction. As with all WNW kits, the tolerances are tight, so don't let any paint get into the holes for the struts, etc. I usually take time and fill the holes with Silly Putty before painting. It only takes a few extra minutes, but the result is a nice tight fit that makes alignment easy. All mating surfaces should be free of paint. There is a ring and bead sight as well as a telescopic one. For the ring and bead, the photo etch part (P-4) is very difficult to fit properly around the Vickers. I would just cut off the actual concentric circle, drill a small hole in the barrel and glue it into that. The ailerons, elevators and rudder all have hinges that allow for a nice looking but very fragile fit.
I cut off the middle part of the hinge and replaced it with thin wire. I then drilled a small hole between the other two parts on the receiving end.
Some ca and the hinge is now strong enough to withstand all the handling a bi-plane is subjected to during rigging.
|
Click on
images below to see larger images
|
|
|
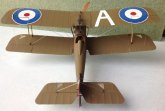
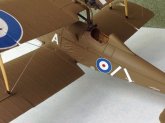
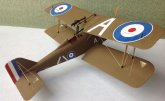
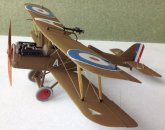
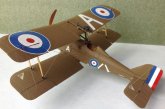
There are 5 different schemes in the kit, but I wanted to do something different. I had decided to do the SE5a flown by Capt. Bogart Rogers, an American who volunteered to fly for the RFC. Rogers is credited with 6 victories while flying with 32 Squadron during the second battle of the Marne and the Somme Offensive. His primary plane was D6991, built by Wolsely Motors, Ltd. Rogers was the brother of Adela Rogers St.John, the famous Hearst journalist and the son of Earl Rogers, a pre-eminent trial lawyer in California. Rogers left Stanford during his sophomore year with 4 friends to volunteer to fight for the British. He was the only one to survive the the War,
His letters home to his fiance were edited by John H. Morrow, Jr. and published by the University Press of Kansas in 1996 as "A Yankee Ace in the RAF". After the War, Rogers returned to the US and became involved in motion pictures. He wrote and/or produced numerous movies such as "The Eagle and the Hawk", "Pigskin Parade", "The Man from Down Under", "White Fang", "13 Hours by Air", "Reunion" and "Everybody's Old Man." He also served as technical adviser on the 1931 film "Body and Soul".
Rogers invested in a horse-race photo-finish camera system, Photochart, Inc. that became the norm in the horse racing industry. He was the President of the Corporation and switched his writing skills from movies to sports. He died at the Hollywood Park racetrack on July 24, 1966.
Rogers scored 4 of his 6 confirmed victories in D6991. I couldn't find a decal for this number either online or in my decal box, so I went without it. It was in white on the fin, with the D separate and above the 6991.
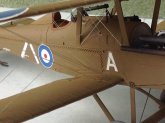
Rogers was in A flight, and from looking at the pictures I could find, it looks like all the A flight SEs had an "A" on the front fuselage and a large "A" on the top wing. I was able to find these in the decal dungeon.
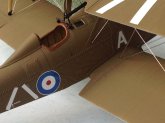
Rogers had cut down the cockpit coaming but I felt reluctant to try this.
He had the engine exhausts cut short so that instead of extending to the mid-point of the cockpit, they ended closer to the front cabane. This was something I felt comfortable in doing and cut the exhausts off accordingly.
Rogers attempted to darken the white on the fuselage roundel with PC-10 to make it less obvious. The photo I was basing things on was taken before this was done, so I left the white untouched. Finally, I painted the wheel covers red, a distinguishing color often used by RFC/RAF fighter squadrons for their A flight airplanes.
For PC -10 (Protective Covering 10, the dope used on most RFC/RAF airplanes ), I used Model Master's Field Drab enamel. I have played around with different colors depending on my mood, and I like this one as well as Model Master's Dark Earth as a good approximation of PC-10. The composition for PC-10 was iron oxide, lamp black and yellow ochre in cellulose dope.
Depending on the factory and when the dope was mixed, colors ranged from olive green to chocolate brown. Since most of the books I've read from pilots who flew in WW I often mention chocolate brown in describing the color, that it what I usually go with. For the clear doped linen I tried something new, MRP CDL(Clear Doped Linen) #1. It is already pre-thinned and is designed to be air brushed. It gives a white look to the undersides of the wings and fuselage and I think this provides a nice contrast with the PC-10.
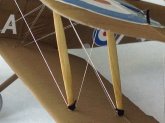
Rigging is what scares off many modelers from doing bi-planes. The rigging on the SE5a is not for the faint of heart. If you are looking for a first biplane to rig, don't try this one. WNW provides small locating holes where the rigging enters the wings , fuselage, etc. I use a silver embroidery thread that I picked up at the local sewing goods store. I drill a hole part way through the bottom of the upper wing and all the way through the bottom wing. Insert thread into the upper wing hole, apply ca and let it set. Then, drop the thread through the appropriate hole in the bottom wing, apply some type of weight to the end of the thread (I use a locking tweezer) to pull the thread tight, apply ca and let it set. Cut off the excess thread and done! The double flying wires can be a bit tricky, but use the supplied pilot holes and a #80 drill bit and you won't have any problem. The kit's instructions provide a pretty good rigging diagram. For the landing gear rigging, I used 2 pieces of thin wire applied with ca.
The landing gear on many WNW kits is scale appropriate but that leaves things a little bit wobbly. The thin wire provides a sturdy base so that is what I usually use instead of thread. I suspect stretched sprue would also provide the needed sturdiness.
WNW kits allow a modeler of modest skill to turn out a finished product that looks great. Take you time, make sure mating surfaces are free of paint and think through how you want to rig the plane. The building of one of their kits will give you hours of enjoyment,
Mike Muth
|
Click on
images below to see larger images
|
|
|
|