|
Hello, fellow modelers and readers!
The armistice that marked the end of the World War I, the so called Great War, was signed by November 11, 1918, a hundred years ago. I'd like to commemorate this important date with the second Fokker Dr.I that I post here at ARC (the first one was Manfred von Richthofen's last aircraft, and was posted on the 95th anniversary of his death.)
Eduard's 1-72 scale Fokker Dr.I kit is a very good. Although mine it's not the ProfiPack version, its cockpit is well detailed, and the kit includes vinyl masks for painting the tires. The fabric textures are delicately represented. The rudder and the stabilizer are perhaps the thinner plastic parts I've seen in any kit. I have few complaints about this kit. The first one is that the plastic is very hard. This fact on one hand made it very difficult to drill holes for the rigging, and on the other hand, combined with the fact that the struts are attached to their sprues at odd places, made it very easy to break the tail struts. My second complaint is that the piece that represents the Oberursel rotary engine is overly simplified and lacks the cylinder push rods. I cannot figure out why Eduard missed this important detail, it was included even in the old tooled Revell kit that I finished five years ago.
My third complaint is related with kit's decals. The kit is intended to be built in two versions, one flown by Manfred von Richthofen (not his last aircraft,) and the other flown by Rudolf Klimke. I first chose to build Klimke's airplane, with its eye catching anchors, because I already had one flown by Manfred von Richthofen.
I began building and painting the cockpit, the fuselage and the tail. After painting all the yellow parts with RLM 04 Gelb, I took the kit's decal sheet from the sealed container in which I keep all my decals in order to measure the anchors that go over the fuselage, and sadly found that the these anchors were printed black, but they should be yellow. Because of this fact, the kit cannot be built as Klimke's airplane unless appropriate aftermarket decals are purchased.
|
Click on
images below to see larger images
|
|
|
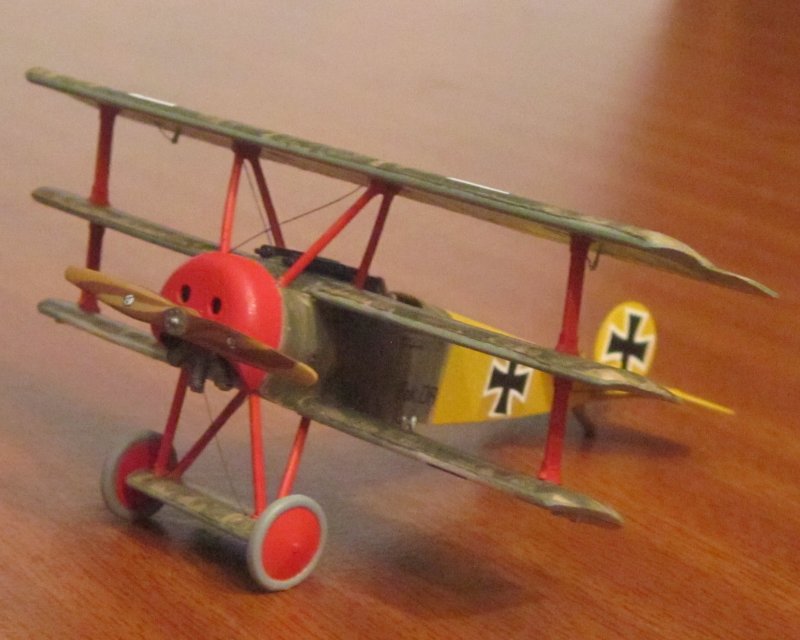
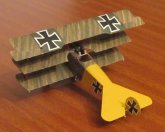
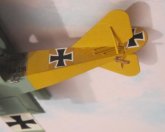
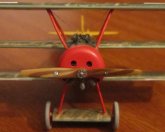
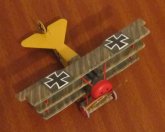
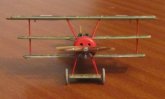
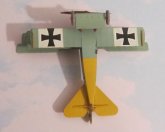
I searched the internet for other painting options, and I found that the best choice for me was the Fokker Dr.I flown by Manfred's youngest brother Lothar, who had 40 confirmed kills, survived the war and later flew commercial airplanes until his death in a flight accident in 1922. This option was my best choice because it has a yellow tail, as Klimke's aircraft, so it was only necessary to enlarge the yellow area a bit (including the rudder,) and to paint the struts, the cowling and the wheels' disks with Hu 174 Signal Red.
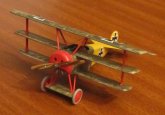
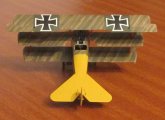
Surprisingly, I found three different paint schemes for Lothar's airplane: the first one with the upper surfaces of the top wing painted overall yellow, the second with these painted in yellow, with the addition of green rectangles backing the top wing crosses, and the third with the upper surfaces of the top wing painted in Fokker streaked camouflage and with the same green rectangles. I chose the later after reading the article by Tomasz Gronczewski at IPMS Stockholm,
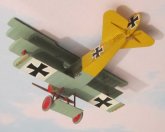
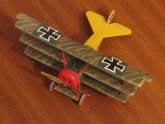
http://www.ipmsstockholm.org/magazine/2002/08/stuff_eng_profile_dr1.htm. The profiles included there show that Lothar's airplane ID numbers 454/17 were covered with yellow paint on the port side, so I could cut the numbers and use only the "Fok. DR" portion from one of the decals already included in the kit. Although isn't shown there, I deduced that numbers 454/17 should be visible on the starboard side, but I'm not able to reproduce them faithfully.
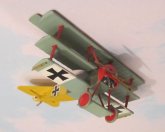
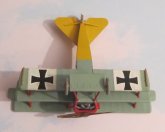
There are other details particular to Lothar's airplane. First, the wings and fuselage crosses are backed by rectangles of different colors: olive green for the top wing, white for the bottom wing and burnt yellow for the fuselage (which I got by mixing Insignia Yellow Hu 154 with Brown Yellow Hu 94 in 3:1 proportion.) Additionally, the metal portion of the top fuselage, between the cowling and the cockpit, is painted solid olive green, not Fokker streaked camouflage.
Happily, when it was still possible in my country to buy things from the Internet, I bought Xtracolor German WWI Topside Green, German WWI Underside Blue and German WWI Topside Purple (which will be used for an Albatros D.V), so I could paint my Fokker with the most accurate paints available for
German WWI airplanes (IMHO,) although I mixed Underside Blue with Hu 122 Pale Blue in 4:1 proportion to tone it down a little.
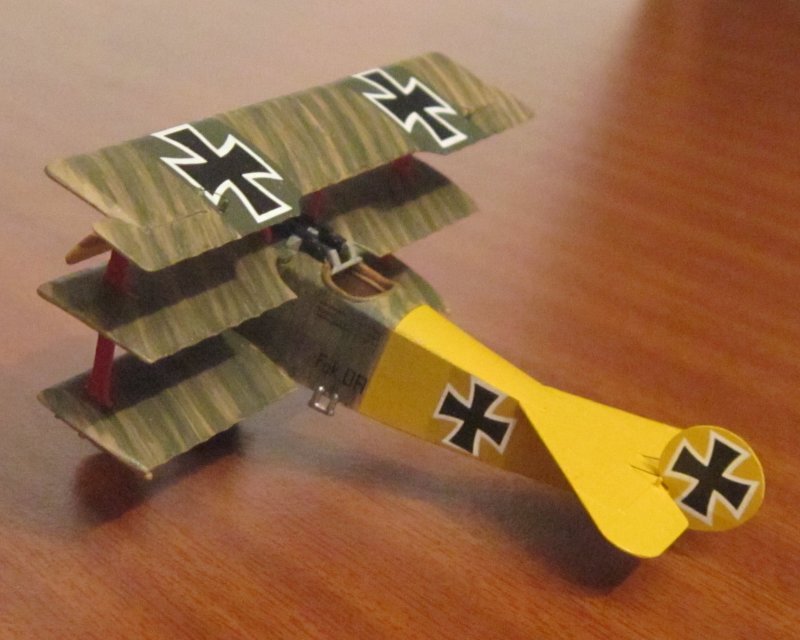
The most difficult thing regarding this build is to paint the Fokker streaked camouflage. I began by masking the already painted yellow and light blue parts and then painting the doped linen. I read somewhere that
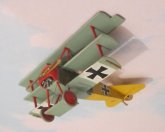
German doped linen is darker than the British one, so I tried Tamiya Wooden Deck Tan, but I found it's too dark, so I lighten it with white in 2:1 proportion. The next step was applying a coat of acrylic Gloss Clear to isolate the doped linen undercoat from the German Topside Green enamel overcoat, which was streaked over with a brush. I used vertical strokes on the fuselage sides and angled strokes on the wings, the fuselage top and the rectangular winglet that lies between the undercarriage struts.
I had a little trouble with the German Topside Green paint because it didn't run well over the gloss clear cote. Now I think it would have been better to leave the tan color (which is acrylic anyway) without any clear coat. I would also recommend to paint the solid green portions before applying the streaked camouflage, not after that, as I did, because some brush marks show under the solid green.
I applied the decals and the final satin clear cote while the main parts where still separated, so the last step in the build was the assembly of these parts, and the rigging. I began by gluing the middle wing and the cowling-engine-propeller assembly to the fuselage, later I added the outer wing struts. The best way to attach them was a very tricky one: I first dry fitted the parts and found that I had to enlarge the middle wing slots a little, then I inserted a bit of each strut through each slot, added plastic cement to the already inserted struts, and adjusted their positions so they could match the attachment points on both the bottom and middle wings. If the cement would have been applied before the insertion of the struts through the slots, a mess would have resulted that would have damaged the struts' paint job.
Well, after a lot of research and work I'm truly satisfied with my tiny Lothar von Richthofen's Fokker Dr.I. It's the third, the better, and will surely be the last, Fokker Dr.I kit that I have built.
Greetings from Caracas, Venezuela, the country in which a single kitchen egg nowadays costs twenty times the cost of a 105 square meters apartment seventeen years ago.
Orlando Sucre Rosales
|
Click on
images below to see larger images
|
|
|
|