|
Manufacturer website:
https://www.kittyhawkmodel.com/
Mfr Stock No.: KH80154
MSRP: $55.99
Provided by: Kitty Hawk
Vendor Web Site: https://www.kittyhawkmodel.com/
Direct Link to Item: https://www.kittyhawkmodel.com/copy-of-kh50003
DISCLAIMER- Upfront honesty, I had more than a passing hand in producing this kit. Myself and Ray
Wilhite, were responsible for providing input for the CAD of this kit and proofing the CAD designs. You'll note that the Werner's Wings logo appears in the lower right corner of the box. Anything I find wrong, you'll know about. If you know me, you know I'm honest. I, along with Ray, take complete responsibility for the kit. Drawings and instructions not so much, we have no input on that. I did provide the four marking options for the US Army.
I was very disappointed when Kitty Hawk decided to release this kit in 1/48th scale instead of the originally announced 1/35th scale. But once I got the kit in my hand, I was excited to see kit in person. If I'm hyper critical it is because I'm so close to the project. I take full responsibility for any errors.
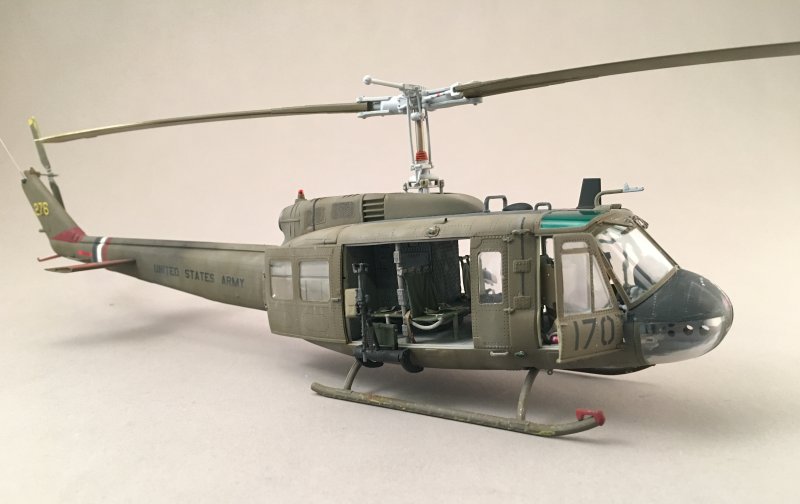
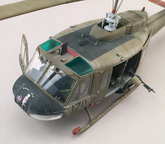
The model comes in a sturdy cardboard box with some beautiful artwork on the front. The kit should be marked as UH-1D/H and not just a UH-1D. The only differences are the engine, which is externally identical, and the position of the pitot tubes. The UH-1D has them on the nose along with two FM whisker antennas while the UH-1H, except for the first few, has the pitot tube on the roof. That said the box top Huey doesn't have either pitot tube. I've looked everywhere and could not find any short shot parts which were a problem with some previous Kitty Hawk kits. This is because KH has changed the company that does the injection molding and the metal cutter. There is a little flash on some of the parts, but nothing too bad. The surface detail is exceptional. There are recessed rivets on the kit. Some have complained about that but in this scale they are prefect representation and not replication of the real thing. Panel lines are recessed.
Inside of a small cardboard box are all the clear parts. They are thin and very clear. The windshield and upper windows are molded together and because of this there is no seam and the greenhouse is faired in properly. One thing that we discovered was the left side windshield has an angled bracket at the top corner. Not a big thing to me, but it is not quite correct. There is a clear sprue which is packaged inside of plastic wrapping inside a sturdy cardboard box so there is little chance of damage.
A fret of photo etch is included with a protective film on it. The fret has all the screens and seatbelts that are required for the kit. It also has tie down rings, a first, and tow rings, another first in any scale. The pilot shoulder harness is a little long. We'll see how we deal with that when we get there. There are also bipod mounts for the kits M-60 machine guns.
There are two decal sheets. The first one is the larger of the two. It has the basic markings but limited stencils. This oversight will be addressed by Werner's Wings shortly, but it should have been caught by
KH. We provided the markings manual to the artist. There are markings for four US Army
Hueys, One D and three UH-1Hs. There are makings for a German Army, Tiawanese Air Force and a Japanese Army subject. The decals are crisp and in perfect register. The second sheet contains the nose art for the four US Army aircraft and the instrument panel. The nose art is some of the best I've seen. Photo quality. The instrument and center console are included. The instrument panel is on a black background. This is not correct for a Vietnam era helicopter, but that just means I'll have to paint it. Surprisingly there is a lack of stencil decals.
|
Click on
images below to see larger images
|
|
|
The instructions are printed in a booklet on 24 pages. The instructions are easy to understand, IF you are putting everything on the model. Where the instructions fall down is they don't identify what options belong on which version. Not all the parts belong on every version. Unfortunately, the profiles don't show what should be included on which version. I'll explain what parts don't belong on a Vietnam era Huey as I progress this build.
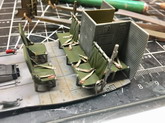
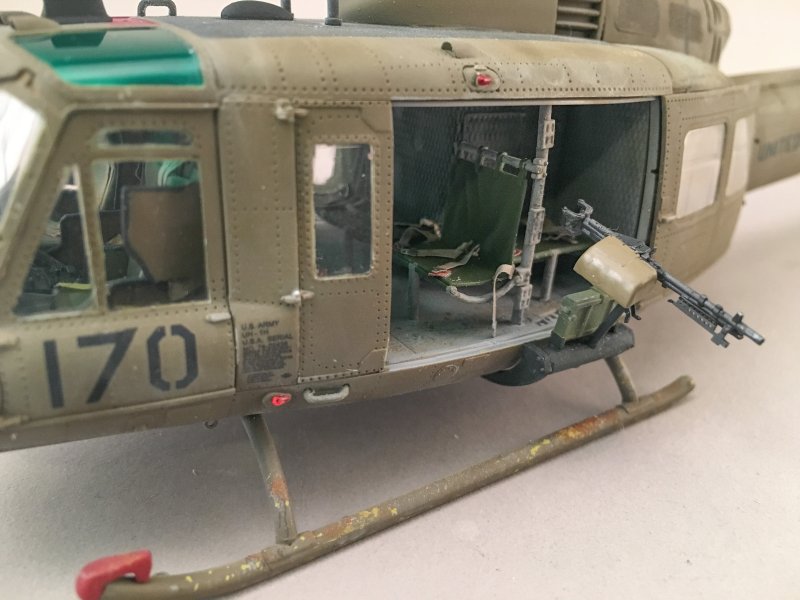
Let's get started and see how well it fits. Like most models this one starts in the cockpit. One thing that I noticed was the inclusion of the fire extinguisher is included. The first oops I noticed on my example was the omission of the mounting ledge for the transmission. The floor features an accurate tie down pattern. The detail is impressive. The transmission area and roof has the sound proofing quilt pattern. The instrument panel glare shield has the correct pattern, again a first in any scale. The rear facing seats are replicated for the first time and feature beautifully rendered fabric sagging pattern.
There were some mold marks on some parts. I filled them and then sanded smooth not a real problem. Many will see the three marks on the aft wall as mold marks but they are not. They are holes in the soundproofing. Of course, there should be five and not just three. I used a punch to add some additional detail to them so they didn't look so much like mold marks.
The instrument panel decal is a flat black type which is not accurate for a Vietnam era aircraft. The Vietnam era had light grey instrument panel. This wasn't an issue I just painted it with Gunze and brush painted the instruments. I used some aeroscale instrument decals to replicate the markings on them. I flat coated the interior with Alclad Flat Clear. When it was all done I sealed the instruments with some Microscale Krystal Kleer.
For the first time, the armored seats seats are included in the kit. They are really nice looking. These are even better than some resin seats I've seen. One thing I did noticed about the interior was that the rear well seats should have two vertical supports and not just one. Something we completely missed. The seats were painted Model Master Field Green.
I did notice that the shoulder harness on the armored seats were too long. I just cut them at the buckles and around the curved portion. Then it was just as simple as lining the two cuts up and attaching them. That meant that the lapbelts were not represented. I used masking tape cut to shape and painted to represent the lapbelts. They were very effective.
The seatbelts for the rear seats are included on the photo etch fret. I folded and molded them so they looked arbitrarily placed. The one side had a little leather piece so I decided to add this as it would be easy. I just cut some masking tape and painted it Vallejo leather. This was slipped under the appropriate side. The buckles were painted with Citadel Chain Mail silver.
I painted the interior with Gunze light grey. There are yellow stripes around the door and door frames so I added those. Now I did find that there were five different types of warning areas for the door so I just selected the easiest one to paint. The floor was given a wash of burnt umber artist oils. Then some chipped paint was added using a sponge technique and silver paint. Some Mig Pigments Vietnam dirt was added to the floor to add weathering.
I masked the sliding door windows and painted them yellow to simulate the emergency markings on them. Once done, adding the windows was no big deal. The hoist panel was added to the belly. It was missing any locating tabs so just align the hoist along the aircraft center line. Not a big deal. The aft cooler panel has you add a photo etch cooler in it. There is a slight problem. The plastic piece is not rectangular shaped and the photo etch is. You can either sand the photo etch or slice the panel to get it to be squared corners. That is what I did and it worked perfectly.
Kitty Hawk would have you add PE parts PE12 and PE15 to the pilot's door. Don't. They aren't there on any Huey I've seen. One other thing I noticed putting the components together was that Part C24 should be rounded. KH has it square. It is easy to take care of with a quick swipe of a sanding stick. Make sure you add the hoist first before you add C24. Don't forget to add the exhaust. Now is the time to do that.
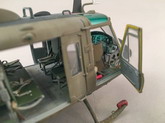
I elected to have the pilot's door open and the copilot's door closed. Just for variation. So before you can attach the copilot door you have to cut off the 'hinge'. Both doors need to be sanded slightly on the inside of part C66 and C65 the door interior and the actual door. When fitted C65 and C66 should fit flush with the door. Before you can add the clear parts you will need to paint the interior color as this will be seen through the inside of the window. All the windows fit perfectly. Zinc chromate was added to the front bulkhead. Everything fit perfectly. If you are not going to have your engine compartment open don't install parts C36.
Now that the cockpit and engine were assembled it was time to join the fuselage halves. The fit of the cabin was perfect. I did have to thin the attachment points for the exhaust. They were just too thick to fit into the mounts. Once I thinned them down there was no problem. I had previously added the tailboom to the fuselage halves. I don't think one way works better than the other so next time I may just follow the instructions and build the tailboom separately. I had to add a spot of filler here and there but certainly not a lot. Just some very small spots probably where I was too aggressive with nippers and sanding stick. One side of the tail rotor driveshaft doesn't have a panel line which was easy to add. I checked my seams with Mr. Surfacer and the fit was so well that I just removed with some Mr. Thnnner.
I test fitted the top part of the nose and noticed that my instrument panel interfered with the fit. Well all I had to do was remove the panel and reposition it. Then the upper portion of the nose fit perfectly. I checked the fit with the windscreen and I noticed something else, the window was too wide. Oh the horror. Wait a minute that doesn't seem right and it wasn't. The roof actually spreads the cockpit area slightly and the fit of the clear part was again perfect. All was right in the world. The fit of the roof was very tight. I clamped the roof while the glue dried. It was exactly like it was designed. Again I was impressed with the fit of the model.
Adding the photo etch to the engine compartment panels was easy enough. I filled around them to fair them in. It would have helped to bend the forward panel slightly at the top.
I added a green tint to the top two windows. I wanted to try a new product, Ammo Crystal Green. I tested the stuff on the bulged window. I was pleased with the results so I taped up the greenhouse windows and then painted the Crystal Green on the inside. I was pleasantly surprised with the results. I'll be using this and the smoke colored clear on my future helicopter kits.
While that was drying I started to get parts ready to put into the windscreen portion of the cockpit. Part A17 does not have the detail that the instructions show it should, which is a shame. I'm not sure what happened here. The detail should have rivalled the center console. At least it is on the top and not seen very easily. Before installing A17 ensure that you open the appropriate holes. If you are doing a Vietnam era Huey then don't open the very front hole on part GP1. That hole is for the Wire Strike and since they didn't come into effect until the 1980s, I could forget about them. While at it, I filled the two spots where part PE10 goes on the outside of the windscreen. That is also part of the WSPS system.
It was time to add the engine panels. They were a little small, around .010. Now before you say I told you so about the modular panels, it was my fault. I obviously sanded the panel too much and had to add .010 styrene to build it back up. I checked on my second kit and by adding the panel right off the sprue BEFORE assembling the fuselage, it fit perfectly. So after correcting my mistake on the engine panels all fit perfectly. I used clamps and tape to hold things in place while the parts set up. The modular design which was much distained by many proved to be a non-issue. They all fit perfectly if you are careful.
I needed to build up the M-23 system on the sides. I had to open the holes for the mounts. It is important to open them up before adding the landing gear while you have access to the spots which are marked on the outside of the kit. If you aren't going to add the system you will have to fill the small outline holes. Again it is important to do that while you have access.
I filled the cut on the skids with Apoxy Sculpt and when dried I sanded to shape. That little booboo was taken care of. Attaching the landing gear themselves was no problem but you have to be aware of a potential problem. Both crosstubes are labeled A26. They are not identical. The stubs where they mount to the fuselage are different. The narrower mount is for the rear. Make sure you identify them properly. The other thing I did which was self induced was that I removed the nub on the inside of the skids. This is supposed to be there to add the tow rings. I removed mine. What I did instead worked even better I think. I cut the tow ring from fret flush on one side and the other side I left the stub on. Then I drilled a small hole in the skid where I should have left the nub and added the ring. This provided a secure mount for the ring. The landing gear was added to the model. Now we were really starting to look like a Huey.
I wanted to build up the rotor system now for a break on the airframe. The breakdown of the parts is awesome, especially for painting. I painted the mast Alclad Pale Burnt Metal like an anodized finish.
For the blades, I primed them with Alclad Grey Primer, then painted them with Testor's Zinc Chromate, just like the real thing. After that was dried I painted the blades with Aeromaster Olive Drab. And then I added a yellow tips again just like the real thing. I did it this way so that when I sand the blades like erosion would they will be visible just like the real blades.
Don't forget to fill the holes on the nose where the antennas and pitot tube go if you are doing a UH-1H. Those things are for the UH-1D.
I filled the rivets on the roof where the walkway and non-skid area were. I used an acrylic filler from AK and wiped them off with water. The walkway was a diamond tread with non-skid paint on it. The pattern is so small you can't see it in 1/48th scale so I just painted that area Tamiya NATO Black when the time came for it.
Little parts are added to the model, like antennas and some photo etch parts. One thing I did do was drill a #78 hole where the tie-down rings go. Then I slid a new Xacto blade in the hole and wiggled it back and forth. This provided a secure spot to add the tie downs as opposed to the flush mount the instructions would have you do.
I recommend that you bend the windshield wiper protectors to shape and paint the inside of them now why you can. The windscreen were added, like the scoops and pitot tube.
Then it was simply a matter of adding the chin bubbles. When they were dry I added the windscreen. I added the chin bubbles with Elmer's Glue just in case I needed to remove them for cleaning later. The windshield as added with Tamiya Extra Thin Cement. It is a big part that is structural so I thought it should be sturdier. It was brought to my attention that the belly is missing a strake on the belly. The kit has one but is missing the other. It is shown on the instructions but is not on the kit.
And just like that it was time to get this model ready for primer. I tried to use my Eduard masks for the UH-1Y that I had but they are not the same shape. So I had to mask off the windows with Tamiya tape and there are a lot of windows. Once the windows were done I used foam cut to shape to fill the door openings. The entire model was then sprayed with Alclad Primer. It was set aside overnight to check for flaws.
Amazingly there were very few spots that needed just a little more cleanup. Certainly a testament to the kit design by Kitty Hawk. Once they were cleaned up and reprimed I was ready to get some paint on this baby.
The first part of my painting process is to pre-shade with Tamiya NATO Black. I don't just do a panel line pre-shade I spray in random patterns to allow some of the black to show through later and offer up a variation on the base coat. Sometimes I even add a white pre-fade, but not this time. The roof and nose were painted normally with the NATO Black. I like this color because it is not a stark color and looks great in scale.
Once dried I masked off the nose compartment, top of the nose and the roof area with Tamiya tape. Then it was time to add some primer to my kit. I used a very thin application of Tamiya Yellow Green over the entire model. This was then oversprayed with Mig Chipping Effects and allowed to dry.
Gunze FS34087 was added to the entire model. Then some highlights were added with Tamiya Buff to various panels and on the top of the model where they tend to fade more. What I should have done at this stage was to add water to the model to loosen up the chipping fluid underneath but I didn't and subsequently forgot to do. So I just wasted that step. No harm, no foul.
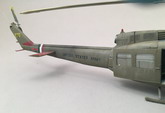
This was allowed to dry overnight. The tailboom stripes were masked off and the white was added first. I use Alclad White Primer and Microfiller for white. It covers quickly and dries almost immediately. Then the blue stripe was painted with Ultramarine Blue. After that, the various parts were masked off for the red portions of the markings were added. Skid shoe tips, a red stripe on the roof and the tailboom 'swoosh' were painted with Gunze Thunderbird Red, this was a very bright color but over the olive drab it dulled down perfectly. KH chose these markings without me so I assumed they knew what they were doing with it. I was wrong. The instructions profile is all but useless. I also masked off and painted the top of the elevators with Pactra Orange Acrylic which I've been holding onto for years because I like the tone of the orange. It isn't a very bright orange. For me it is perfect for a Vietnam era helicopter recognition markings. One of the things that KH screwed up on is the 52 for the left synch elevator. I ended up painting my own. Thanks to Mason Doupnik who drew up the correct font for me. I just printed it out on computer paper, put some double stick tape on the back of it. Then laid some Tamiya tape down on my cutting mat and laid the paper over it and cut out the markings. When I pulled up the Tamiya tape I had a near perfect stencil. I added it to the model and sprayed Tamiya Black. I did have to touch it up but when I was done I was very happy with the results.
The model was sprayed with Future with a couple of drops of Tamiya thinner. This was allowed to dry overnight.
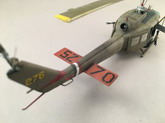
The first decal I added was the Bikini Red decal on the nose. This would make or break the rest of the model. It fit perfectly. You will have to be very careful applying it as there are two areas where the radio compartment access panel should align with the decals. I got close. I had to paint out the 'weathered' decal and re-add the weathering later. Anyhow the rest of the markings worked well. For some reason KH did not give you a tail number for this aircraft so I went onto the 170th AHC Facebook page and they were great enough to give me an aircraft tail number that corresponded to my model. So since I have both Cobra and Blackhawk stencil sheets in the Werner's Wings catalog I just cobbled together the correct tail number. The only other problem I had was that the 170th oversprayed their tail numbers with the last three of the serial number in yellow over the existing tail number. Luckily for me I had some dry transfers that matched the markings and were perfectly sized. I must have been living right. They went on perfectly. All the decals were set in place with Solvaset and allowed to dry overnight. I did screw up one place, the warning stripe on the engine cowling. When I do this again I will not use the decal here. I forgot to trim the excess carrier film off the stripe and because I didn't it didn't look quite right. I ended up cutting and scraping off the carrier film and having to touch up the markings. It came out okay but I should have known better. Remarkably KH didn't include many stencils in this kit. I just had to live with it for now. Werner's Wings will release a set of stencils and corrected markings for all the US Army Hueys on the sheet. I had to add cut the center of the '0's out to match my photos and had to paint a point on the '7's. It was easy enough to do, but I shouldn't have had to do that. Oh well this is modeling and like I said we'll fix that shortly.
Once everything was on and dried I oversprayed everything with another coat of Future and then Alclad Flat the next day.
While that was drying completely I went to work on the M-60 door guns. These things are little jewels in themselves. Very little clean up here. I did remove the aft mount on the guns. There appears to be two. They are to mount the ammo bag. You can't attach the ammo bag with both of the mounts. I simply removed the aft one and attached the ammo bag. The C Ration can was added as well. I did cut off the mount on this and flush mounted this. It looked more accurate to me. It is easier to build up the entire assembly first and then paint in this case. Pay very close attention to the bipod mount and how that folds up. It is gorgeous. The same can be said for the carrying handle and the ring site. I wanted to have one of my guns pointed down in the stowed postion so I attached the swivel at the appropriate angle. I painted the gun Model Master Titanium. The gun components were painted Lifecolor Satin Black. The cover was weathered with a silver pencil since it is often worn.
This kit is the first time in any scale that we have the pintle mount. I bent mine around with tweezers and then splayed the end out like the instructions show. They worked great and look fabulous. The mounts appear to be black on a Bikini ship so I primed them and painted them Tamiya NATO Black. Various items like the bag were painted in Tamiya Khaki. The C ration can was painted as well in Field Green and also weathered with a silver pencil. I set it aside until final assembly.
Weathering is one of my favorite parts of a model. The first thing I did was add a filter to one or two panels. Nothing drastic but the filter does alter the color slightly. Then a wash of burnt umber artist oils thinned with Turpenoid was added to the panel lines and 'splattered' on the model to further break up the OD color. I added dots of artist oils in white and buff on the top surfaces and then blended them in with an almost dry flat bursh with
Turpenoid. This was swirled around to blend it and dragged down the side of the model like rain water would be seen.
After the dot filter dried I added chipping with a silver and #2 pencil. I also used a sponge to chip the landing gear with silver and zinc chromate. Various other parts were picked out for chipping such as grab handles, push latches and some wear and tear areas on the roof.
Some dirt was added to the skids to bland the model with the base and the interior weathering. Mig pigment Smoke Black was added very sparingly to the tailboom as per photos. I went light as it is there but not as sooty as a piston engine. Once I was happy I oversprayed the entire model with Alclad Flat again to blend everything together and protect the pigments.
With that the masks were pulled out of the doorways and a little touch up was added here and there. Canopy masks were next. And they actually worked pretty well. I did have to clean up just a little overspray then I polished them.
I added all the small parts such as the M-23 system, cargo doors and pilot's open door. The lights were added and the model was set aside while I worked on the rotors.
The rotor system is the best representation of the UH-1D/H rotor system in any scale. I love that the main rotor blades are separate items. It makes painting them so easy. I like to wear my main rotor and tail rotor blades. I paint my rotor blades just like the real thing. First off I prime the blades with Alclad Grey Primer. Then this is oversprayed with Alclad Aluminum. That is sprayed with Tamiya Yellow Green primer. Then the Olive Drab is added and the finally the yellow tip is added. Allowed to dry for a few days, I start scrubbing my blades from front to back concentrating on the tip leading edge and working my way down the blade. Always front to back, like the airflow goes. When I get it to where I like it just stop and wipe down the blade. The next thing I do is use the Tamiya weathering powders sand and mud and streak that from front to back as well. That is all there is to it.
Assembling the rotor system is like building the real thing. Take your time and it will all fit. I think that KH actually got the scissors levers mirrored image from the real thing. Still the build-up is impressive.
The tail rotor is another plus as it is the actual type of tail rotor blade as on the real thing. Again something that hasn't been captured before. All is not great, however, you do need to do something to get it to fit. The gearbox is supposed to fit on the tail by a pin mount, unfortunately KH molded the gearbox as a solid piece. There are two ways to handle this. One, which I did, was to drill out the hole for the mount and the tail rotor output shaft. It worked great but next time I'll just drill out the hole for the output shaft and cut off the mount part and mount the gearbox flush to the model.
I drilled out a hole on the tailboom antenna on top of the vertical stabilizer for the antenna. The antenna is not included in the kit as it would be impossible to mold thin enough. I used some Albion tubing to add that bit of detail. Adding the rotors and tail rotor blades brought this project to a conclusion.
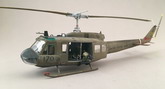
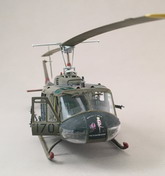
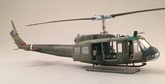
Ok just as a reminder, I had a large part in bringing this model to the market. That said, I loved the kit and the finished model. Is it perfect? No it isn't, but the detail is far superior to ANY other UH-1D/H on the market. You can finally build an accurate Vietnam era Huey out of the box. What took so long?
The instructions are helpful but they aren't great. The biggest issue with the kit is the lack of mounting tabs for the transmission. If you build it like I did by adding the engine then mounting the transmission deck level with the bottom of the engine front you'll be fine.
The shape of the kit is PERFECT. It matches perfectly with factory drawings and looks every bit the part. The fit of the kit was superior throughout. You have to remove all the sprue attachment points. If you do that everything will line up perfectly. I checked my engine cowlings on my next kit, yes there will be another one, and they fit perfectly right out of the box. I'll add them first so I can manipulate them. The fit is very precise throughout.
The clear parts are great. The inclusion of the upper windows with the front windscreens is an ingenious way to deal with them. They are perfect.
The interior is very good, the best on the market. The front seats need a replacement lapbelt and maybe a shoulder harness, but it is all there. I was happy with my results using the PE parts for the shoulder harness. The armored seats are the first time that they have been done correctly in any scale. It would have been nice to have the armor side panels slid back but that isn't a big thing to me. The lack of detail on the overhead panel is a disappointment. The center console is great right out of the box. I think the only things missing from the cockpit are the windscreen wiper motors and first aid kits.
The cabin is impressive and can be configured in a variety of ways. Many times in Vietnam there were only seats for the door gunners. Everybody else sat on the floor. The M-23 systems are really impressive. The PE is a nice touch. The inclusion of the hold downs is a nice touch.
The engine and engine area are impressive and good basis for super detailing should you choose to do that.
The rotor system is impressive and is the very first accurate one. The coning is captured perfectly, again the first time ever in kit form. Some won't like the blade flex molded in. I love it. This is the first time that a model has captured the correct blade laminations on the blades with the correct trim tabs and blade tie down setup. I especially loved the separate items which made painting a breeze.
There is the missing strake on the belly. The kit has one but there are two. Most won't even notice it but it can be easily added with either PE or styrene. It's shape is shown in the instructions and the CAD we proofed but it didn't make it into the plastic.
The 'cutout' on the landing gear is a mystery to me. It is easily fixed with Apoxy Sculpt but we shouldn't have had to do that. The inclusion of the tow rings is a nice touch as are the skid shoes on the bottom. The sit of the model is perfect.
The decals are okay but are lacking some detail and they are not as accurate as they should be on my subject. The nose art is really nice but the other decals need improvement. Werner's Wings will fix that but we didn't want to have to.
Overall I'm impressed. The look of the finished model to me is perfect. You will need to have some builds under your belt to do it right but it certainly is doable and a very enjoyable kit. Like I said before I've already started another one. That says a lot for me. I'm sure there will be a few more on the horizon.
It is about time to finally have an accurate Vietnam era UH-1D/H. We can finally remember all those who flew in the Huey. Taking them into battle and ushering in the era of the battlefield helicopter. For those that heard the whop whop of the Huey it left an indelible impact on them. It could mean time to go to battle, rescue or
resupply. Nothing says Vietnam like the Huey while it has taken so long to get it correct is beyond me. In 1/48th scale this is an impressive kit. It is the best UH-1D/H in ANY scale. Period. I can't wait for Kitty Hawk to do it in 1/35th scale.
Highly recommended
Floyd S. Werner, Jr.
IPMS No.: 26266
|
Click on
images below to see larger images
|
|
|
|