|
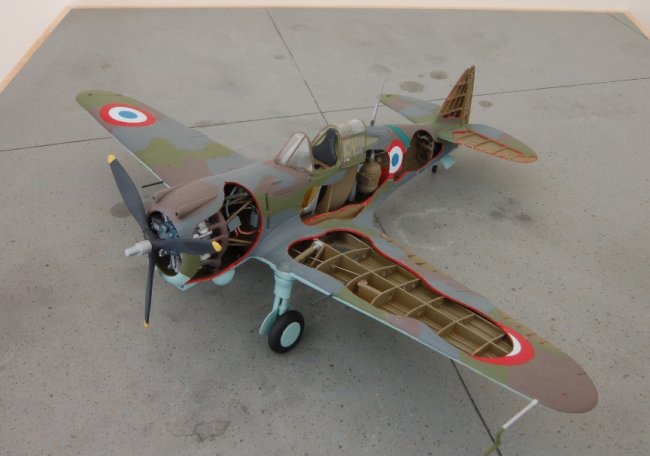
I was given this
Academy kit around the beginning of 2010. I rarely like to build out of the box,
and had a couple of larger kits that I was considering building as cutaway
models. Since I'd never built a cutaway before, I decided it would be wise to
practice on a small cheap kit before committing to something more expensive.
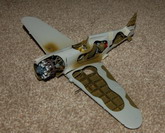
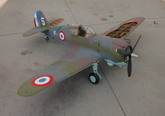
The first part of
the build was to use the kit instructions and a cutaway drawing to plan which
parts of the model would be shown. Being my first try at this, I wanted to show
an interesting selection of the internal details without making life difficult
for myself. The main part of the wing structure was to be shown, but hiding the
false trailing edge with the hinging and aileron/flap linkages. I wanted to show
the engine/ancillaries bay, the cockpit and rear fuselage, but again, some areas
were left with fuselage skin so that I didn't have to build absolutely
everything. A request on a fullsize aviation forum brought a fantastic selection
of internal and external pictures of the UK based Fighter Collection P-36.
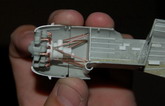
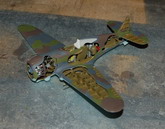
The first part of
the actual build was to cut openings in the fuselage, and from there I was able
to determine to what extent the interior could be seen. This then dictated what
parts needed to be made. The interior details were made from a combination of
styrene, copper wire and 'Chemiwood', a very high density polyurethane foam. It
has no grain and can be cut, carved, sanded, drilled tapped, machined etc. This
was used for many of the larger accessories such as the fuel tank, hydraulic
cylinder, battery box etc.
Click on
images below to see larger images
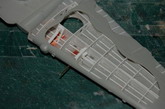
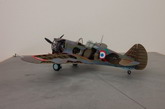
The fuselage needed the
wing roots filling to make up the fuselage skin on the inside before the
internal stringers could be added. The cockpit floor needed extending, and
the wing skin under the wing fairing had to be made before the internal
details could be worked on. One tailplane was to be cut away, and since
the original kit part was a single piece moulding, a new one was made at
half the thickness so the structure could be added to it to make up the
remaining thickness. The engine saw quite a bit of additional work, adding
the rear crank case and ancillaries. The engine mount was from thin copper
wire, intake tubes from mains cable copper wire, and the exhaust collector
ring from styrene.
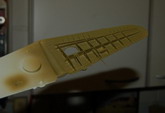
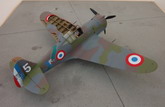
The wing ended up a much more
simple build than the fuselage, although perhaps I was just getting better!
Spars and stringers were glued in first, followed by over sized ribs which were
trimmed and sanded to shape after they had dried. They were gradually sanded to
shape until the top wing skin fitted properly. The top skin had already been
thinned to allow more rib height and to give a thinner edge where the wing skin
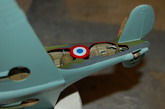
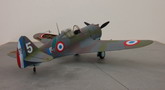
was cut open. Brass wire gun barrels replaced the styrene originals. The cockpit
received some additional work and modification. The seat frame was reworked to
make it more like the original, skid plates for the pilots feet under the rudder
pedals, seat harness, and seat cushion.
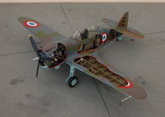
Once the basic airframe was
together, I did ponder for a while on the best way to mask the model without
causing damage to the open structure or allowing paint in. In the end, I opted
for brush painting the model. With the complex camo pattern and the likelihood
of a number of re-maskings, spraying was going to be too much effort. The basic
scheme was done with Humbrol enamels, followed by a Warbirdcolors water based
clear before decalling. This can be dried in minutes with a hair-dryer. The
decals over the cutaway sections were quite tricky, but were applied intact.
They were left to dry a little while, but before they were fully hard, they were
trimmed with a brand new scalpel blade. Microsol was used to bed down the decals
into the surface detail. A Warbirdcolor matt coat was sprayed to seal everything
in. Once dry, the landing gear, prop, pitot, aerial and canopy were added and it
was done!
The build was started in May
2010. The basic structure was ready to be painted in July, followed by a 3 month
break while the summer military shows took over my life. I got back to the model
in early October and then it took another two to three weeks to paint and finish
off the model. I didn't weather the model as it didn't feel right being a
cutaway. It is a virtual 3D technical drawing, and as such, I felt a clean
finish was more appropriate. The model has its flaws, but overall, I'm quite
happy with my first attempt at a cutaway and can consider larger models with
more confidence.
Stephen A. Carr
Click on
images below to see larger images
|
|