|
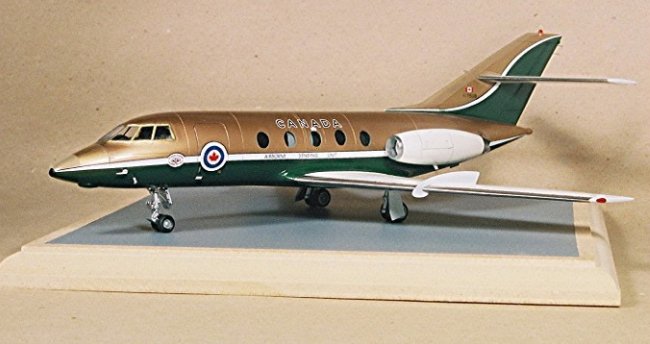
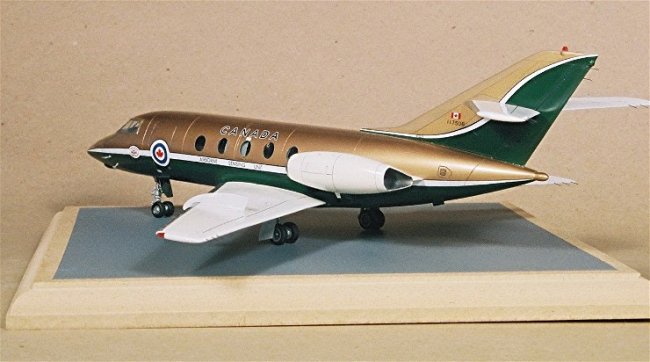
The Canadian
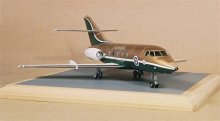
Armed Forces had used a small number of this sleek business jet for various
roles in the 1970’s and while most of the fleet was painted in the all-white
scheme with the national markings and lightning bolt cheat line, one aircraft,
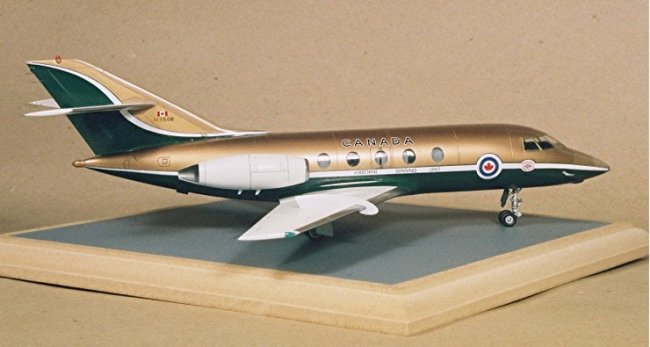
used by the Airborne Sensing Unit, was adorned with a striking gold and green
paint scheme. I had photos of this
aircraft in my file, and a colour scheme and marking article in an old IPMS
Canada RT Magazine, that had been burning a hole in my “must do” pile for
the longest time. When the Mach 2
kit of the Falcon 20 came out in the early 1990’s, I bought one immediately
with this scheme in mind.
I picked this
kit up when it first arrived in North America, knowing it was a limited run
injection molded kit and could disappear soon.
I was not blessed with the opportunity to see the guts of any of the
other Mach 2 kit offerings at the time so when I opened the flattish soft
pasteboard box, I didn’t really know what to expect.
At first glance, not too bad - recessed panel lines, choice of two engine
nacelle types, all the basic parts are there, but on closer inspection….
The soft grey
plastic had noticeable “flow patterns” with the depth of some of the flow
marks rivaling some of the recessed panel lines.
The panel lines that were there were large, “muddy looking”, and some
others were shallow and hardly visible. The
smaller parts such as landing gear legs and wheels were adorned with what I can
only describe as “mold debris” – small bumps and lumps scattered over
various spots. The sprue gates were
large and thick, and the trailing edges and general parts thicknesses were
“clunky”. It was not going to
be an easy build up. As a modeler
who grew up on the Frog and Airfix line of models in the distant past, I could
see that this kit would “need a little work”, but it didn’t seem to
present any daunting challenges on first glance.
However, my early optimism would not go unpunished.
The clear parts
were almost un-usable. The very
thick clear fuselage windows were molded onto a thick plate with the windows
standing proud, for insertion into the window openings in the fuselage halves.
Test fitting showed that the fuselage openings were different sizes, and
the spacing of the windows on the thick plate did not match up very well to the
window openings. The windscreen was
about 5mm thick and had bubbles trapped inside the plastic – that part was not
going to be usable at all. It
wasn’t even molded with the distinct flat panes of glass that can be clearly
seen on any photo of a Falcon 20.
Upon cutting
the major parts from the sprues, it became apparent that some of the parts’
sizes were not symmetrical, and the insides of the wing halves were adorned with
large flow channels which would have to be shaved, gouged, and rasped off to
allow the wings to mate with some semblance to the scale thickness they should
have. The fuselage halves actually
touched together in some spots, which was a good sign, but there were mis-matches
along the nose contours and the belly areas.
The rest of the main parts were reasonable looking “shapes” but would
need some refining and cleaning up to insure they’d fit together.
All of the major parts, when test mated, showed differences in shape and
outline between the respective mating halves by up to 4-5mm in some areas.
The initial
detailed review of the kit, as described above, caused me to shelve the model
for the last twelve years until I built up the courage to tackle it this last
year.
The first step
was to gather my reference material, decals and start planning the project
(along with pumping up my courage). I
would need many photos of the aircraft, close-ups, walk-arounds and plans.
Luckily there is an ex-CAF Falcon 20 held by the British Columbia
Institute of Technology out at their airport campus, of which I had been able to
shoot some good photos during an open house some years ago.
I had most of the national markings, and the black-outlined white
cheatlines were going to be relatively easy to make up from solid colour decal
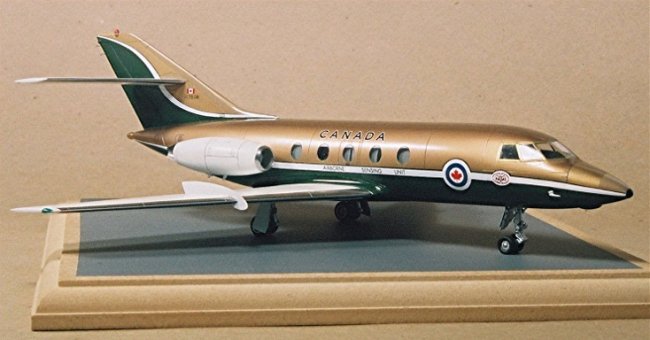
stock. The “Airborne Sensing
Unit” crest and the white outlined black “Canada” lettering for the
fuselage were “oddballs” and nothing in my stash of Canadian Decals was
available. A check mailed off to
Mike Grant Decals, with some dimensioned drawings and photos, were my solution
to this little problem. The Mike
Grant decals were sharp enough to cut my eyeballs, and he was good enough to
print the needed markings in multiples so I could have spares on hand “just in
case”.
The other
challenges I had to work out were how to deal with the clear parts, how to
replace the windscreen, and how to achieve the polished “chrome” look to the
leading edges of the wings, tailplanes and the engine nacelle intakes.
The rest of the project was just going to be plain old elbow grease and
“stick-to-it-ivness”.
The fuselage
windows were separated from their carrier plates and then I spent time trimming,
filing and shaping all the fuselage window openings to match photos and plans,
and to make them all symmetrical. The
individual clear windows were then Zap-A-Gapped into the openings so that the
surface of the clear part stuck out proud of the fuselage, and the gap-filling
glue filled in any spaces around the edges.
A number of evenings were then spent sanding down the clear parts and
polishing them out flush with the fuselage halves.
The next step was to make a sheet plastic template of the window opening
and scribe the “true” window outline onto the fuselage parts, lining up all
the windows and insuring that I had a “cut-line” to use when masking the
windows off later.
I polished the
inside surfaces of the windows, completed the cockpit assembly and painted the
inside of the fuselage a dark gull grey colour. Not
much detail was going to be seen inside the model or the cockpit so I did not
spend a lot of time fussing about inside there.
I painted parts of the clear windows on the inside to represent the
consoles and equipment that could be seen in the photos of the actual Airborne
Sensing Unit Falcon 20. I added
painted lead foil seat belts to the pilots’ seats and then added a good chunk
of wadded up lead foil to the nose cavities to insure that the finished model
would perch properly on it’s nose gear.
|
Click on
images below to see larger images
|
|
|
|

|
The windscreen
was more of a “project”. The
first step was to file and shape the flat panels to match the drawings and
photos I was using for reference, and make sure the fuselage contours matched.
The shaped and polished windscreen was then used as a master to vacuform
some copies using 0.020” (0.5mm) clear plastic. One of the vacuformed windscreens was used from the two
“good” copies I managed to get, which was trimmed and mated to the fuselage
area with a lot of test-fitting and adjusting to insure a relatively flush fit.
The “good” copy of the windscreen was dipped in Future and set aside
to dry.
More evenings
were spent cleaning up the mating faces and edges of all the major assemblies,
filling in the flow marks found on almost all the parts, and generally
“accurizing” the various bits and pieces.
Heavy mold seams had to be cleaned up, and locating pins and structural
reinforcing pins and holes were drilled in the landing gear attachment points,
engine nacelle mounts and vertical tail assembly base.
The bulk of the time was spent test fitting, shaping, filing, refining
and otherwise cleaning up mating edges and connections for better fit.
I also cleaned
up all of the panel lines and control surface hinge points as best I could.
Many of the deeper panel lines could have been filled and rescribed, but
by the time I was close to major assembly I was not willing to put out more time
to do that. At this point on the
project I just wanted to get the damn thing together and painted, and maybe the
coats of paint would refine the panel lines a bit.
I spent a
couple of evenings glueing the major parts together, fuselage halves, wing upper
and lowers, vertical fin halves etc. Then
another few evenings cleaning up seams, refining trailing edges, and polishing
the seams on the leading edges of the flying surfaces to accept some kind of
“polished metal finish”. Once
all the “sub-models” were done, I assembled the major assemblies together to
get a near finished model that was almost ready for painting.
The vacuformed windscreen was carefully fitted and glued into place with
some minor filling and polishing required along the back window edges. I used combinations of Zap-A-Gap and white glue to get a
solid bond as well as to insure the edges were smooth and flush to the fuselage.
Fiddly bits such as the landing gear, wheels, and gear doors were set
aside for painting separately.
The next step
before painting was to mask off all the clear bits.
I used Bare Metal foil for all the fuselage windows, strips of cut tape
for the windscreen and the wingtip navigation lights.
I’d added coloured wingtip navigation lights using chips of clear red
and clear blue toothbrush handles glued in place and polished out.
The first
colour to be sprayed on was the white for the wings and horizontal stabilizers.
I used Floquil’s Reefer White since it provides a nice dense white in a
minimum of coats, dries hard as rock and has the only drawback that it is a flat
finish, requiring an overcoat of gloss white or a clear gloss finish. The
dark green was then sprayed on through my trusty Badger 200 airbrush, first in
light mist coats, then slowly built up to a solid green colour.
I’d masked off the upper gold areas on the fuselage and vertical tail
using masking tape with the curved separation lines cut using French curve
drafting guides. I used a Humbrol
Dark green gloss enamel from the tin, with a few drops of gloss black mixed in
to get “eyeball close” to the colour based on the photos I was using for
reference.
I peeled off
the masking and re-masked over the green and the white parts of the model in
preparation for shooting on the gold paint.
I used Testor’s Gold enamel from the small square glass jars, thinned
with lacquer thinner. The gold was
sprayed on in light mist coats, building up a solid colour after slowly adding
coats with at least 10 minutes in between sprays to allow the gold paint to
“set”. The lacquer thinner allows the paint to dry fairly quickly
and have a hard finish. I’d been
burned in the past using standard airbrush thinner for metallic paint and having
extremely long drying/curing periods which still had a “soft” finish.
Once the gold
paint was dry, I peeled off all the masking with the exception of the masked
clear parts. I masked off the small
areas that had a “buff” colour on the nose and tail and sprayed on a 50/50
mix of Humbrol Khaki and gold. The
areas that would require a polished metal finish were left alone at this stage,
as I planned to finish those areas last with either Bare Metal Foil or some
other method.
Time for
decals. The application of the
decals to this model was reasonably straightforward, with the only time
consuming step being measuring off and cutting the curved solid portions of
black and white decal material to form the cheat lines.
To get a black-outlined white cheat line, first apply the solid black
decal, then overlay that with white decal material that is cut slightly smaller
than the black, leaving a thin black outline.
A circle template was used to create the forward fuselage roundel
locations. Where decals had to be
applied to the flat white areas on the wings, I brushed on a patch of Future to
create a gloss base for the decal. I
was planning to overcoat the whole model with Future later on, after the decals
were all done, in order to seal in the decals and give the model that overall
clean shine that the actual aircraft seemed to have.
Once all the
decals were done and dry, I sprayed on some Future to provide an overall gloss
finish and seal the decals in. I
used the stuff straight from the bottle, no thinning, and cleaned up the
airbrush afterwards with alcohol and hot water.
Once the Future overcoat was dry (that flat white sure sucks up the
Future – took about 6-7 solid coats to get a gloss finish in the end), I
polished out some of the “pebbly” areas with some fine polishing cloths
(6000, 8000 and 12000 grit) to get a nice sharp finish.
By now I was
getting kind of excited, the model looked pretty good, very flashy colour
scheme, a ton of work had been put into the project to get the basic model to
this stage, and I was starting to see the light at the end of the tunnel.
Murphy lives under my model desk, too.
When I peeled off the masking from the windscreen, it pulled out a
section of the vacuformed part, creating small
jagged edges where the clear part had parted company with the nice gold paint
edge. Some of the filler had also
chipped out. A deep sigh was all I
could manage. I finished taking off
the rest of the masking, and at least the starboard section of the windshield
looked OK and stayed in place. The
solution to the separated edges of the windscreen was to try to mate the clear
part back into the fuselage as best I could (it fit flush before, so why won’t
it go back in now? *!#$%@&*). I
tried to blend in the newly re-attached section with white glue, but I was still
left with a very visible seam line along the edge of the gold paint.
Some careful brush applied gold paint, followed by applications of gold
coloured decal stripes to simulate the window framing, and it was going to be as
good as it was going to get. Oh,
well, I can make sure to display the model with the starboard side facing
out….
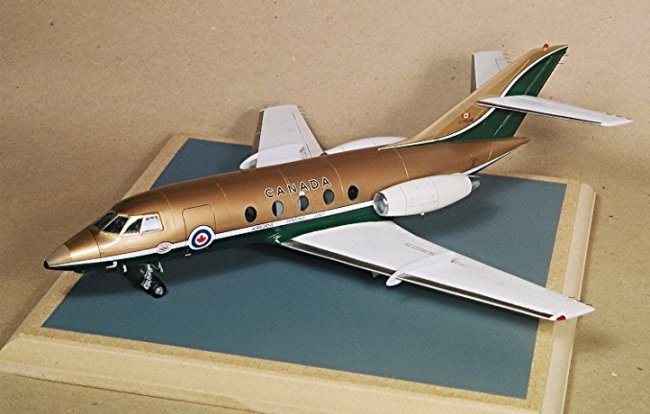
The final step
for paint and finishing was to deal with the polished metal leading edges of the
wings, stabilizers and engine nacelles. About
the time I was starting to think about how to deal with these areas, I was in at
my friendly neighborhood Hobby Shop and the proprietor was showing me some of
the Alclad II products, and the chrome finish that was able to be achieved by
the Alclad II Chrome sprayed onto a gloss black base coat.
Hmmm, looked pretty good, and to my eye, looked more realistic than Bare
Metal Foil, and would be a lot less messy than trying to do something with SNJ
Polishing powder.
More masking of
the model was performed and I sprayed on some Tamiya Gloss Black acrylic paint
to the areas where the polished metal needed to go.
A week later to insure the gloss black was totally dry and hard, and it
was polished out with some 12000 grit cloth to insure a smooth surface.
I sprayed on the Alclad II product in light mist coats, building it up to
a smooth solid finish. It was dry
within minutes and resulted in a near mirror finish. Nice stuff.
The wheels and
landing gear parts were painted separately with Floquil’s Old Silver, given a
wash with a brownish-grey watercolour paint and then assembled onto the model.
Some additional details such as the landing gear door struts were added
from short lengths of wire, and the other fiddly bits such as pitot tubes and
antennae were added to the model. The
wing fences were made from sections of 0.010” (0.25mm) sheet plastic and glued
on after the wing leading edges were done, using thinned beads of white glue run
into the mating edges. (Sounds
simple, but that consisted of about four evenings’ worth of cutting, sanding,
shaping and test fitting to get a snug, flush fit….)
Final detailing
consisted of dark grey washes applied to some of the panel lines and control
surfaces separation lines and picking out the airbrake panels in the upper wing
surfaces. The engine nacelles were given a slight amount of weathering
to match what I could see on some of the photos of the CAF Falcon 20 fleet I’d
been using as references. Small
blade antennae were added from cut and shaped sheet plastic and attached with
Zap-A-Gap.
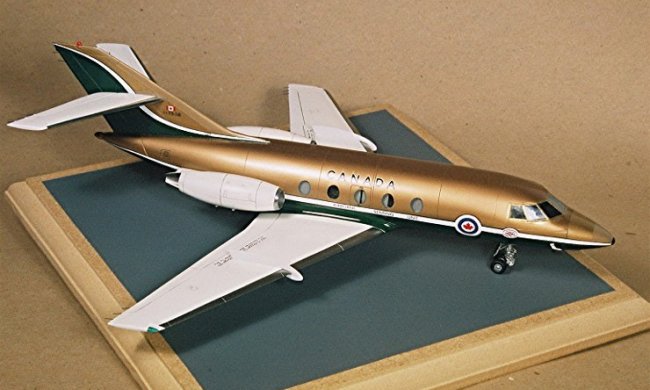
Finally
finished, I set the model onto a wood base for display purposes and started to
think about the next project. It
was a grueling project, that Mach-2 kit, and I am trying to do some “straight
out of the box” projects now as therapy.
Geoff
|
Click on
images below to see larger images
|
|

|

|
|
|