|
This is my first
full natural metal finish kit using Alclad II. After viewing a group
of highly colored commemorative Starfighters in a recent ARC article, I decided
to send this one in. If the colorful F-104's looked like a bunch of pretty
ladies in colorful dresses, then here is the aeronautical equivalent of a long
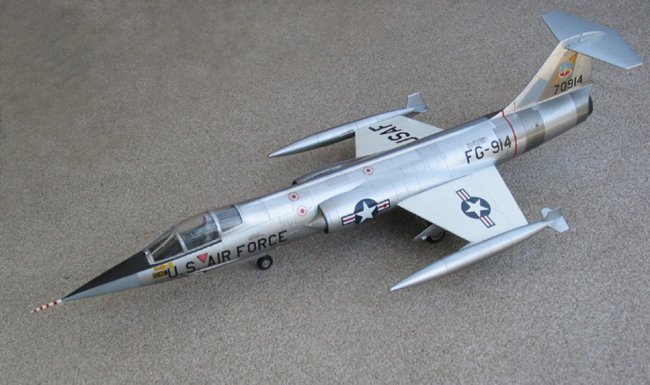
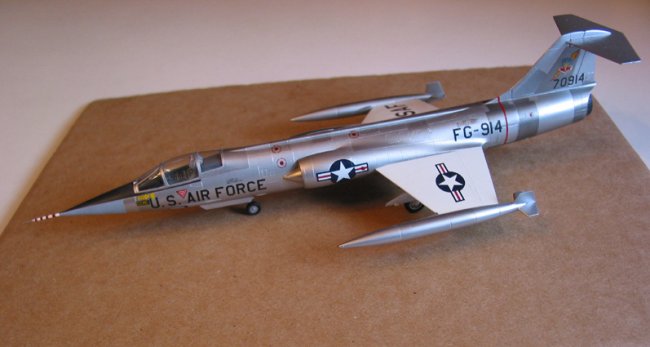
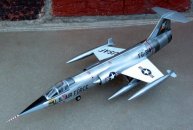
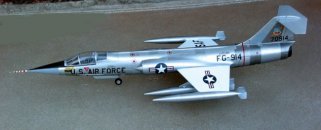
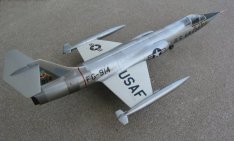
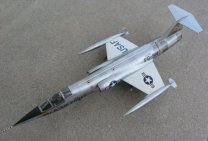
cool woman in a little black dress. The Zipper, in basic natural metal USAF
markings. Understated and elegant. I modeled a generic looking 479th TFW
aircraft, F-104C-10LO, 57-0914, in the early 1960's period based on a photo
I found at Harry's Starfighter website. The photo shows 57-0914 at RAF
Waddington on September 17, 1960. With Italeri re-releasing this kit,
I thought it would be a good idea to see how it holds up against its newer
Hasegawa and Revell/Monogram competition. The kit is an original issue
Esci F-104C in the silver-gray plastic, although a later version of this kit by
AMT contributed its better C-2 seat. (The AMT release included two extra seats
of higher quality, a C-2 and a Martin Baker seat, in addition to the very sparse C-2
on the parts tree). The AMT kit is earmarked for building as a German G
model with the MB seat, so the surplus C-2 got liberated. Only the AMT
release included both the two extra seats and all parts for both long and
short vertical tails. The new Italeri releases are like the original Esci
releases, coming boxed as model-specific kits, with either the A/C shorter tail
and refueling boom, or the longer G/J tail. Unfortunately, Esci's original
tool never included the very different USAF style main wheels, nor did it
include the bulged main gear doors for a later G version. The Esci kit is
done in hard, easy to polish, silver-gray plastic, while the AMT is done in
AMT's typical light gray softer plastic. Italeri plastic is also light gray.
Both the AMT and Italeri releases have much better decals than the old
Esci kits. The more detailed AMT C-2 seat, being designed long after the
original tool, was too tall for the canopy, and had to be lowered by
removing material from the bottom. (Good thing I left the seat out until after
joining the fuselage halves and trying the one-piece canopy, rather than learning
this the hard way). The plastic nose pitot probe was replaced by one made from
two diameters of hypodermic needle tubing, something I highly recommend on all
F-104's regardless of scale. (Trust me on this!) The hollow pitot tip
adds a nice touch, even if it takes a loupe to see it.
|
Click on
images below to see larger images
|
|
|
 |

|
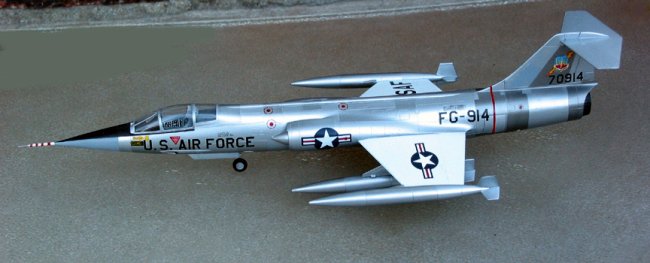
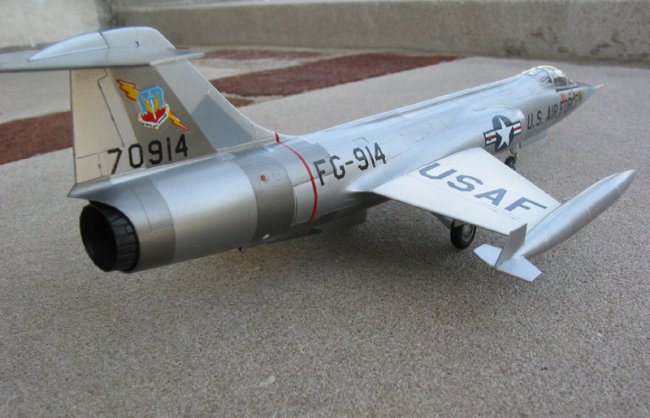
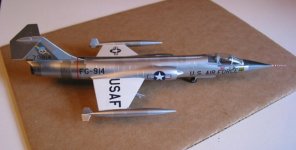
The only other
change from an otherwise OOB build was the addition as a set of resin USAF style
wheels I cast using a RTV mold made from the USAF style wheels in
the Revellogram F-104C. The wheel change was a necessary change for a C
model, and an unfortunate omission by Esci. The Esci kit's F-104G type
wheels, now surplus, are easily the best detailed G style wheel in this
scale. I'll save them for a Revell or Hasegawa F-104G kit. I didn't do any
extra detailing as this was mainly an Alclad learning experiment. I built
the model with closed canopy (the only kit option unless you want to saw
away), so the AMT seat and the kit supplied decal instrument and side panels
proved to be adequate. In viewing hundreds of F-104 photos, I was struck by the
fact that the F-104, unless being tended to, is almost always seen
parked on the flight line with a closed canopy (no doubt to avoid wind gust
damage), slats and flaps up, and speed brakes closed, so if you want a
realistic looking model, it is not necessary to knock yourself out! That said,
the Esci kit, aside from its well known slightly skinny drop tanks, captures the
shape of the Zipper beautifully. The recessed panel lines are extremely
accurate and well done. The Hasegawa and Revell offerings in 1/72 are better
detailed to be sure, particularly in the gear bays and cockpits, but in shape
and surface detail, the Esci kit holds up very well indeed. This is especially
true if doing a NMF, where the deep rivet holes that Hasegawa chose to
adorn the aft fuselage of their kit with may not be so desirable for a
highly polished machine. I find the way those rivet holes reflect light on a NMF
to be quite distracting. Too bad Hasegawa got even more rivet-happy on
their 1/48 kits. Having seen real Starfighters in the flesh, I can assure you
that you need to look very close indeed to see any hint of panel lines and
rivets. The airframe is utterly as smooth as a baby's bottom. Also, Esci's 104 seems
to be the only one with wing tip tanks that slip around the wing
tip as they should, instead of just being stuck on the end.
The fit of the kit was excellent.
I used Tenax in a Touch-N-Flow applicator to weld the seams, and no filler
was needed, save a drop of ACC on the bottom corners of the intake joints. I
just sanded and polished down the seams where the Tenax-softened plastic
squeezed out and buffed the entire surface of the model with a nail buffing
stick before priming. The Alclad II was applied on top of the Alclad brand gray
primer. Various Alclad shades were used matching the panel tones of typical
F-104 panels. I found certain Alclad shades could use a touch of lacquer
thinner to spray more easily in my fine tipped Sotar 20/20 airbrush. This seemed
to be the shades with denser pigment content, which can be
judged by the depth of the pigments laying at the bottom of the bottle before
mixing. With a bit of thinner in the Alclad, the Sotar 20/20 was quite happy at
around 15 PSI air pressure (Alclad recommends 15 to 20 PSI). I think I
could push the Sotar down to 10 PSI, but I got good results at 15 even when
moving in tight. It was a bit tedious masking all the various panels, but
I like the results. After spraying the Alclad, I buffed the surface using a
nail polishing buffer of the type normally used by modelers to remove canopy
scratches. It worked beautifully, putting a nice shine on the Alclad.
Alclad II seems to be very much like automotive acrylic lacquer, albeit with far
more finely ground pigments, and it buffs out just like compounding a car
finish. It is tough and can take Tamiya masking tape without trouble.
Microscale Liquid Mask also worked well for small panels.
|
Click on
images below to see larger images
|
|
|
|

|
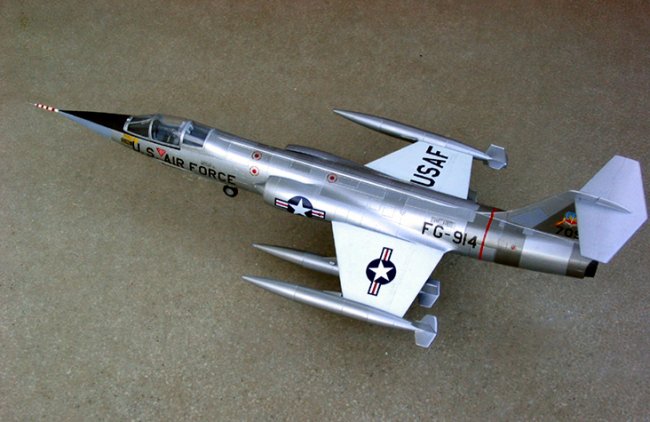
The Esci decals had dried out so
the decals used were a mix of the AMT kit decals for US national insignia and
USAF lettering, with the rest coming from an Albatross sheet and the decal
spares box. I shortened and reshaped the inboard wingtip tank fins to an
equal shape on both sides, as per all USAF Starfighters. I might still add
the SUU-21 practice bomb dispenser (the Esci family of kits are
the sole source for this very typical piece of F-104 hardware in
1/72 scale) but I've decided not to add the refueling boom, as in the early
1960's time frame modeled, F-104C's were often seen without them, just as in the
photo I used for research. By the early Vietnam era, refueling booms
were rarely removed, and buzz numbers vanished, before camouflage came back
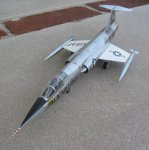
in vogue. I took some photos with only the wingtip tanks, then some with all
four tanks, and shot in different types of lighting so you can see how the
Alclad looks in different light settings. I learned a lot about Alclad from
this kit and I'll have a lot less trial and error on the next go. Hope you like
my little Zipper.
Michael
|
Click on
images below to see larger images
|
|
|
|

|
|
|