|
McDonnell CF-101B Voodoo
Manufacturer: Revell Germany
scale: 1:72
The Beginnings
Originally tasked as escort fighters for the protection of the US atomic bombers meant, the Voodoo became
a late carrier of atomic weapons, an air-defense hunter as well as the reconnaissance aircraft. The development of the Voodoo was,
different from those of the other machines from the "century-series" very lengthy and was subject to continuous changes in planning. At the beginning
w as the Xp-88 (F-88) developed as the first prototype and flew to extensive changes in the range of the bearing areas and air intakes on 20 October 1948 for the first time. This was already
a delay of 6 months to the plan, and further delays would follow. Approximately two years later the second prototype
flew, this already with the Westinghouse afterburner engines which followed and gave to the machine substantially better
performance. The entire F-88-Project was adjusted however in 1950 due to a change in operational planning: The F-84E
would take over the tasks of the F-88.
SAC was however not particularly inspired by this decision, and so in 1951 a new
contract was sent out to the industry: General operational requirement 101 (GOR.101). To these itself among other things, McDonnell
was again involved with a revised draft of the F-88: the F-101 Voodoo. On 15 January 1952 this
was received. The first prototype, which flew F-101a, on the 29 of September 1954 the first time following became 77 copies of the
A-version and 47 of the C-version built, which by the maximum stress of the cell differed: with A this was loadable with 6,33 g, with C with 7,33 g.
Despite the many other versions, the main production of the Voodoo however
was clearly the F-101B, a two-seat fighter with clearly extended afterburner. Altogether 480 machines
were produced, among them approx.. 25 per cent with dual control. With its Hughes MG-13 fire-control equipment
which would serve those particularly as insurance for the case, which had not been up to the F-102 to the requirements. After an extensive test routine with up to 50 machines on the bases Edwards, Eglin and Otis were equipped altogether 17 relays with the F-101.
These were in operational use with the USAF till approx. 1968 (afterwards with the USANG
till approx. 1982) and in Canada
until approx. 1985. The aircraft went through various upgrades and changes
during their operational career. Thus they were equipped for example starting from 1960 with the Mb-1 genius, an air-to-air rocket with atomic warhead.
|
Click on images below to
see larger images |
 |
 |
The model
First impression:
I got the kit for a low-priced on Ebay, and the reasons I bought this kit were
due to some recommendations by some model builders which heaped this kit with much
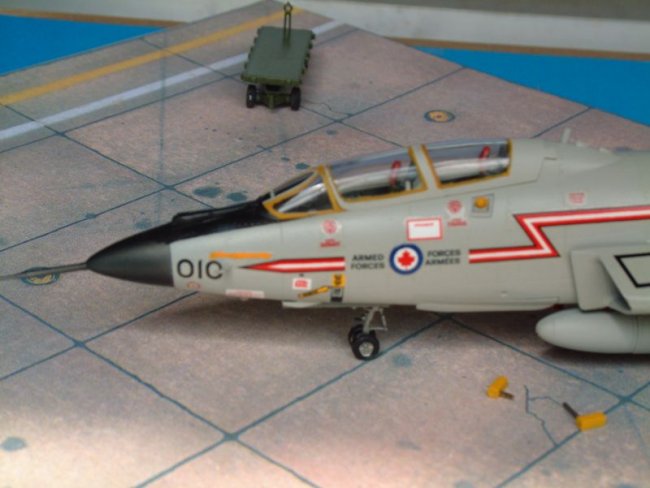
praise. This praise is justified mostly, the kit has some weaknesses nevertheless. The details are excellently shown, a good cockpit with very good seats,
opened up Airbrakes at the trunk, recessed panel lines!
Altogether the kit consists of two silver-grey sprues and a sprue with the cockpit
canopy, which can be represented opened. The clear cover for the search headlight underneath the cockpit is
also present.
My kit was purchased from Ebay - from a "collector" but he certainly didn't earn
the status of a collector judgin gby the way this kit was stored. The Decals
were stored incorrectly the whole time and this caused many problems when I
tried to use them. But in addition later more.
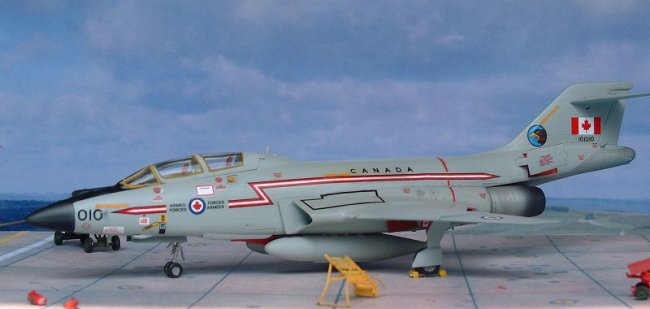
The decals permit you to build one of two machines:
* F-101B 95-MC of the 60th Fighter Interceptor Squad in Hansonfield, Massachusets
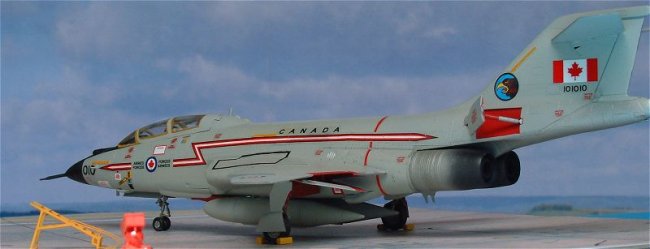
* CF-101B of the 409th Sqaud "Nighthawk" the Royal Canadian Airforce in CAFB Comox, British Columbia
I decided on the Canadian machine. This particular machine was manufactured in 1957 as a F-101B 85-MC and
carried the s/n 57-0286. At the Canadian Air Force it carried the identification 101010.
Building:
The assembly is interesting....very interesting. Above all the assembly of the nose gear is very "strange":
the assembly procedure requires you to install the nose gear leg as one of the
very first steps in the assembly.....so you have to be careful you don't break
the nose gear leg off later during the building process. The nose gear
assembly is installed in the fuselage before the fuselage halves are glued
together. The cockpit is install after the fuselage halves are glued
together. This assembly process can produce fit problems with the fit in the back and in front. In particular the instrument
panel needed much filing, so that it could be installed.
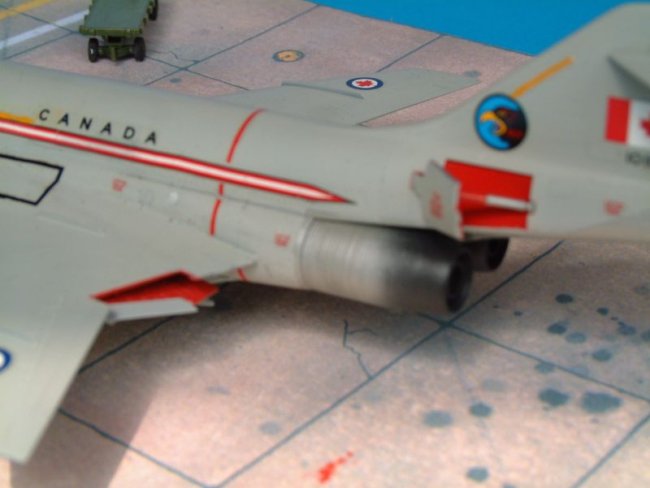
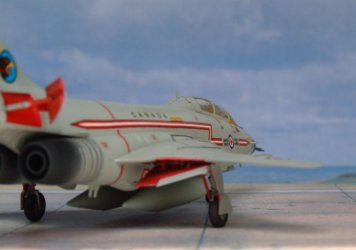
Otherwise the building is simple. The wings require some putty, also I glued the "rocket pit", which is
designed to swivel on the model. In my opinion the gap is not as accurate
as the rest of the model, plus a swiveling part tempts me to play with it again
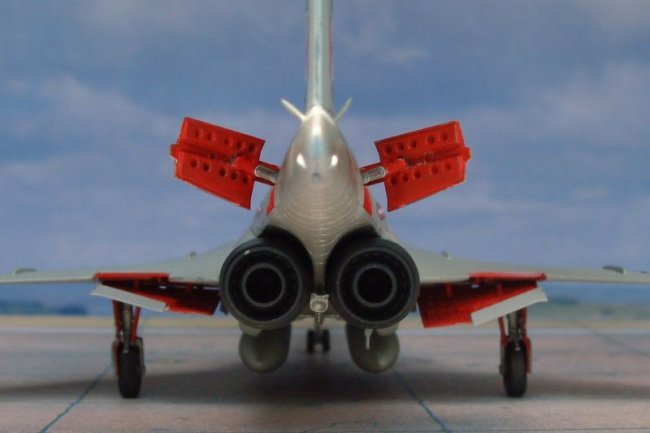
and again till it breaks off. The afterburner thrust nozzles are
represented very well, but require some grinding work, but the end results
are well worth the effort.
Larger problems involve the horizontal tailplane units. Do not follow the
instructions with regards to which angles/which position the parts must be attached. The horizontal tail unit has a clearly positive dihedral with the Voodoo. Besides the horizontal tail unit
of the model prevents the excursion of the vertical stabilizer, since the recess at the model is too small. With a small cut this is repaired.
The fuselage is likewise very well detailed. The machine can be armed with two Falcon and/or two genius,
that look very realistic. I attached the main landing gear, the auxiliary tanks, Airbrakes only after applying the Decals.
Model photos are particularly helpful!
|
Click on images below to
see larger images |
 |
 |
Lacquer finish:
The Canadian CF-101B flew in the beginning with paint similar to natural metal, which yielded later by (also in the USA)
to air defence grey. At the end of their service most machines flew even in a black lacquer finish. The lacquer finish is
a relatively simple paint scheme. The landing gear bays were
airbrushed green after the masking with tape, main gear sliding doors and the Airbrakes at the trunk as well as the insides of the opened
under wing flaps at the wing red. The cockpit received a black glare shield, with the same color
airbrushed to the radome. The orange seal for the cockpit glazing was painted with water color. For the Decals I covered the model with a
gloss layer of clear lacquer.
Decals:
The Decals - a history in itself. As already mentioned above, the decals had been
improperly stored. I saw upon closer inspection that these decals would not hold
together. I confirmed this after a test with a needed Decal. In hope the Decals
could still be saved I sprayed several layers of clear lacquer. The decals divided itself in the water into dozens of individual parts, one could even in parts hear the breaking. A genuine agony
was applying these parts of the decals to the model, particularly with the two long strips
running along the fuselage. Another problem was that I couldn't use a decal softener, since this
caused all the small decal parts to reposition themselves. I must say in addition, that the Decals
are outstanding cleanly printed and wouldn't seem to need softeners. After several hours of
this torture I sealed the model with matte clear lacquer.
General impression:
A good kit straight from the box that produces a marvelous Voodoo and this is
not a kit to be afraid of buying on E-bay.
Andreas
To see more of Andreas' excellent models....go to http://modellbau.bw-flyer.de
|
|