|
Introduction:
Perhaps
there are those among us who buy a model one day, start construction the next,
and finish it with a few weeks.
I however, am not one of those people.
For me, models are generally like a fine Brandy, I allow the kits to sit
undisturbed age and mellow before jumping in.
This does have the advantage of not having to worry about mold release
agent on the parts prior to painting.
Acquisition:
About
4 years ago, a friend of mine was going to Korea and I asked him to see if he
could find the newly released Academy Hunter for me.
Well two weeks later he shows up at my desk with both the 1/48th
Hunter and the 1/72nd SB-17 kits.
I thanked him for the kits and ask him what I owe.
The answer was 15,000 Won.
Now let’s see, the exchange rate at that time was about 1800 won per US
dollar or eight dollars and 33 cents, for both kits!
What a deal.
I graciously rounded up to $9.00 and took my latest editions homes.
I performed the compulsory cursory inspection of the kits and they both
went into my “someday” pile.
About
2 years ago I was ordering some aftermarket accessories from an on-line source.
As we all know, shipping and handling is generally a fixed price so I
starting exploring other items of interest to “spread out” the S&H
costs.
One of the things that caught my eye was the Belgium Red Devil aerobatic
team markings for the Hunter manufactured by DACO.
About a week later my order arrived.
I performed a cursory inspection and the decals joined the kit in my
“someday” pile.
During
last year’s IPMS Nationals in Dallas, one of the major vendors was Meteor
Production / Cutting Edge.
As I wandered through their display of cockpits and other aftermarket
goodies, I noticed a cockpit update set for the Hunter Mk-6.
Using the rational that I had paid so little for the kit, I bought the
cockpit update.
This later turned out to be a VERY fortunate impulse buy.
After returning home from the Nationals, I did a cursory inspection of
the cockpit and it joined the kit/decals in my “someday” pile.
Inspiration:
In
September of 2000, my sons gave me the 1/48th Tamiya A1-H Skyraider
for my birthday.
Since this was a gift from my kids, it went immediately to the front of
the building queue.
After a couple of months of researching, building, detailing, painting,
decaling, and weathering the Skyraider to represent an aircraft from VA-25 off
of the USS Midway in 1966, I showed it to my wife.
Her only comment “It’s gray, just like all of the others”.
AARRRGGGHHH!
After picking up my now deflated ego, I went to look at my display case
(a beautiful cherry wood and glass curio cabinet which my wife had bought me the
previous father’s day and she allows in the front room of the house).
Not all of the aircraft were gray.
There were two natural metal finishes, OK sort of gray.
A weathered Corsair, yea it’s kind-of gray. An FW-190, OK that one has
gray in it.
A heavily weathered Zero, faded green with lots of chipped paint does
have a gray cast to it.
An F-4E in Israeli markings, it’s not gray but is on the bottom shelve.
And finally, an F/A-18, do multiple shades of gray count?
RATS, I hate it when she’s right.
OK, time for something different.
Realization:
A
quick review of my “someday” pile and the Hunter with the “Red Devils”
markings was determined to be as far away from gray as I could get.
Now all I had to do was find that cockpit set.
I know I put it somewhere.
After several hours and a complete reorganization of my aftermarket
goodies, I had all the pieces in place.
| I
decided to do a quick perusal of the on-line model review sites to see
if there was something about this kit that I should be on the lookout
for.
The warnings came in loud and clear.
THE COCKPIT AND THE SEAT ARE THE WRONG SCALE.
This took me be surprise.
I had built several Academy kits and they had all been very nice.
Perhaps these on-line reviews had been a bit too critical.
Well it was time to actually open the plastic bags and take a
look at the parts.
With my Cutting Edge update close at hand, my first inspection
was the kit cockpit.
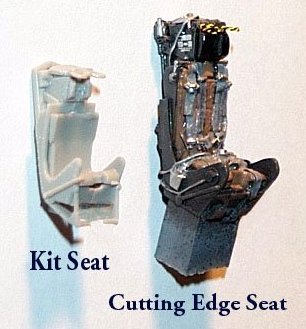
OH MY, the reviews were right.
The cockpit and ejection seat were way too small.
For those who are doubters, I have included a photo of the kit
seat and the Cutting Edge seat.
I am not sure if the kit seat is 1/72nd scale but it
is definitely NOT 1/48th. |
|
Frustration:
Thankful
that the modeling gods had smiled on me and guided me to buy the Cutting Edge
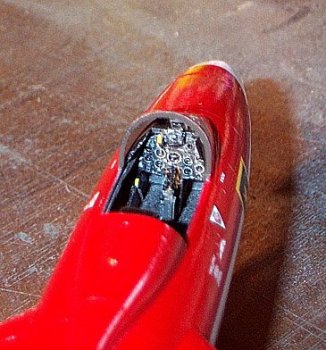
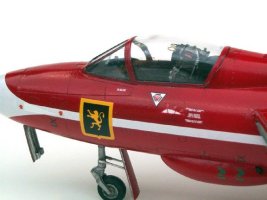
update, I set to work on the cockpit.
As is typical for Cutting Edge, the detail of the Hunter cockpit is
superb and the assembly / finish of the “front office” was very smooth.
After many hours, spread out over several days, the cockpit was finished
and I was ready to proceed with the kit.
This is where I learned another valuable lesson about modeling.
I decided that the first thing to do would be to remove the fuselage
halves and to test fit the cockpit.
Wait a minute, the fuselage halves don’t fit together.
Ah crud, one of the halves had a severe warp in the section below the
wing and the entire thing was twisted.
How in the H*LL am I going to fix that!
If I hadn’t just spent all of that time on the cockpit I would pitch
this thing.
Thus the lesson, always inspect all of the parts prior to starting.
Oh well, in for a Penny, in for a Pound.
Perhaps a soaking in warm water would soften the plastic and allow me to
reshape it.
Nothing!
OK, the water will have to be hotter. Nothing!
OK, even hotter.
Nothing!
OK, one more try, even hotter.
OUCH, TOO HOT!
But wait, some of the warp came out that time.
After several hours and hands that looked like a lobster, the fuselage
was acceptable.
I hoped that the bulkheads required to support the inlet would help hold
the proper shape in the fuselage.
Additionally, I added a lower fuselage doubler along the seam line to
help force the mating of the two halves.
| Once
I had the fuselage parts in close to correct condition, I test fitted
the CE cockpit in place.
It didn’t fit.
The cockpit floor hit the nose wheel well.
Well now what?
I wonder if the instructions say anything about that.
Or yea, there it is, clearly printed, just waiting for me to read
it.
The CE instructions address this problem and tell you exactly
where to cut the cockpit floor to clear the wheel well.
Yet another lesson – read the instructions.
OK, the cockpit floor was trimmed and the test fitting resumed.
Rats, the cockpit was still too wide at the nose.
The fuselage would not close around the tub so out came the
Dremel tool and a grinding disk.
After reshaping the cockpit floor and losing some of the front
sidewall, the cockpit was fitted to the fuselage. |
|
Next
came the engine inlets.
These need to be assembled and installed prior to joining the fuselage
halves.
The construction on the inlets was really pretty simple and they went
together very well.
At last, the moment of truth arrived and the fuselage was assembled with
cockpit and engine face/inlets installed.
After much effort, glue, putty, sanding, scribing, and swearing, the
fuselage was complete.
The rest of the construction was pretty uneventful.
A nice part about the Academy kit is that it has separate flaps,
ailerons, rudder, and speed brake.
This allows the modeler to easily add some character to the model without
having to cut.
I know that having the rudder and ailerons off center is not very
“realistic” but I think it adds interest.
Frustration
Part II:
With
basic construction finished, it was off to the paint barn.
My first thoughts were that this would be a very easy paint project since
most of the markings are on the decal sheet.
Like most other parts of this project, things were not quite as they
first appeared.
After careful examination of the decal sheet, I noticed an issue with the
large wing lower surface decals, there were no holes for the landing gear doors.
These decals would work very nicely if the kit were built to represent
“in-flight” with the gear in the up position.
The problem with that idea was that an in-flight model would require a
pilot and after all of the work in the cockpit, I was not going to hide it all
under a pilots back side.
This left two options: 1-apply the decals, try to cut out the wheel wells
and paint the gear doors, or 2-paint the yellow and black portions on bottom of
the wing and forget the decals.
Luckily, the demarcation lines for the yellow and black areas were placed
along panel or seam lines.
This made the masking much easier to replicate side-to-side.
Well
a couple of weeks and many painting sessions later, the Hunter was ready for
decaling.
The rest of the DACO decals went on very nice.
Even the white scallops on the nose were convinced to lay down with a
couple of careful applications of solva-set.
A final application of 5-parts Future to 1-part microscale-microflat gave
a nice semi-gloss finish.
Personally, I think that a high gloss finish on a model just doesn’t
look right.
I guess it is the scale effect.
As
I moved into final assembly, I discovered the most complex part of this kit, the
landing gear.
I must give credit here to the Academy mold maker for his efforts with
the landing gear.
Counting the doors, there were a total 29 parts.
For anyone considering this kit, I recommend doing a full assembly of the
main gear struts, actuators, pushrods, scissor links, and doors, prior to
installing the strut.
I of course, installed the struts first and had a terrible time fitting
some of the other very small parts.
| I
them installed the ejection seat and began work on the canopy.
OK, one more lesson.
I had planned to have canopy open but the design of the kit just
didn’t support this option very well.
I should have tested this earlier.
After scratching the paint trying to get the canopy to look right
in the open position, I gave up on that idea.
Oh well, a quick dip in the future and the canopy is reasonable
to look through. |
|
Click on pic
below to see larger pic |
 |
|
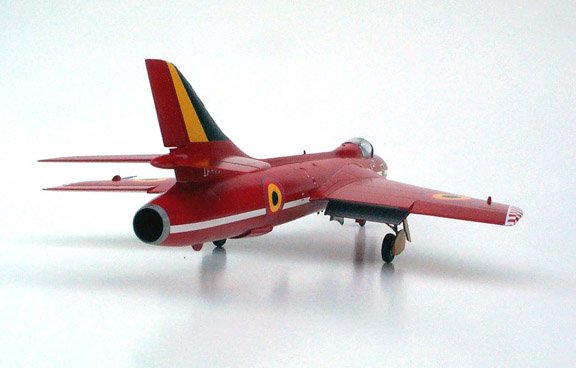
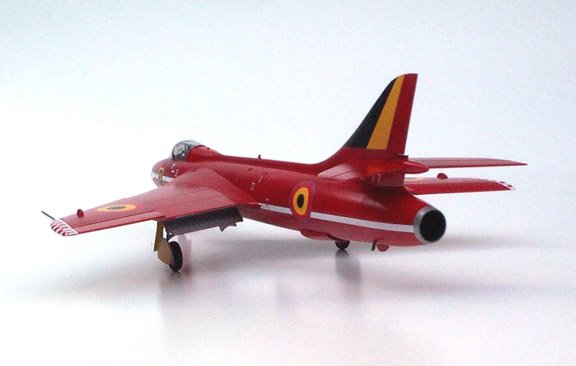
Conclusion:
Well
here I am.
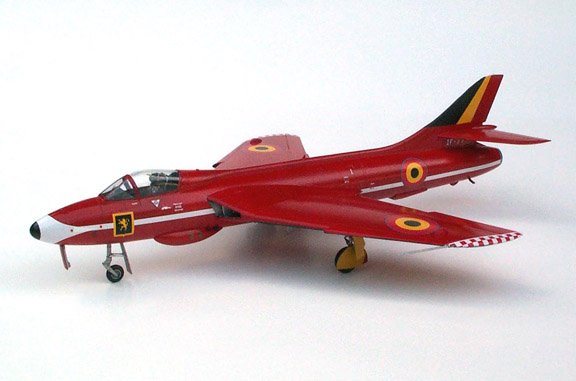
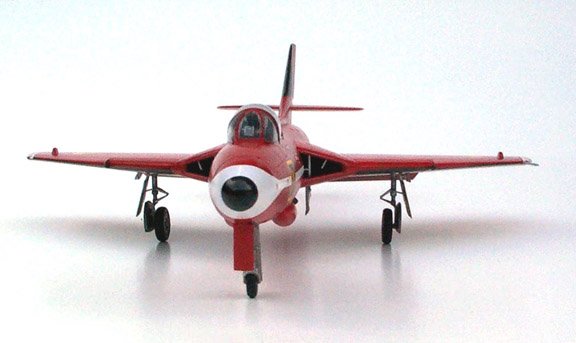
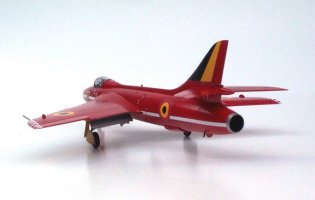
The Hunter is finished in a nice bright red, yellow, and black scheme.
The closest thing to gray would be the natural metal inside the wheel
wells and inside the flaps.
I proudly set the Hunter on the kitchen counter and called my wife to
come and see my latest project.
She looks it over, thinks for a minute, than says “it’s very nice,
how come it isn’t gray like all of the others”.
DOH!
Erwin
|
Click on images below
to see larger images |
 |
 |
|
|