1/144 Arii P3C Orion |
|
Gallery Article by Trey Andrews
on
Sept 14 2003
|
|
|
|
|
|
|
I'd been wanting to
do this model since I started dating the lady who eventually became my wife - a
lieutenant in the US Navy. When I met her, she was a navigation instructor
(navagatrix!) at NAS Pensacola, but her previous post had been as a Naval Flight
Officer with VP-5 in Jacksonville, FL, flying P3s. We've recently moved
north to Pennsylvania, where she is now stationed at Willow Grove and back
flying P3s. I found an incredible hobby shop in Doylestown called Herb's
Hobbies, and sure enough they had this P3 kit.
My wife was out of town all weekend, and I wanted to surprise her with this as a
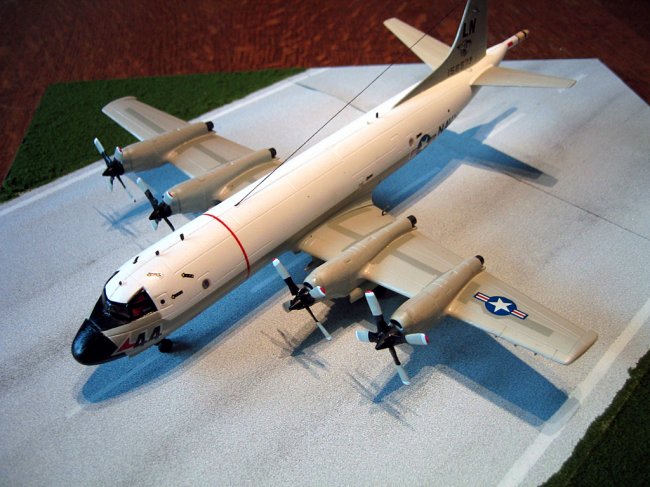
gift, so I worked on it for three straight days. I built it straight OOB,
using Testors Model Master flat enamels and a final single coat of Future,
brushed on, to get a semi-gloss that I thought was appropriate to the
scale. The canopy detailing was done by cutting strips from a blank page
of black water-transfer decal.... of course, I noticed on my next trip to the
store that they had thinner black pinstriping that would've worked better, but
it turned out alright. Each engine nacelle is filled with small lead
fishing weights, but the model still has a tendency to rock backwards and sit on
its tail. The aerial is a piece of fine blue sewing thread held on with
Elmer's, but I don't really recommend doing it this way. It was what I had.
When my wife came home and I showed her the model, she looked at the insignia on
the tail and said "Oh yeah, VP-45, that's out of Jacksonville..." she
looked closer and then told me that she had flown on this very plane. I
was thrilled!
The runway is grey sandpaper spray-mounted to the base of the display case, and
unfortunately it's already beginning to buckle. The white stripes are flat
white Model Master enamel. The grass is standard model-train grass shaken
over a coating of Elmer's. The dark smudges on the runway are #2 pencil
graphite, smudged with my finger.
This kit was very well made, and nothing more than a bit of sanding was required
for a nice smooth fit from every piece. The instructions were simple, but
clear, with only a few errors in translation... which side of the plane,
exactly, is the "wrong" side the instructions kept referring to? 
The model took about 19 hours to build.
Trey Andrews
|
|
|