|
History
Its amazing to think
that only 20 Concordes were built. The first 2 Concordes were prototype models,
one built in France and the other in England.
Another 2 pre-production prototypes were built to further refine design and test
out ground breaking systems before the production runs, of only 16 aircraft in
total, commenced in both countries.
The first production aircraft off each production line did not enter service but
acted as a test bed for production techniques, airline training and further
development work. They also paved the way for the granting of airworthiness
certification as well as providing extensive route proving information.
In the end only
British Airways and Air France purchased Concordes, with the airlines initially
purchasing 5 and 4 aircraft respectively. The 5 surplus models were placed with
the airlines in 1980 and eventually purchased for a nominal cost of £1 / 1
Franc each at the end of the Concorde programme a few years later, as part of a
multi million pound support costs deal. British Airways acquired the 2 unsold UK
built aircraft, while Air France bought the 3 unsold French built craft.
British Airways have
a fleet of 7 aircraft while Air France had 5 aircraft. The British Airways
Concordes have nearly 150,000 hours of flight time so far, which equates to
roughly 52,000 flights, while Air France have over 105,000 hrs of flight time.
The two prototypes, two pre production and one first production model are now on
show in museums on both sides of the channel. The first British production
Concorde is now owned by BA and used for spares.
Air France returned
4 aircraft to service after the Paris accident in July 2000, of the others; one
was retired for spares use in 1982, one never completed a D check (due to
retirement) and the final one was the aircraft lost in the accident. The 4
serviceable aircraft were retired to museums in France, Germany and the US.
British Airways
operated 5 aircraft, after the accident in France (F-BTSC) with a further 2 in
storage at London Heathrow, that were not modified post accident. All 7 have now
been retired, and are on display around the world.
The Kit
On opening the BIG
box you will find a total of three bags containing the sprues and a bag
containing the clear parts. Also included is a bag containing paints (Humbrol
Acrylics I think),a tube of Humbrol Cement,2 paintbrushes, the metal MLG inserts
and also included is a tube of the elusive Clearfix. The main sprues are
coloured white, black and silver. The decals provided with the Airfix kit cover
all production aircraft from 1976 - 2003 that flew with British Airways (The
Heller version has the equivalent Air France markings apparently). This sheet is
57cm wide by 23.5cm tall.
The plastic is hard ,but flexible, and in some areas, where thin, brittle. But
it sands well. Also of note is the amount of ejector pin marks found all over
the parts some are not too bad but the ones found on the underside of the flaps
were a pain to cleanup. During test fitting, some of the hidden areas, for
example inside surfaces of the wings definitely need to be seen to, as they will
hamper the fit if not.
|
Click on
images below to see larger images
|
|

|
 |

|
Construction
I thought for this first build (I intend to do 3 in the different BA livery,
1976-1984, 1985-1997 & 1998-2003), I would follow the instructions. So the
first stage was to build the huge stand made out of Black plastic. This set the
stage for what I could expect from the rest of the construction phase. The two
vertical halves were warped and needed a lot of clamping to get the two to come
together. The rest of the stand went together OK.
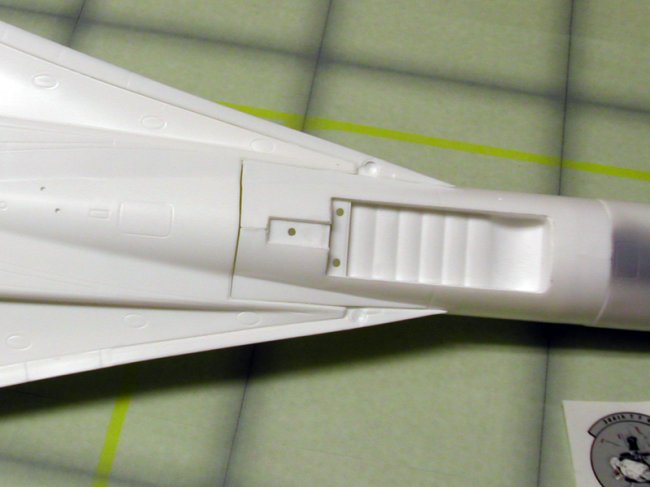
Next up are engines.
As the insides are required to be gloss white up to the fans I built up the
divider and air intake ramps in situ, and then put them to one side. I then
attached the rear engine enclosure and exhaust nozzles. I also recommend you
build up the sides of the intakes, as there is a tapered gap of about 1-2mm
where supposedly there should have been a raised portion on the wing for it to
locate on. You can see the impressions on the wing portion but is not raised. It
is also shown on the instructions.
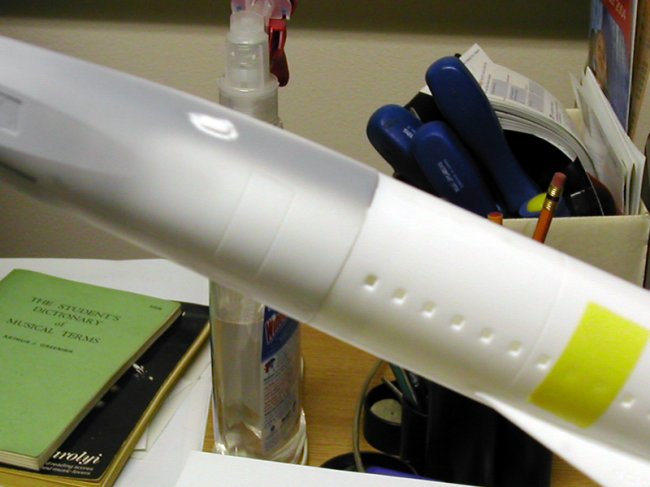
The next step
entailed attaching the nose/visor droop mechanism to visor. So I dipped both the
Visor and Cockpit windshield, Klear/Future and when dry, masked them up. This
was not easy as unlike other aircraft there is no clear definition to the
framing, so my usual method of using a lightbox was out. Once masked the Clear
parts of the mechanism were glued together and popped into place on the visor.
Next is the cockpit.
I quickly sprayed up all the components, and added the decals to the Main
instrument panels and the engineers console. These parts are very well detailed
with raised gauges, knobs and switches, but looking at the cockpit windshield, I
thought you wouldn't be able to see much, once complete. On test fitting the
finished cockpit in the I discovered the back of the Engineers console is
moulded hollow so I glued a piece of plastic card to this area to cover up the
hole. Also a point to note when you are building the cockpit, when finished you
can see through the visor, and see the front cockpit, so I would suggest
building up the front with plastic card to block that as well.
Now came the PITA
section. The fitting of the Visor and at the same time trying to close the two
halves of the cockpit and the nose. The instructions tell you to fit the cockpit
to the right hand side. Don't, fit it to the left hand side, as it is very
difficult to manoeuvre the windshield round the Engineers console. The
windshield has to be placed on the left hand side as this is where visor and
mechanism is attached. I found this out whilst test fitting, and in the process
managed to break the visor mechanism 3 times. Whose bright idea was it to make
this out of brittle clear plastic? After finally managing to glue all the parts
in situ I then tried to repair the mechanism a further 5 times, but to no avail.
So I glued the visor in the full up position and carried on.
The undercarriage
was the next stage, and went together very well. The main landing gear has metal
inserts as supports, a la some of the bigger jet fighters. Nice touch.
The tail fin section
was up next and also went together OK.
Next I glued the
bulkheads in the main fuselage. At this stage I decided to do a test fit of the
cockpit and tail section to the main fuselage, and discovered that there was a
difference in diameters between the three sections. I think in my next build I
shall join the left section halves together first, then the right and then join
them. Hopefully this should reduce the amount of sanding and filling that I
consequently went through.
The next stage was
the fitting of the nose tip to the main nose. Yet another difference in
diameters, which gave me no option but to use copious amounts of Milliput to
build up the join.
Part of building up
the main fuselage is fitting of the Nose Landing gear bay. My recommendation for
this area, is to not fit the bulkhead part #106, tape the fuselage halves
together, get the bay to fit, then fit this bulkhead.
The remaining major
construction consists of attaching the main fuselage to the lower section of the
wings, top parts of the wings to this, and finally the outer portions of the
lower section of the wings. If you go carefully and clamp as you're gluing in
small steps, it will fit together nicely. The only problem I encountered was the
join between the lower sections of the wings. This needed a fair amount
stretched sprue and putty to fill the resultant gap, where not covered by the
intakes.
I finished up by
attaching the front and rear sections to main fuselage, and then proceeded to
fill the joins with more stretched sprue and putty. I then sanded the whole
plane down and covered with Halfords White Plastic Primer from their
spraycan.
Painting
This area was the
simplest - Halfords Appliance White spraycan was used to cover everything
(including the paint shop). I only needed 2 coats applied over 4 nights to cover
the aircraft and other parts.
I then masked off the wheel bays and the front of the engines and sprayed the
bays with the Humbrol Enamels called out for in the instructions and the engines
Humbrol Semi-Gloss Black. I then applied Humbrol Matt Aluminium Metalcote to all
the undercarriage and wheel hubs. After this had cured I applied Humbrol #11
Silver where called out for in the instructions, masked off the main wheel hub
centres and sprayed Humbrol #89 Matt Middle Blue on the edges.
Finally I attached all
Undercarrige assemblies using CA.
|
Click on
images below to see larger images
|
|

|
 |
|
The Markings
As
G-BOAC is the oldest Concorde in the BA fleet, although not the oldest
officially owned by BA (that honour falls to G-BOAA), and the letters 'BOAC'
were also the initials of the British Overseas Airways Corporation, the
forerunner, along with British European Airlines, to British Airways, I chose to
use the markings for 'G-BOAC' in the 1976 Livery.
Please note, even though Airfix
provide markings for the blue stripe from the cockpit to the rear, but they
expect you to paint the stripe between the windows. Unless you are confident
that you're masking tape will not pull up the decals when applied I would
suggest painting this stripe, and the Tail fin actuator bulges and VOR Aerial,
prior to decalling. (I didn't take my own advice. see below)
In the case of the Airfix decals
themselves, they are to their usual standard. Pretty good, except for the
registration "creep" and variations of colour in the larger markings,
that I have found in most of the Airfix kits I have built recently. When are
they going to get this sorted?
Over the course of three nights I
applied all the markings stencils, let them cure, cleaned off the dried Micro
Set with distilled water and a kitchen towel. I found there was no need for
Micro Sol in this instance as the decals bedded down nicely. I then attached the
engines, which I had left off til now for ease of decal application, to the
wings using CA and about 7-8 clamps. A couple of coats of Klear/Future was then
sprayed over the plane.
I then masked off the plane, for
painting of the stripes over the windows and the tail fin touch ups required.
After the paint had cured I removed the masking and to my horror managed to pull
up the right hand side "British Airways". A quick printout on to white
decal film of replacement copies, resulted in failure, So I went to my Local
Hobby Shop and purchased another Concorde, and used the "British
Airways" decal from that one.
Finish
The last stage in finally finishing was to fill in the windows, which up until
now are just holes moulded in the fuselage. I tried the Clearfix technique shown
in the instructions, but it took me about 30 minutes just to complete two
windows. So I fell back to my method of using PVA Glue instead. 10 Minutes and
they were all done. I then repaired all the bits I had knocked off during the
build/decal process (i.e. antennas, gear doors,etc)
This build was not one of my most
enjoyable, but it has produced a nice representation of a truly amazing
Aircraft. Hopefully I have helped a few of you, by pointing out some of the
nasties to expect in this kit, and expect to see some of your builds soon.
Andy
|
Click on
images below to see larger images
|
|

|

|
 |
 |
|