|
A NEW LIGHTWEIGHT
FIGHTER
The genesis of the F-18 Hornet was in the early 1970's, when the US Air Force
announced a new lightweight fighter competition. The General Dynamics
YF-16 flew off against the Northrop YF-17, and of course the YF-16 won and
became a mainstay of the USAF fighter force to this day. However, the
YF-17 design was not dead. The Navy decided that the YF-17 would make an
ideal supplement to its new Tomcat force, due to the YF-17 having two engines
and being larger than the YF-16 (so that more equipment could be fitted).
The Navy had Northrop give the design to McDonnell Douglas due to that company
having naval fighter experience, and the F-18 soon came out in prototype form.
In the early eighties, the F-18 entered operational service and continues to
this day.
| Also in the same
timeframe, the Canadians and other air forces were looking to modernize
their fighter forces. The F-18 proved ideal for a number of air arms
worldwide, and Canada, Australia, Switzerland, and Spain were among the
first export customers. The Canadians liked the F-18's two engines
for added redundancy while flying long patrols over their Arctic coasts,
and the first CF-188's were delivered in 1982. They have completed
over 20 years in service with the Canadian armed forces. |
Click on
image below to see larger image
|

|
|
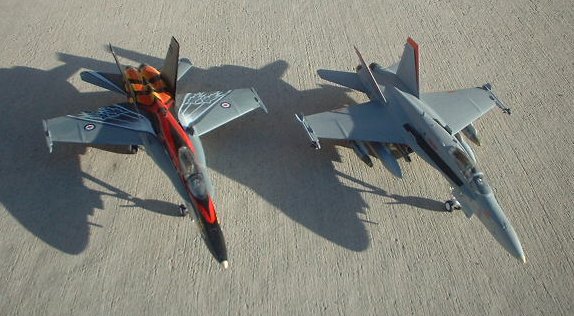
THE MODELS
The "Bug", as the F-18 is called, has fought in both Gulf Wars as well
as the Balkan war and Operation Enduring Freedom. In March, as my
"model of the month" I decided to build the Canadian 20th Anniversary
Hornet "color bird", and I also decided to build a US Navy Hornet in
the same scale while I was at it. The USN Hornet I decided to do was from
the Twobobs VFA-94 decal sheet - I liked the CAG plane the best so I did that.
I used the 1/72nd Hasegawa kit, and got to work on the cockpits right away.
The cockpit area of the kit is not the most accurate in the world. In
particular, the side consoles are much too high, and I sanded them down until
they were down to the level of the seat bottom. The seat was all right,
but I used Tamiya tape to simulate seatbelts. I also used the kit provided
decals on the consoles and instrument panel.
After I glued the cockpits in their respective models, I began to glue the
fuselages together. Now that was a challenge. The Hase 1/72nd kit
has some fit issues, particularly in the midsection. Thanks to Mike for
his tip on gluing the aft fuselage, I used that on the second model (glue the
aft sidewalls FIRST, then CA on the aft end with accelerator when assembling the
halves) and that helped me a lot. The fit around the intakes was also
poor.
Thank heaven for Tamiya putty! Next time I'll use Juan Martin's tip and
drop the flaps and slats -- That'll make it easier to work on the aft end as the
flaps won't be in the way (they won't be glued on till later). I also
forgot to include the intake blanking plastic (to prevent see through to the
burners) on one of the birds!! The other one didn't fit well and left a
gap on the bottom. Ah well.
After assembling the fuselages and wings (and putting on the tails and nose) I
glued the Future'd canopies using Testors clear cement. I then used
Ambroid liquid mask on them to cover them during the subsequent paintwork.
I sprayed the wells white, then masked them and used Tamiya primer on the kits.
After seeing the flaws and sanding away until they looked okay, I began the
paint job.
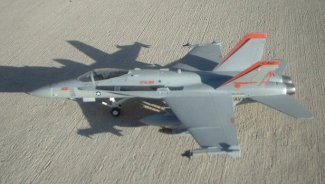
PAINTING
The USN CAG bird was fairly straightforward. Dark ghost gray and light
ghost gray (Testors MM Acryl) were airbrushed on and I encountered no problems.
I then used Tamiya clear, which went on okay. Then I put on the Twobobs
VFA-94 markings; I had problems getting a few decals on and lined up, like one
of the national insignias. (Suggestion to Twobobs: Print the stars and
bars with the red stripes already on in addition to the current split set).
I also had some problems with one of the red tail flashes.
But overall the decals went on okay. Keep in mind that my "fumblefingers"
and relative inexperience with gloss/flat coats and decals might have
contributed to the problems. After the decals were on, I sprayed another
gloss coat to seal the decals in, and then I had a few "spotting"
problems - it was cold when I sprayed and I might not have sprayed correctly.
But the effect wasn't noticeable except if you looked really closely at a few
areas, so I figured it was okay. I sprayed Testors Dullcote, then used
pastel
chalks to do some weathering along the panel lines and at the gun area.
The landing gear assembly, pylons, tailhook, and canopy framing was fairly
straightforward, and I armed the bird with 2 JDAM's from a Hase weapons set
along with 2 Sidewinders and fuel tanks plus a couple of sensor pods.
Thanks to Twobobs for the armament references! (for Enduring Freedom)
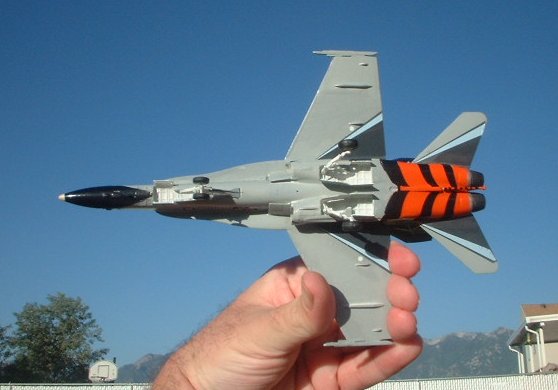
The Canadian 20th
Anniversary color bird was a bit more complicated, due to its complex scheme.
My first coat was light ghost gray. That went well enough. Then came
the medium gray. Again, so far so good. Then the gunship gray.
Here I got a few areas where the gray seeped under the lighter gray where I
didn't want it. Plus some cracking in certain areas.
But I didn't discover it until later. I sprayed Tamiya yellow on the aft
(next time I'll keep the tails off!) and then airbrushed International Orange on
the orange areas. I ended up having to do touchups using yellow paint in
certain areas of overspray, and I brushed Polly Scale Russian Underside Brown on
the edges for a lighter orange look. Then after a day or so I unmasked the
whole bird. That's when I found the issues with the
gunship gray. Brushing, touch up, sanding and respraying made the gunship
gray areas look acceptable. On to a gloss coat then decals. I had a
number of problems with many of the decals, particularly the red striping over
the compound curves on the top of the fuselage, in fact I even had to paint red
in some unexpected gaps. Some decals just wouldn't stick onto the bird,
while others (the black stripes) bubbled up and I had to prick them, then brush
black paint on. I tried Microsol/Microset but it didn't help much.
Later I figured out
that I got good results with the decals when the water was hot, but bad results
with my typical lukewarm water. Maybe the decals didn't like the Tamiya
clear, also? I have other Leading Edge sets and they look great, I've seen
other submissions on ARC with far better results.
I'll get a little heating cup for next time, maybe use a different gloss coat
too.
Finally I got an acceptable looking finish and the decals were on....I sealed
the whole deal with semigloss coat from Testors. Then I finished the
landing gear and tailhook....no weapons on this one! Weapons would have
looked so incongruous on this Bug.
To complement Steve
Bamford's excellent article about the CF-188 vs. F-18C, here's a breakdown of
the parts I used from the Hase kits:
1. Kits used: CF-188 - Hase F-18A
F-18C: Hase F-18A/C World Hornet
2. Tails used: CF-188 - F-18A tails
F-18C: F-18C tails
3. LERX fences: CF-188: Yes
F-18C: Yes
4. Nosegear doors: CF-188 - F-18A door F-18C: F-18C door
5. Spotlight on left fuselage: CF-188 - Yes F-18C: No (the kit
included a decal for the spotlight, and I used that on the CDN bird)
|
Click on
images below to see larger images
|
 |
 |
CONCLUSION
Two kits are better than one! This was an enjoyable build that helped me
learn a lot about the Bug and also its operational history. And with every
build I make I learn and improve my techniques. Hope you all enjoy this
Bug duo!
Happy modeling
Justin
|
|